1.Prepare
1.1.Setup Domain

Test MX record:
nslookup -type=mx <Your domain>
1.2.Official Installation Guide
Install iRedMail on Red Hat Enterprise Linux, CentOS
1.3.System Requirements
- iRedMail is designed to be deployed on a FRESH server system, which means your server does NOT have mail related components installed, e.g. MySQL, OpenLDAP, Postfix, Dovecot, Amavisd, etc. iRedMail will install and configure them for you automatically. Otherwise it may override your existing files/configurations although it will backup files before modifying, and it may not be working as expected.
- Port 25 is required by mail server but many ISPs block it by default.
Port 25 is used for communication between mail servers, it must be open, otherwise your mail server won’t be able to receive and send emails. Please contact your ISP to make sure it’s not blocked, or ask them to unblock it.
To install iRedMail on RHEL or CentOS Linux, you need:
– A FRESH, working RHEL or CentOS system. Supported releases are listed on Download page. https://www.iredmail.org/download.html
– At least 4 GB memory is required for a low traffic production mail server with spam/virus scanning enabled.
– Make sure 3 UID/GID are not used by other user/group: 2000, 2001, 2002.
1.4.PORTS
SMTP, submission, SMTPS
The default SMTP port number is : 25
submission: 587
SMTP over SSL/TLS port number: 465
IMAP, IMAPS
Default IMAP port number : 143
IMAP over SSL (IMAPS) port number : 993
POP3, POP3S
Default POP Port number : 110
POP3 port number with SSL/TLS : 995
2.Install Linux server
Don’t use CentOS 7 it’s old and iRedMail will drop support for CentOS 7 for NEW installation shortly.
Ubuntu Server Installation Guide
Install basic software only (minimum)
2.1.Disable SELinux
vi /etc/selinux/config

SELINUX=disabled
Disable it immediately without rebooting your server.
setenforce 0
2.2.Config FQDN Hostname
[web@mail ~]$ cat /etc/hosts
127.0.0.1   mail.<domain> mail localhost localhost.localdomain
missing these step, you will hit this error while install iRedMail.
<< ERROR >> Please configure a fully qualified domain name (FQDN) in /etc/hosts before we go further.
You can now verify your hostname.
hostname -f
mx.example.com
On RHEL/CentOS Linux, hostname is set in two files:
1./etc/hostname
mx.example.com
2./etc/hosts
hostname <=> IP address mapping. Warning: List the FQDN hostname as first item.
127.0.0.1 mx.example.com mx localhost localhost.localdomain
Verify the FQDN hostname. If it wasn’t changed, please reboot server to make it work.
hostname -f
mx.example.com
2.3.Install net-tools
yum install -y net-tools
yum install bind-utils
3.Install iRedMail
3.1.Download iRedMail
https://www.iredmail.com/download.html

FileName: iRedMail-1.4.2.tar.gz
Option: Download the latest version of iRedMail using wget:
wget https://bitbucket.org/zhb/iredmail/downloads/iRedMail-<VERSION>.tar.bz2
3.2.unzip package
tar xzvf iRedMail-1.4.2.tar.gz
3.3.Start iRedMail installer
switch to root
root@mail iRedMail-1.4.2]# bash iRedMail.sh

<< ERROR >> Please configure a fully qualified domain name (FQDN) in /etc/hosts before we go further.

Example:

127.0.0.1   mail.iredmail.org mail localhost

[root@mail iRedMail-1.4.2]# cat /etc/hosts
127.0.0.1   mail.teddit.ca mail localhost
[ INFO ] Fetching source tarballs ...
[ INFO ] + 1 of 5: https://dl.iredmail.org/yum/misc/iRedAdmin-1.5.tar.gz
[ INFO ] + 2 of 5: https://dl.iredmail.org/yum/misc/mlmmjadmin-3.1.2.tar.gz
[ INFO ] + 3 of 5: https://dl.iredmail.org/yum/misc/iRedAPD-5.0.3.tar.gz
[ INFO ] + 4 of 5: https://dl.iredmail.org/yum/misc/netdata-v1.31.0.gz.run
[ INFO ] + 5 of 5: https://dl.iredmail.org/yum/misc/roundcubemail-1.4.11-complete.tar.gz
[ INFO ] Validate downloaded source tarballs ...
sha256sum: misc/iRedAdmin-1.5.tar.gz: No such file or directory
misc/iRedAdmin-1.5.tar.gz: FAILED open or read
sha256sum: misc/mlmmjadmin-3.1.2.tar.gz: No such file or directory
misc/mlmmjadmin-3.1.2.tar.gz: FAILED open or read
sha256sum: misc/iRedAPD-5.0.3.tar.gz: No such file or directory
misc/iRedAPD-5.0.3.tar.gz: FAILED open or read
sha256sum: misc/netdata-v1.31.0.gz.run: No such file or directory
misc/netdata-v1.31.0.gz.run: FAILED open or read
sha256sum: misc/roundcubemail-1.4.11-complete.tar.gz: No such file or directory
misc/roundcubemail-1.4.11-complete.tar.gz: FAILED open or read
sha256sum: WARNING: 5 listed files could not be read
Notes: The iRedMail installer failed to download these packages, you can download them manually and copy to directory “iRedMail-1.4.2/pkgs/misc/” then re-launch the iRedMail installer.
A setup wizard that will ask you some questions:
- Where you would like to store your mailboxes. The default location is /var/vmail.
- The backend to use for storing your mail. If you choose MySQL or MariaDB you will also need to set the SQL root password.
- Your first mail domain. This will be your domain from earlier minus the sub-domain. For example if you set your domain as mail.example.com then you would enter example.com as your first mail domain name.
- Your domain administrator password.
- Which optional components you would like installed. Minimally you should select Roundcube and iRedAdmin.
When asked whether you would like to use firewall rules provided with iRedMail, select ‘No’. Firewall rules should be custom made for each server, and adopting a DROP ruleset from iRedMail’s package is not recommended.
3.4.Restart Service
sudo systemctl restart postfix
sudo systemctl restart apache2
sudo systemctl restart dovecot
3.5.web admin page
After rebooting, you can access the web admin page at:
Webmail http://your_domain/SOGo/ (or /mail, /webmail, /roundcube)
iRedAdmin (admin panel) https://your_domain/iredadmin/
phpMyAdmin https://your_domain/phpmyadmin/
phpLDAPadmin https://your_domain/phpldapadmin/
Awstats https://your_domain/awstats/awstats.pl?config=web (or ?config=smtp)
3.6.Setup DNS record for SPF
https://code.google.com/archive/p/iredmail/wikis/DNS_SPF.wiki
An SPF record or SPF TXT record is a record that is part of your domain’s DNS — similar to a DMARC record. It contains a list of all the IP addresses that are permitted to send email on behalf of your domain.
This is a simply example:
v=spf1 a mx ip4:x.x.x.x ~all
Another tip from maxie_ro:
http://www.iredmail.org/forum/post5456.html#p5456
3.7.Setup DNS record for DKIM
https://code.google.com/archive/p/iredmail/wikis/DNS_DKIM.wiki
After installation, please reboot your system, then use amavisd to help you setup DNS record.
1.Run command in terminal to show your DKIM keys:
amavisd showkeys
dkim._domainkey.iredmail.org. 3600 TXT ( "v=DKIM1; p=" "MIGfMA0GCSqGSIb3DQEBAQUAA4GNADCBiQKBgQDYArsr2BKbdhv9efugByf7LhaK" "txFUt0ec5+1dWmcDv0WH0qZLFK711sibNN5LutvnaiuH+w3Kr8Ylbw8gq2j0UBok" "FcMycUvOBd7nsYn/TUrOua3Nns+qKSJBy88IWSh2zHaGbjRYujyWSTjlPELJ0H+5" "EV711qseo/omquskkwIDAQAB")
Note: On some Linux/BSD distribution, you should use command ‘amavisd-new’ instead of ‘amavisd’.
if it complains “/etc/amavisd.conf not found”, you should tell amavisd the correct path of its config file. For example:
amavisd -c /etc/amavisd/amavisd.conf showkeys
Note: Bind can handle this kind of multi-line format, so you can paste it in your domain zone file directly.
2.Copy output of above command into one line, like below. It will be the value of DNS record.
v=DKIM1; p=MIGfMA0GCSqGSIb3DQEBAQUAA4GNADCBiQKBgQDYArsr2BKbdhv9efugByf7LhaKtxFUt0ec5+1dWmcDv0WH0qZLFK711sibNN5LutvnaiuH+w3Kr8Ylbw8gq2j0UBokFcMycUvOBd7nsYn/TUrOua3Nns+qKSJBy88IWSh2zHaGbjRYujyWSTjlPELJ0H+5EV711qseo/omquskkwIDAQAB
3.Add a ‘TXT’ type DNS record, set value to the line you copied above.
4.After you added this in DNS, type below command to verify it
amavisd testkeys
TESTING: dkim._domainkey.iredmail.org => pass
If it shows ‘pass’, it works.
Note: If you use DNS service provided by ISP, new DNS record might take some hours to be available.
5.References
http://www.dkim.org/
6.Test
https://mxtoolbox.com/
or
nslookup -type=txt dkim._domainkey.<your domain>
nslookup need to run on another machine.
3.8.SPF_HELO_NONE
adding the below setting in /etc/postfix/main.cf
smtp_helo_name = $mydomain
4.Setup LetsEncrypt
iRedMail installs the server with a self-signed certificate which requires special permissions to open the page in your browser. It is recommended that you upgrade to an official CA certificate. Let’s Encrypt is a CA that offers free certificates.
Once the certificate is obtained you will need to replace the self-signed certs.
sudo cp /path/to/your/cert /etc/ssl/certs/iRedMail.crt
sudo cp /path/to/your/key /etc/ssl/private/iRedMail.key
Let’s Encrypt is an automated, open certificate authority that offers free TLS/SSL certificates. The service is provided by the Internet Security Research Group (ISRG).
4.1.Install Certbot
Install snapd
yum install snapd
systemctl enable --now snapd.socket
ln -s /var/lib/snapd/snap /snap

snap install core;
Either log out and back in again or restart your system to ensure snap’s paths are updated correctly.
Ensure that your version of snapd is up to date:
sudo snap refresh core
Remove any Certbot OS packages
If you have any Certbot packages installed using an OS package manager like apt, dnf, or yum, you should remove them before installing the Certbot snap to ensure that when you run the command certbot the snap is used rather than the installation from your OS package manager. The exact command to do this depends on your OS, but common examples are sudo apt-get remove certbot, sudo dnf remove certbot, or sudo yum remove certbot.
sudo yum remove certbot
Install Certbot with Snap
sudo snap install --classic certbot
Link Certbot to /usr/bin
sudo ln -s /snap/bin/certbot /usr/bin/certbot
4.2.nginx conf
Before running Certbot, make sure server_name is set properly. Edit your Nginx configuration:
vi /etc/nginx/sites-enabled/00-default-ssl.conf
Update server_name to include your domain name.
server {
    server_name  example.com www.example.com;
Restart nginx
nginx -t
systemctl restart nginx
4.3.Install Certificate
make sure to use this domain name: mail.your_domain_name
certbot certonly --agree-tos --manual --preferred-challenges=dns -d mail.example.com -d example.com

Saving debug log to /var/log/letsencrypt/letsencrypt.log
Requesting a certificate for snow-mon.com

- - - - - - - - - - - - - - - - - - - - - - - - - - - - - - - - - - - - - - - -
Please deploy a DNS TXT record under the name:

_acme-challenge.example.com.

with the following value:

h1NCumOWTbcvUXw57XzUhlQV8pvaHOvnadW4167FQ2g

Before continuing, verify the TXT record has been deployed. Depending on the DNS
provider, this may take some time, from a few seconds to multiple minutes. You can
check if it has finished deploying with aid of online tools, such as the Google
Admin Toolbox: https://toolbox.googleapps.com/apps/dig/#TXT/_acme-challenge.example.com.
Look for one or more bolded line(s) below the line ';ANSWER'. It should show the
value(s) you've just added.

- - - - - - - - - - - - - - - - - - - - - - - - - - - - - - - - - - - - - - - -
Press Enter to Continue
It takes Google toolbox at least 1 hour before you can verify it.
Use this command on another machine to test the TXT record before hit Enter:
nslookup -type=txt _acme-challenge.mail.your_domain_name
Certificate is saved at:
/etc/letsencrypt/live/mail.example.com/fullchain.pem
Key is saved at:
/etc/letsencrypt/live/mail.example.com/privkey.pem
4.4.Replace SSL cert with Let’s Encrypt cert
creating symbol links to the self-signed SSL cert generated by iRedMail installer.
ln -s /etc/letsencrypt/live/mail.example.com/fullchain.pem /etc/pki/tls/certs/iRedMail.crt
ln -s /etc/letsencrypt/live/mail.example.com/privkey.pem /etc/pki/tls/private/iRedMail.key
4.5.Change permission
Directory /etc/letsencrypt/live/ and /etc/letsencrypt/archive are owned by root user and group, with permission 0700 (set by certbot program) by default, it means other users can not access them — including the daemon users used to run network services like Postfix/Dovecot/OpenLDAP/MariaDB/PostgreSQL.It’s necessary to set the permission to 0755 for other applications to access them.
chmod 0755 /etc/letsencrypt/live
chmod 0755 /etc/letsencrypt/archive
4.6.Restart network services
Required services:
- Postfix
- Dovecot
- Nginx
- MariaDB
or reboot the Linux server
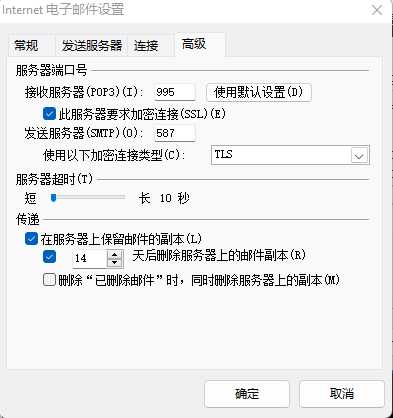
5.Configure Outlook to use iRedMail accounts
smtpd_tls_wrappermode=yes
smtpd_sasl_auth_enable=yes

systemctl reload postfix.service
imap 465 SSL
smtp 25 SSL
https://docs.iredmail.org/#mua
Quick MUA Settings
– Login username of SMTP/POP3/IMAP services must be full email address.
– POP3 service: port 110 over STARTTLS, or port 995 with SSL.
– IMAP service: port 143 over STARTTLS, or port 993 with SSL.
– SMTP service: port 587 over STARTTLS, or port 465 with SSL.
– CalDAV and CardDAV server addresses:
https://<server>/SOGo/dav/<full email address>
6.iRedMail组件
6.1.List
- Apache 2.2.x
- PHP 5.3.x
- MySQL 5.1.x
- OpenLDAP 2.4.x
- Postfix 2.7.x ( MTA )
- Dovecot 1.2.x
- Amavisd 2.6.x
- ClamAV 0.9x
- SpamAssassin 3.2.x
- Policyd 1.8.x
- Pysieved 1.0
- Roundcube 0.7.2 (Webmail )
- phpMyAdmin 3.3
- phpLDAPadmin 1.2
- Awstats 6.9
6.2.工作原理
amavisd的作用主要是:
- 负责调用 ClamAV 对邮件进行病毒扫描
- 负责调用 SpamAssassin 对邮件内容进行过滤
- 实现 DKIM 签名和验证功能,还有实现免责声明的功能。


1.当邮件发送到服务器的25端口,Postfix接受连接,它会做一些基本检查:
发送者是否在黑名单或者实时黑名单,如果在黑名单,马上拒绝
是否是授权用户,可以进行转发
接收者是否是服务器的用户,如果不是,马上拒绝
如果我们启用的灰名单,那么会拒绝邮件或者接收
2.Postfix 把邮件通过10024端口交给amavis来处理,注意amavis,只会检查邮件而不会丢弃或者拒绝邮件。
3.amavis调用SpamAssassin检查邮件是否是spam,如果SpamAssassin认为邮件是垃圾邮件,会给邮件打上标记spam。
4.amavis调用ClamAV,看邮件是否含有病毒。
5.amavis把检查完的邮件,通过10025端口重新把邮件交回给postfix。
6.postfix把邮件交给LDA(local delivery agent),LDA是负责本地邮件投放到用户的邮箱,(这里使用dovecot提供的LDA功能,而不是postfix提供的LDA)邮件会进入用户的邮箱,Dovecot会执行用户设置的filter,也就是Dovecot通过调用Sieve,放到相关的文件夹。
7.Dovecot 把邮件以maildir的方式存放在硬盘上。
8.用户使用邮件客户端,通过pop3或imap协议进行连接。webmail RoundCube,是通过imap的方式来读取邮件。
7.Not receiving mail
logfile:
/var/log/dovecot
Where are the postfix log files?
/var/log/maillog
checking postfix config
postconf -n
checking postfix status
service postfix status

Oct 09 08:55:09 mail postfix/submission/smtpd[278219]: disconnect from unknown[107.6.112.252] unknown=0/2 commands=0/2
Oct 09 09:17:20 mail postfix/submission/smtpd[286080]: warning: hostname apzg-0721p-076.stretchoid.com does not resolve to>
Oct 09 09:17:20 mail postfix/submission/smtpd[286080]: connect from unknown[192.241.227.49]
Oct 09 09:17:20 mail postfix/submission/smtpd[286080]: lost connection after UNKNOWN from unknown[192.241.227.49]
Oct 09 09:17:20 mail postfix/submission/smtpd[286080]: disconnect from unknown[192.241.227.49] unknown=0/1 commands=0/1
Oct 09 09:24:38 mail postfix/submission/smtpd[288620]: connect from scanner-25.ch1.censys-scanner.com[162.142.125.224]
Oct 09 09:24:38 mail postfix/submission/smtpd[288620]: discarding EHLO keywords: CHUNKING
Oct 09 09:24:39 mail postfix/submission/smtpd[288620]: Anonymous TLS connection established from scanner-25.ch1.censys-sca>
Oct 09 09:24:39 mail postfix/submission/smtpd[288620]: lost connection after STARTTLS from scanner-25.ch1.censys-scanner.c>
Oct 09 09:24:39 mail postfix/submission/smtpd[288620]: disconnect from scanner-25.ch1.censys-scanner.com[162.142.125.224] >
postconf | grep chunking
smtpd_discard_ehlo_keywords = chunking
chunking is disabled out of the box on RH.
Append following line to /etc/postfix/main.cf:
smtpd_discard_ehlo_keywords = ''
Reload Postfix config:
systemctl reload postfix.service
Validate chunking no longer disabled:
postconf | grep chunking
test port 25:
telnet <your domain> 25
220 mail.tedditinc.com ESMTP Postfix
quit
221 2.0.0 Bye
Sent email from gmail again:
Oct 09 11:49:15 mail postfix/smtps/smtpd[340254]: warning: hostname apzg-0721n-068.stretchoid.com does not resolve to address >
Oct 09 11:49:15 mail postfix/smtps/smtpd[340254]: connect from unknown[192.241.213.42]
Oct 09 11:49:15 mail postfix/smtps/smtpd[340254]: SSL_accept error from unknown[192.241.213.42]: -1
Oct 09 11:49:15 mail postfix/smtps/smtpd[340254]: warning: TLS library problem: error:1408F10B:SSL routines:ssl3_get_record:wr>
Oct 09 11:49:15 mail postfix/smtps/smtpd[340254]: lost connection after CONNECT from unknown[192.241.213.42]
Oct 09 11:49:15 mail postfix/smtps/smtpd[340254]: disconnect from unknown[192.241.213.42] commands=0/0
Certification incorrect!
Make sure you are using the correct certificate.
If you are using “letsencrypt” free certificate, please copy:
fullchain.pem to /etc/pki/tls/certs/iRedMail.crt
privkey.pem to /etc/pki/tls/private/iRedMail.key
vi /etc/postfix/main.cf
mydestination = localhost.mydomain, localhost,mydomain
Test on https://www.mail-tester.com/
service postfix status


Oct 10 17:39:39 mail.tedditinc.com postfix/smtp[3932]: connect to gmail-smtp-in.l.google.com[2607:f8b0:4004:c1d::1b]:25: Network is unreachable
Oct 10 17:39:39 mail.tedditinc.com postfix/smtp[3932]: Trusted TLS connection established to gmail-smtp-in.l.google.com[142.251.167.26]:25: TLSv1.3 with cipher TLS_AES_256_GCM_>
Oct 10 17:39:40 mail.tedditinc.com postfix/smtp[3932]: 4S4q6y54Z1zYr5tV: to=<ted.liu.2030@gmail.com>, relay=gmail-smtp-in.l.google.com[142.251.167.26]:25, delay=1.5, delays=0.0>
Oct 10 17:39:40 mail.tedditinc.com postfix/qmgr[1408]: 4S4q6y54Z1zYr5tV: removed
Oct 10 17:39:40 mail.tedditinc.com postfix/submission/smtpd[3913]: disconnect from d24-36-227-149.home1.cgocable.net[24.36.227.149] ehlo=2 starttls=1 auth=1 mail=1 rcpt=1 data=>
doveadm log find

Looking for log files from /var/log
Debug: /var/log/dovecot/dovecot.log
Info: /var/log/dovecot/dovecot.log
Warning: /var/log/dovecot/dovecot.log
Error: /var/log/dovecot/dovecot.log
Fatal: /var/log/dovecot/dovecot.log


[root@mail conf.d]# vi /var/log/dovecot/dovecot.log
Oct 10 16:54:22 mail dovecot[1323]: master: Dovecot v2.3.16 (7e2e900c1a) starting up for pop3, imap, sieve, lmtp (core dumps disabled)
Oct 10 16:54:29 mail dovecot[1356]: stats: Error: conn stats-reader (127.0.0.1:55740): didn't reply with a valid VERSION line: EXPORT#011global
Safe to ignore this “error”, it was triggered by netdata when trying to discover locally running service.
You can easily print the last 1000 error messages of a running Dovecot:
doveadm log errors
https://doc.dovecot.org/admin_manual/logging/
reference:
http://www.postfix.org/TLS_README.html#server_logging
Configure postfix mail server and client with examples (CentOS/RHEL 7/8)
Configure postfix mail server and client with examples (CentOS/RHEL 7/8)
https://docs.iredmail.org/network.ports.html
8.Set Up Mail Proxy Server
Option 1: Highly Available HAProxy Servers
Set Up SMTP & IMAP Proxy with HAProxy (Debian, Ubuntu, CentOS)
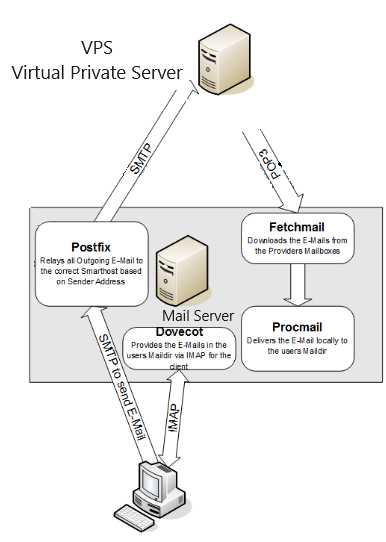
Option 2: Port forwarding
Config the following ports be forwarded from the VPN server to the mail server.
- TCP 25
- TCP 587
- TCP 465
- TCP 143
- TCP 993
- TCP 80
- TCP 443
- TCP 110
- TCP 995
8.1: Creagte a AWS EC2 Linux Server for Mail Proxy
Install and enable firewalld
sudo yum install firewalld
sudo systemctl start firewalld
sudo systemctl enable firewalld
sudo systemctl status firewalld
You can use the following commands to open ports, e.g. port 80, and reload configuration to apply changes.
sudo firewall-cmd --zone=public --add-port=22/tcp --permanent
sudo firewall-cmd --zone=public --add-port=80/tcp --permanent
sudo firewall-cmd --reload
The commands to block ports
sudo firewall-cmd --zone=public --remove-port=80/tcp --permanent
8.2: Set Up VPN Server on EC2
Features of WireGuard VPN
– WireGuard is made specifically for the Linux kernel. It runs inside the Linux kernel and allows you to create fast, modern, and secure VPN tunnel.
– Lightweight and super fast speed, blowing OpenVPN out of the water.
– Cross-platform. WireGuard can run on Linux, BSD, macOS, Windows, Android, iOS, and OpenWRT.
– User authentication is done by exchanging public keys, similar to SSH keys.
– It assigns static tunnel IP addresses to VPN clients. Some folks may not like it, but it can be useful in some cases.
– Mobile devices can switch between Wi-Fi and mobile network seamlessly without dropping any connectivity.
– It aims to replace OpenVPN and IPSec in most use cases.
8.2.1.Install WireGuard
CentOS8/Alma Linux8 — Client
sudo dnf install elrepo-release epel-release -y
sudo dnf install kmod-wireguard wireguard-tools -y
Amazon linux 2 — Server
sudo amazon-linux-extras install epel -y
sudo curl -Lo /etc/yum.repos.d/wireguard.repo https://copr.fedorainfracloud.org/coprs/jdoss/wireguard/repo/epel-7/jdoss-wireguard-epel-7.repo
sudo yum install wireguard-dkms wireguard-tools
8.2.2.Generate Public/Private Keypair
Server
Create a directory for WireGuard.
sudo mkdir -p /etc/wireguard/
create a public/private key pair, save to /etc/wireguard/ directory.
wg genkey | sudo tee /etc/wireguard/server_private.key | wg pubkey | sudo tee /etc/wireguard/server_public.key
Client
Create a directory for WireGuard.
sudo mkdir -p /etc/wireguard/
create a public/private key pair, save to /etc/wireguard/ directory.
wg genkey | sudo tee /etc/wireguard/server_private.key | wg pubkey | sudo tee /etc/wireguard/server_public.key
8.2.3.Create WireGuard Configuration File
Server
Use a command-line text editor like vi to create a WireGuard configuration file on the server. wg0 will be the network interface name.
/etc/wireguard/wg0.conf

[Interface]
Address = 172.1.1.1/24
ListenPort = 51820
PrivateKey =xxxxxxxx

[Peer]
PublicKey = xxxxxxxx
AllowedIPs = 172.1.1.9/32
- Address: Specify the private IP address of the VPN server. Here I’m using the 172.1.1.1/24 network range, so it won’t conflict with your home network range. (Most home routers use 192.168.0.0/24 or 192.168.1.0/24). 172.1.1.9 is the private IP address for the VPN server.
- PrivateKey: The private key of VPN server, which can be found in the /etc/wireguard/server_private.key file on the server.
- ListenPort: WireGuard VPN server will be listening on UDP port 51820, which is the default.
- PublicKey: The public key of VPN client, which can be found in the /etc/wireguard/client_public.key file on the client computer.
- AllowedIPs: IP addresses the VPN client is allowed to use. In this example, the client can only use the 172.1.1.9 address inside the VPN tunnel.
Change the file permission mode so that only root user can read the files
sudo chmod 600 /etc/wireguard/ -R
Client
Use a command-line text editor like vi to create a WireGuard configuration file on your local computer. wg-client0 will be the network interface name.
/etc/wireguard/wg-client0.conf

[Interface]
Address = 172.1.1.9/32
DNS = 172.1.1.1
PrivateKey = xxxxxxxx

[Peer]
PublicKey = xxxxxxxx
AllowedIPs = 0.0.0.0/0
Endpoint = 12.34.56.78:51820
PersistentKeepalive = 25
- Address: Specify the private IP address of the VPN client.
- DNS: specify 172.1.1.1 (the VPN server) as the DNS server. It will be configured via the resolvconf command. You can also specify multiple DNS servers for redundancy like this: DNS = 172.1.1.1 8.8.8.8
- PrivateKey: The client’s private key, which can be found in the /etc/wireguard/client_private.key file on the client computer.
- PublicKey: The server’s public key, which can be found in the /etc/wireguard/server_public.key file on the server.
- AllowedIPs: 0.0.0.0/0 represents the whole Internet, which means all traffic to the Internet should be routed via the VPN.
- Endpoint: The public IP address and port number of VPN server. Replace 12.34.56.78 with your server’s real public IP address.
- PersistentKeepalive: Send an authenticated empty packet to the peer every 25 seconds to keep the connection alive. If PersistentKeepalive isn’t enabled, the VPN server might not be able to ping the VPN client.
Change the file permission mode so that only root user can read the files
sudo chmod 600 /etc/wireguard/ -R
8.2.4.Enable IP Forwarding on the Server
For the VPN server to route packets between VPN clients and the Internet, we need to enable IP forwarding. Edit sysctl.conf file.
vi /etc/sysctl.conf
Add the following line at the end of this file.
net.ipv4.ip_forward = 1
Save and close the file. Then apply the changes with the below command. The -p option will load sysctl settings from /etc/sysctl.conf file. This command will preserve our changes across system reboots.
sudo sysctl -p
8.2.5.Configure IP Masquerading on the Server
Run the following command to enable IP masquerading for the 172.1.1.1/24 subnet in the server firewall.
sudo firewall-cmd --permanent --add-rich-rule='rule family="ipv4" source address="172.1.1.1/24" masquerade'

sudo systemctl reload firewalld
This will hide your VPN network from the outside world. So the Internet can only see your VPN server’s IP, but can’t see your VPN client’s IP, just like your home router hides your private home network.
8.2.6.Install a DNS Resolver on the Server
Since we specify the VPN server as the DNS server for client, we need to run a DNS resolver on the VPN server. We can install the bind DNS server.
sudo yum install bind
Start BIND and enable auto start:
sudo systemctl start named
sudo systemctl enable named
check status
systemctl status named
Edit the BIND main configuration file /etc/named.conf
In the options clause, you can find the following two lines.
listen-on port 53 { 127.0.0.1; };
listen-on-v6 port 53 { ::1; };
This makes named listen on localhost only. If you want to allow clients in the same network to query domain names, then comment out these two lines. (add double slashes at the beginning of each line)
Find the following line:
allow-query { localhost; };
Add the 172.1.1.1/24 network range so that VPN clients can send DNS queries. Note that you need to end each network range with a semicolon.
allow-query { localhost; 172.1.1.1/24; };
Save and close the file. Restart BIND9 for the changes to take effect.
sudo systemctl restart named
Then you need to run the following command to allow VPN clients to connect to port 53.
sudo firewall-cmd --zone=public --permanent --add-rich-rule='rule family="ipv4" source address="172.1.1.1/24" accept'
8.2.7.Open WireGuard Port in Firewall
Run the following commands to open UDP port 51820 on the server.
sudo firewall-cmd --permanent --add-port=51820/udp

sudo systemctl reload firewalld
8.2.7.Start WireGuard
server
Run the following command on the server to start WireGuard.
sudo systemctl start wg-quick@wg0.service
If the start failed, you should check the log to find out what’s wrong
sudo journalctl -eu wg-quick@wg0.service
Enable auto-start at system boot time with the following command.
sudo systemctl enable wg-quick@wg0.service
Check its status with the following command. Its status should be active (exited).
systemctl status wg-quick@wg0.service
Now WireGuard server is ready to accept client connections.
Client
Start WireGuard.
sudo systemctl start wg-quick@wg-client0.service
If the start failed, you should check the log to find out what’s wrong.
sudo journalctl -eu wg-quick@wg-client0.service
If you see the following error in the log, you can try rebooting the OS.
RTNETLINK answers: Operation not supported
Enable auto-start at system boot time.
sudo systemctl enable wg-quick@wg-client0.service
Check its status:
systemctl status wg-quick@wg-client0.service
Now go to this website: http://icanhazip.com/ to check your public IP address. If everything went well, it should display your VPN server’s public IP address instead of your client computer’s public IP address.
You can also run the following command to get the current public IP address.
curl https://icanhazip.com
8.2.8.Adding Additional VPN Clients
WireGuard is designed to associate one IP address with one VPN client. To add more VPN clients, you need to create a unique private/public key pair for each client, then add each VPN client’s public key in the server’s config file (/etc/wireguard/wg0.conf) like this:
[Interface]
Address = 172.1.1.1/24
PrivateKey = xxxxxxxx
ListenPort = 51820

[Peer]
PublicKey = xxxxxxxx
AllowedIPs = 172.1.1.3/32

[Peer]
PublicKey = xxxxxxxx
AllowedIPs = 172.1.1.4/32

[Peer]
PublicKey = xxxxxxxx
AllowedIPs = 172.1.1.5/32
Each VPN client will have a static private IP address. Restart the WireGuard server for the changes to take effect.
sudo systemctl restart wg-quick@wg0.service
Then add WireGuard configuration on each VPN client
8.2.9.Configure VPN Client on iOS/Andorid
Install the WireGuard app from the App store. Then open this app and click the Add a tunnel button.
You have 3 methods to create a new WireGuard tunnel.
- create from file or archive
- create from QR code
- Create from scratch
Choose the QR code method, since it’s easier. Run the following command on the server to generate a WireGuard public/private key for the client.
wg genkey | sudo tee /etc/wireguard/ios_private.key | wg pubkey | sudo tee /etc/wireguard/ios_public.key
Next, create a WireGuard config file for the client.
sudo vi /etc/wireguard/client.conf

[Interface]
Address = 172.1.1.3/24
DNS = 172.1.1.1
PrivateKey =xxxxxxxx

[Peer]
PublicKey =xxxxxxxx
AllowedIPs = 0.0.0.0/0
Endpoint = 12.34.56.78:51820
PersistentKeepalive = 25
Save and close the file. Then run the following command on the WireGuard VPN server to generate a QR code from the iOS config file.
sudo cat /etc/wireguard/client.conf | qrencode -t ansiutf8
Next, scan a QR code from the client WireGuard app, so the content in the /etc/wireguard/client.conf file will be imported to the WireGuard client.
Once the tunnel is added on the client, we also need to add a [peer] in the WireGaurd server config file.
sudo vi /etc/wireguard/wg0.conf
[Interface]
Address = 172.1.1.1/24
PrivateKey =xxxxxxxx
ListenPort = 51820

[Peer]
PublicKey =xxxxxxxx
AllowedIPs = 172.1.1.2/32

[Peer]
# Andriod client
PublicKey =xxxxxxxx
AllowedIPs = 172.1.1.3/32
Save and close the file. Then restart the WireGuard VPN server.
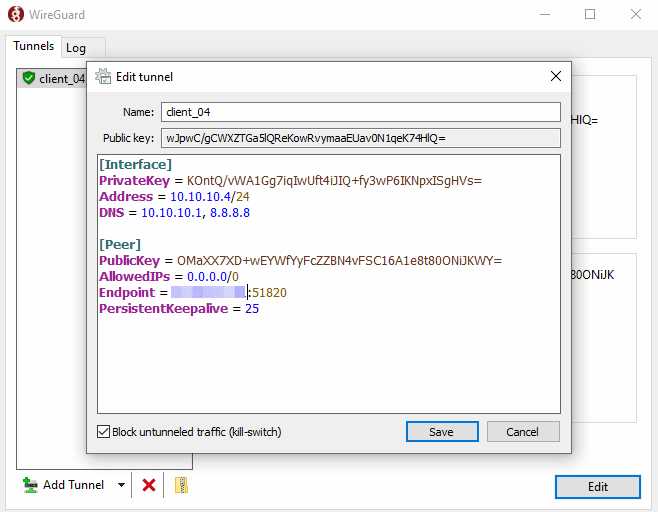
8.2.10.Configure Windows Client
Download the WireGuard installer for Windows.
https://www.wireguard.com/install/
Once it’s installed, start the WireGuard program. You need to right-click on the left sidebar to create a new empty tunnel. It will automatically create a public/private key for the Windows client.
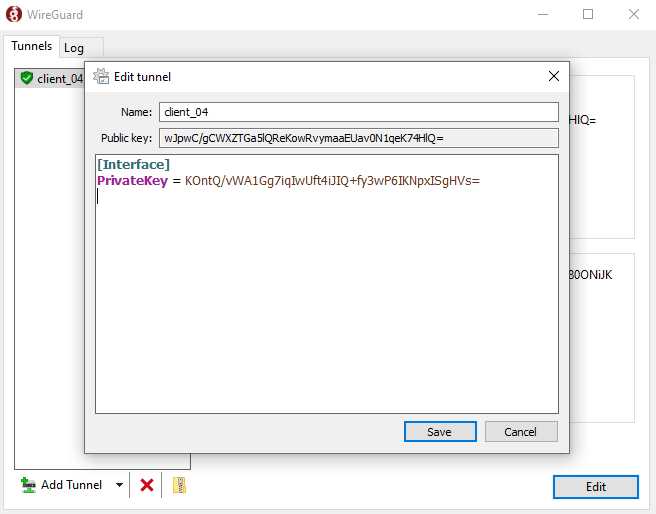
Now you need to add other information.
[Interface]
PrivateKey = xxxxxxxx
Address = 172.1.1.4/24
DNS = 172.1.1.1

[Peer]
# VPN server
PublicKey = xxxxxxxx
AllowedIPs = 0.0.0.0/0
Endpoint = 12.34.56.78:51820
PersistentKeepalive = 25
On Windows, you can use the PowerShell program to SSH into your Linux server.
Save the configuration.
Once the tunnel is added on the Windows client, we also need to add a [peer] in the WireGaurd server config file.
sudo vi /etc/wireguard/wg0.conf

[Interface]
Address = 172.1.1.1/24
PrivateKey = xxxxxxxx
ListenPort = 51820

[Peer]
PublicKey = xxxxxxxx
AllowedIPs = 172.1.1.2/32

[Peer]
# iOS client
PublicKey = xxxxxxxx
AllowedIPs = 172.1.1.3/32

[Peer]
# Windows client
PublicKey = xxxxxxxx
AllowedIPs = 172.1.1.4/32
Save and close the file. Then restart the WireGuard VPN server.
8.2.11.Policy Routing, Split Tunneling & VPN Kill Switch
Note that it’s not recommended to use them in conjunction with each other. If you use policy routing, then you should not enable split tunneling or VPN kill switch, and vice versa.
Policy Routing
By default, all traffic on the VPN client will be routed through the VPN server. Sometimes you may want to route only a specific type of traffic, based on the transport layer protocol and the destination port. This is known as policy routing.
Policy routing is configured on the client computer, and we need to stop the VPN connection first.
sudo systemctl stop wg-quick@wg-client0.service
Then edit the client configuration file.
sudo vi /etc/wireguard/wg-client0.conf
For example, if you add the following 3 lines in the [interface] section, then WireGuard will create a routing table named “1234” and add the ip rule into the routing table. In this example, traffic will be routed through VPN server only when TCP is used as the transport layer protocol and the destination port is 25, i.e, when the client computer sends emails.
Table = 1234
PostUp = ip rule add ipproto tcp dport 25 table 1234
PreDown = ip rule delete ipproto tcp dport 25 table 1234
Save and close the file. Then start WireGuard client again.
sudo systemctl start wg-quick@wg-client0.service
Split Tunneling
By default, all traffic on the VPN client will be routed through the VPN server. Here’s how to enable split tunneling, so only traffic to the 172.1.1.0/24 IP range will be tunneled through WireGuard VPN. This is useful when you want to build a private network for several cloud servers, VPN clients will run on cloud servers and if you use a full VPN tunnel, then you will probably lose connection to the cloud servers.
Edit the client configuration file.
sudo vi /etc/wireguard/wg-client0.conf
Change
AllowedIPs = 0.0.0.0/0
To
AllowedIPs = 172.1.1.0/24
So traffic will be routed through VPN only when the destination address is in the 10.10.10.0/24 IP range. Save and close the file. Then restart WireGuard client.
sudo systemctl restart wg-quick@wg-client0.service
VPN Kill Switch
By default, your computer can access the Internet via the normal gateway when the VPN connection is disrupted. You may want to enable the kill switch feature, which prevents the flow of unencrypted packets through non-WireGuard interfaces.
Stop the WireGuard client process.
sudo systemctl stop wg-quick@wg-client0.service
Edit the client configuration file.
sudo vi /etc/wireguard/wg-client0.conf
Add the following two lines in the [interface] section.
PostUp = iptables -I OUTPUT ! -o %i -m mark ! --mark (wg show %i fwmark) -m addrtype ! --dst-type LOCAL -j REJECT
PreDown = iptables -D OUTPUT ! -o %i -m mark ! --mark(wg show %i fwmark) -m addrtype ! --dst-type LOCAL -j REJECT
Like this:
[Interface]
Address = 172.1.1.2/24
DNS = 172.1.1.1
PrivateKey = xxxxxxxx
PostUp = iptables -I OUTPUT ! -o %i -m mark ! --mark (wg show %i fwmark) -m addrtype ! --dst-type LOCAL -j REJECT
PreDown = iptables -D OUTPUT ! -o %i -m mark ! --mark(wg show %i fwmark) -m addrtype ! --dst-type LOCAL -j REJECT

[Peer]
PublicKey = xxxxxxxx
AllowedIPs = 0.0.0.0/0
Endpoint = 12.34.56.78:51820
PersistentKeepalive = 25
Save and close the file. Then start the WireGuard client.
sudo systemctl start wg-quick@wg-client0.service
8.3.Open Ports in Firewall and Set Up Permissions
Add these ports to both mail server and VPS:
sudo firewall-cmd --zone=public --add-port=80/tcp --permanent
sudo firewall-cmd --zone=public --add-port=443/tcp --permanent
sudo firewall-cmd --zone=public --add-port=25/tcp --permanent
sudo firewall-cmd --zone=public --add-port=587/tcp --permanent
sudo firewall-cmd --zone=public --add-port=465/tcp --permanent
sudo firewall-cmd --zone=public --add-port=110/tcp --permanent
sudo firewall-cmd --zone=public --add-port=995/tcp --permanent
sudo firewall-cmd --zone=public --add-port=143/tcp --permanent
sudo firewall-cmd --zone=public --add-port=993/tcp --permanent
On both mail server and VPS:
sudo firewall-cmd --permanent --add-service={ssh,smtp,smtp-submission,smtps,imap,imaps,pop3,pop3s,http,https}

sudo systemctl reload firewalld
On mail server:
sudo firewall-cmd --permanent --add-rich-rule='rule family="ipv4" source address="172.1.1.0/24" accept'

sudo systemctl reload firewalld
172.1.1.0/24 is the private IP range created by the VPN server, so the VPS can access all ports on the mail server.
Hint: The latest version of iRedMail starts using the nftable firewall. Check if your mail server has the /etc/nftables.conf file. If you can find this file, then open it and locate the following lines.
# smtp, submission, smtps
tcp dport 25 accept
tcp dport 587 accept
tcp dport 465 accept

# pop3, pop3s
tcp dport 110 accept
tcp dport 995 accept

# imap, imaps
tcp dport 143 accept
tcp dport 993 accept
Add TCP ports 2525, 1043, 10465, 10587, and 10993.
# smtp, submission, smtps
tcp dport 25 accept
tcp dport 587 accept
tcp dport 465 accept
tcp dport 2525 accept
tcp dport 10587 accept
tcp dport 10465 accept

# pop3, pop3s
tcp dport 110 accept
tcp dport 995 accept

# imap, imaps
tcp dport 143 accept
tcp dport 993 accept
tcp dport 10143 accept
tcp dport 10993 accept
Save and close the file. Then reload the firewall rules.
sudo nft -f /etc/nftables.conf
or disable it:
sudo systemctl disable --now iptables iptables-persistent
Check the ports being listening:
sudo netstat -tunlp
8.4.Set Up Port Forwarding on VPS
Now we need to set up port forwarding on the VPS, so incoming requests will be redirected from the VPS to the mail server. The following ports should be forwarded to the mail server.
- TCP 25
- TCP 587
- TCP 465
- TCP 143
- TCP 993
- TCP 110
- TCP 995
- TCP 80
- TCP 443
Note that the mail server must use the VPN server as the gateway. If it’s using another IP address as the gateway, port forwarding won’t work. So you should not configure split tunneling or policy routing in WireGuard VPN.
Run the following commands on the VPS. Replace 12.34.56.78 with your VPS public IP address. x.x.x.x is the mail server private IP address.
NOT WORK
sudo firewall-cmd --permanent --direct --add-rule ipv4 nat PREROUTING 0 -i eth0 -d 12.34.56.78 -p tcp --dport 25 -j DNAT --to-destination 172.1.1.9:25

sudo firewall-cmd --permanent --direct --add-rule ipv4 nat PREROUTING 0 -i eth0 -d 12.34.56.78 -p tcp --dport 587 -j DNAT --to-destination 172.1.1.9:587

sudo firewall-cmd --permanent --direct --add-rule ipv4 nat PREROUTING 0 -i eth0 -d 12.34.56.78 -p tcp --dport 465 -j DNAT --to-destination 172.1.1.9:465

sudo firewall-cmd --permanent --direct --add-rule ipv4 nat PREROUTING 0 -i eth0 -d 12.34.56.78 -p tcp --dport 143 -j DNAT --to-destination 172.1.1.9:143

sudo firewall-cmd --permanent --direct --add-rule ipv4 nat PREROUTING 0 -i eth0 -d 12.34.56.78 -p tcp --dport 993 -j DNAT --to-destination 172.1.1.9:993

sudo firewall-cmd --permanent --direct --add-rule ipv4 nat PREROUTING 0 -i eth0 -d 12.34.56.78 -p tcp --dport 110 -j DNAT --to-destination 172.1.1.9:110

sudo firewall-cmd --permanent --direct --add-rule ipv4 nat PREROUTING 0 -i eth0 -d 12.34.56.78 -p tcp --dport 995 -j DNAT --to-destination 172.1.1.9:995

sudo firewall-cmd --permanent --direct --add-rule ipv4 nat PREROUTING 0 -i eth0 -d 12.34.56.78 -p tcp --dport 80 -j DNAT --to-destination 172.1.1.9:80

sudo firewall-cmd --permanent --direct --add-rule ipv4 nat PREROUTING 0 -i eth0 -d 12.34.56.78 -p tcp --dport 443 -j DNAT --to-destination 172.1.1.9:443

sudo systemctl reload firewalld
WORK:
iptables -I FORWARD -d 0.0.0.0/0 -j ACCEPT
firewall-cmd --permanent --zone=public --add-forward-port=port=80:proto=tcp:toport=80:toaddr=172.1.1.9
firewall-cmd --permanent --zone=public --add-forward-port=port=443:proto=tcp:toport=443:toaddr=172.1.1.9


firewall-cmd --permanent --zone=public --add-forward-port=port=25:proto=tcp:toport=25:toaddr=172.1.1.9
firewall-cmd --permanent --zone=public --add-forward-port=port=587:proto=tcp:toport=587:toaddr=172.1.1.9
firewall-cmd --permanent --zone=public --add-forward-port=port=465:proto=tcp:toport=465:toaddr=172.1.1.9
firewall-cmd --permanent --zone=public --add-forward-port=port=143:proto=tcp:toport=143:toaddr=172.1.1.9
firewall-cmd --permanent --zone=public --add-forward-port=port=993:proto=tcp:toport=993:toaddr=172.1.1.9
firewall-cmd --permanent --zone=public --add-forward-port=port=110:proto=tcp:toport=110:toaddr=172.1.1.9
firewall-cmd --permanent --zone=public --add-forward-port=port=995:proto=tcp:toport=995:toaddr=172.1.1.9
firewall-cmd --reload
Check the rules:
iptables-save
8.5.Create DNS Record
A Record
The A record of your mail server mail.example.com needs to be changed to the VPS public IP address. If your mail server also hosts other web applications like NextCloud, make sure all other sub-domains (like nextcloud.example.com) be pointed to the VPS public IP address.
PTR Record
You should set a PTR record, aka reverse DNS record, for your VPS.
9.How to Bypass Email Blacklists
Your outgoing emails might be rejected due to IP address blacklisting. Even if you don’t send spam, sometimes your email server IP address can be blacklisted for reasons out of your control. Follow the tutorial below to learn how to get around blacklists.
How to Bypass Email Blacklists
How to Bypass the Microsoft Outlook IP Blacklist & Other Blacklists
10.How to uninstall iRedmail
yum remove  postfix* nginx* sa-compile* dovecot* fail2ban* ldap* mysql* sogo* clamav* amavis* nginx* php* mlmmj*

sudo rm -rf /var/run/mysql /var/run/amavis /var/run/mlmmjadmin /var/run/iredadmin /var/run/fail2ban /var/run/netdata

sudo rm -rf /etc/mysql /etc/clamav /etc/dovecot /etc/fail2ban /etc/netdata /etc/spamassassin

sudo rm -rf /opt/iredapd /opt/iRedAPD-5.1 /opt/mlmmjadmin /opt/mlmmjadmin-3.1.5 /opt/netdata /opt/www

sudo userdel -f iredadmin
sudo userdel -f iredapd
sudo userdel -f clamav
sudo userdel -f mlmmj
sudo userdel -f netdata
sudo userdel -f vmail
sudo userdel -f debian-spamd
sudo userdel -f mail
Kill process for userdel failure and remove user again.