Oracle Lab – Oracle Software and Database Installation 12c
1.Oracle安装准备
Oracle12cR2=12.2.0.1
Oracle18c =12.2.0.2
Oracle19c =12.2.0.3
Oracle 19c,其实是Oracle 12.2.0.3,是12c中稳定的版本,就像Oracle 11.2.0.4,值得让用户做出升级决策,从Oracle支持的版本序列图中,就可以看出Oracle 19c所处位置。
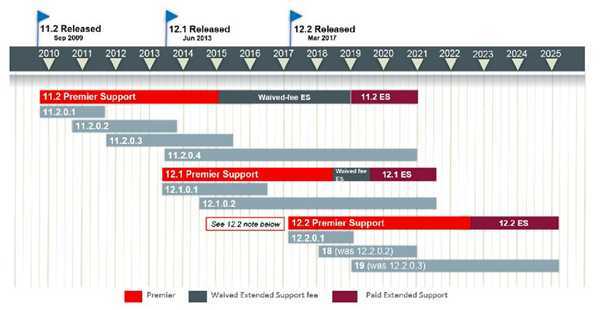
Oracle 19c将稳定性作为此版本的核心目标,开发人员专注于修复已知问题,而不是添加新功能,这可能是让19c更加可靠以及让用户决定升级的关键因素。
19c 支持PRM安装。
Oracle Database 12c Preinstall Steps for Oracle Linux Simplified
Oracle Linux includes a handy RPM to address pre-installation requirement for Oracle Database 12c. Starting with Oracle Database 12c Release 2, we changed the name for this RPM, so the RPM you should look for depends on what release of Oracle Database 12c you plan to install:
- For Oracle Database 12c Release 2: oracle-database-server-12cR2-preinstall
- For Oracle Database 12c Release 1: oracle-rdbms-server-12cR1-preinstal
Both of these RPMs are in the ol6_latest and ol7_latest repository for Oracle Linux 6 and 7 on the Oracle Linux yum server as well as from ULN. All recent releases of Oracle Linux 6 and 7 by default include the proper yum configuration to install these RPMs.
安装oracle预配置包
#yum search oracle-database-server
oracle-database-server-12cR2-preinstall.x86_64 : Sets the system for Oracle Database single instance and Real Application Cluster install for Oracle Linux 7
#yum install –y oracle-database-server-12cR2-preinstall.x86_64
安装后
/var/log/oracle-database-server-12cR2-preinstall/results/orakernel.log 文件记录有关内核更改的消息
/var/log/oracle-database-server-12cR2-preinstall/backup 目录备份当前系统设置
- Automatically downloads and installs any additional RPM packages needed for installing Oracle Grid Infrastructure and Oracle Database, and resolves any dependencies
- Creates an oracle user, and creates the oraInventory (oinstall) and OSDBA (dba) groups for that user
- As needed, sets sysctl.conf settings, system startup parameters, and driver parameters to values based on recommendations from the Oracle RDBMS Pre-Install program
- Sets hard and soft resource limits
- Sets other recommended parameters, depending on your kernel version
自动安装依赖包,创建用户和组,设置内核参数,系统启动参数和一些驱动参数,设置用户资源限制,设置其他以及依赖的内核参数
1.1.安装RPM包
如果安装了oracle-database-server-12cR2-preinstall则不需要
rpm -qa | grep binutils
rpm -qa | grep compat-libstdc
rpm -qa | grep compat-libcap1
rpm -qa | grep elfutils-libelf
rpm -qa | grep gcc
yum -y install gcc.x86_64
yum -y install gcc-c++.x86_64 gcc.x86_64
rpm -qa | grep glibc
glibc-devel
rpm -qa | grep ksh
rpm -qa | grep libaio
libaio-devel
rpm -qa | grep libgcc
rpm -qa | grep libstdc++
libstdc++-devel
rpm -qa | grep make
rpm -qa | grep sysstat
rpm -qa | grep unixODBC
rpm -qa | grep coreutils
yum search
yum -y install

yum -y install compat-libstdc++-33.i686 compat-libstdc++-33.x86_64
yum -y install compat-libcap1.i686 compat-libcap1.x86_64
yum -y install gcc.x86_64
yum -y install gcc-c++.x86_64 gcc.x86_64
yum -y install glibc-devel.i686 glibc-devel.x86_64
yum -y install ksh.x86_64
yum -y install libaio-devel.i686 libaio-devel.x86_64
yum -y install libstdc++-devel.i686 libstdc++-devel.x86_64
yum -y install unixODBC-devel.i686 unixODBC-devel.x86_64 unixODBC.i686 unixODBC.x86_64
1.2.安装rlwrap 工具
rpm -qa | grep readline
yum search readline
yum -y install readline-devel

tar zxvf rlwrap-0.43.tar.gz
cd rlwrap-0.43
./configure
make
make install
1.3.用户,组
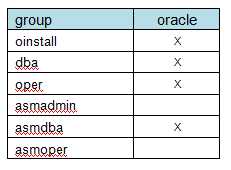
groupadd oinstall
groupadd dba
groupadd oper
groupadd asmadmin
groupadd asmdba
groupadd asmoper

usermod -g oinstall -G dba,oper,asmadmin,asmdba,asmoper oracle
1.4.Linux内核参数
如果安装了oracle-database-server-12cR2-preinstall则不需要
vi /etc/sysctl.conf

kernel.shmmax = 68719476736
kernel.shmall = 4294967296
kernel.shmmni = 4096
kernel.sem = 250 32000 100 128

fs.aio-max-nr = 1048576
fs.file-max = 6815744

net.ipv4.ip_local_port_range = 9000 65500
net.core.rmem_default = 262144
net.core.rmem_max = 4194304
net.core.wmem_default = 262144
net.core.wmem_max = 1048576

sysctl -p
以kernel.sem = 250 32000 100 128为例:
250是参数semmsl的值,表示每个信号量集合中的信号量最大数目。
32000是参数semmns的值,表示系统内的信号量最大数目。
100是参数semopm的值,表示单个semopm()调用在一个信号量集合上可以执行的操作数量。
128是参数semmni的值,表示系统信号量集合总数
# semaphores: semmsi, semmns, semopm, semmni
kernel.sem = 300 307200 100 1024
kernel.shmall = 4294967296 可以使用的共享内存的总量
kernel.shmmax = 68719476736 最大共享内存段大小
kernel.shmmni = 4096 整个系统共享内存段的最大数目
fs.aio-max-nr = 1048576  系统中允许同时可以拥有的的异步IO请求数目
fs.file-max = 6815744    系统中允许的文件句柄最大数目
net.ipv4.ip_local_port_range = 9000 65500  应用程序可使用的IPv4端口范围
net.core.rmem_default = 262144  套接字接收缓冲区大小的缺省值
net.core.rmem_max = 4194304   套接字接收缓冲区大小的最大值
net.core.wmem_default = 262144 套接字发送缓冲区大小的缺省值
net.core.wmem_max = 1048576  套接字发送缓冲区大小的最大值
1.5./etc/security/limits.conf
vi /etc/security/limits.conf

oracle soft nproc 2047
oracle hard nproc 16384
oracle soft nofile 1024
oracle hard nofile 65536
oracle soft stack 10240
oracle hard stack 32768
定义用户或组规则,规则是“软(soft)”或“硬(hard)”,规则的内容可以是CPU、内存、最大文件大小等。
limits.conf的格式如下:
username|@groupname type resource limit
username|@groupname:设置需要被限制的用户名,组名前面加@和用户名区别。也可以用通配符*来做所有用户的限制。
type:有 soft,hard 和 -,soft 指的是当前系统生效的设置值。hard 表明系统中所能设定的最大值。soft 的限制不能比hard 限制高。用 – 就表明同时设置了 soft 和 hard 的值。
vi /etc/security/limits.conf
*    -       nofile    8000


*   表示对所有用户
nofile  表示最大文件打开数
noproc 表示最大进程数
stack   表示最大栈大小
1.6./etc/profile
vi /etc/profile
if [ £USER = "oracle" ] ; then
    if [ $SHELL = "/bin/ksh" ] ; then
        ulimit -p 16384
        ulimit -n 65536
    else
        ulimit -u 16384 -n 65536
    fi
    umask 022
fi
ulimit -n 65535 将每个进程可以打开的文件数目加大到65535,缺省为1024
-p 设置管道的最大值,单位为block,1block=512bytes
1.7.Prepare directory
Oracle Database Settings:
HOME=/home/oracle
ORACLE_BASE=/oracle/app
ORACLE_HOME=/oracle/app/oracle/product/12.2.0.1
Database datafiles:  /oradata/data
FlashBack: /oradata/fra
ArchiveLog: /oradata/arc

cd /
mkdir -p /oradata/data
mkdir  /oradata/fra
mkdir  /oradata/arc
chown -R oracle:oinstall /oradata
chmod -R 775 /oradata
mkdir -p /oracle/app/oracle/product/12.2.0.1
mkdir /oracle/dba_scripts
mkdir /oracle/log_files
chown -R oracle:oinstall /oracle
chmod -R 775 /oracle
mkdir /bck
chown -R oracle:oinstall /bck
chmod -R 775 /bck
1.8.oracle用户 profile
vi /oracle/dba_scripts/setOracleProfile.txt
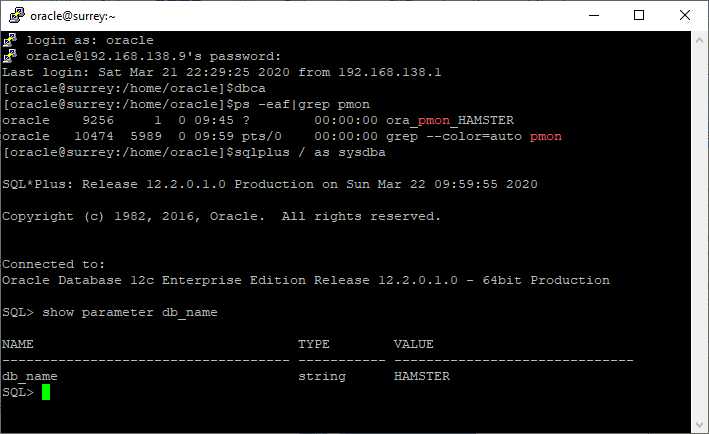
export ORACLE_SID=HAMSTER
export ORACLE_BASE=/oracle/app/oracle
export ORACLE_HOME=/oracle/app/oracle/product/12.2.0.1
export TNS_ADMIN=£ORACLE_HOME/network/admin
export PATH=£ORACLE_HOME/bin:£PATH
export LD_LIBRARY_PATH=£ORACLE_HOME/lib:£OGG_HOME:£LD_LIBRARY_PATH
export NLS_LANG=AMERICAN_AMERICA.AL32UTF8
export DISPLAY=localhost:10.0
export PS1='[\u@\h:`pwd`]€'
alias sqlplus='rlwrap sqlplus'
alias rman='rlwrap rman'
alias ggsci='rlwrap ggsci'
cat setOracleProfile.txt >> /home/oracle/.bash_profile
cat .bash_profile
export ORACLE_SID=HAMSTER
export ORACLE_BASE=/oracle/app/oracle
export ORACLE_HOME=/oracle/app/oracle/product/12.2.0.1
export TNS_ADMIN= €ORACLE_HOME/network/admin
export PATH=¥ORACLE_HOME/bin:¥PATH
export LD_LIBRARY_PATH=¥ORACLE_HOME/lib:¥LD_LIBRARY_PATH
export NLS_LANG=AMERICAN_AMERICA.AL32UTF8
export DISPLAY=localhost:10.0
export PS1='[\u@\h:`pwd`]¥'
alias sqlplus='rlwrap sqlplus'
alias rman='rlwrap rman'
alias ggsci='rlwrap ggsci'
2.安装Oracle 12c软件
2.1.上传oracle 数据库安装文件
linuxx64_12201_database.zip  -> /home/oracle
unzip linuxx64_12201_database.zip
2.2.运行图形安装程序
只装软件,先不装数据库
$cd /home/oracle/database
# for Almalinus export CV_ASSUME_DISTID=OEL7.6
$./runInstaller

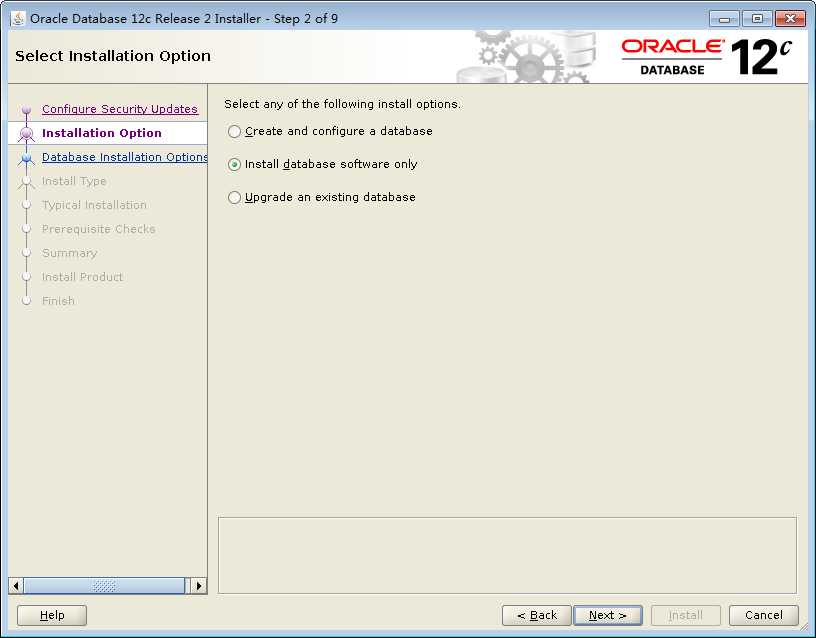
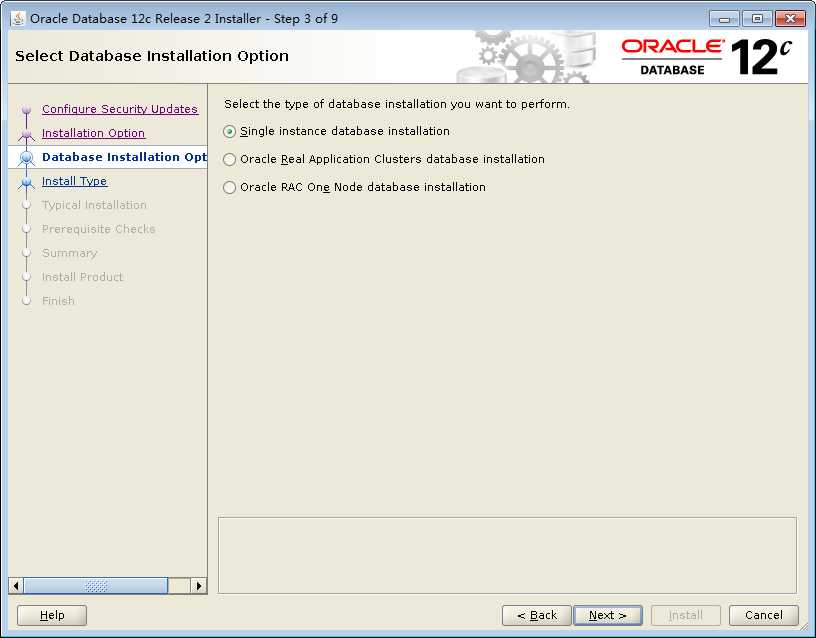
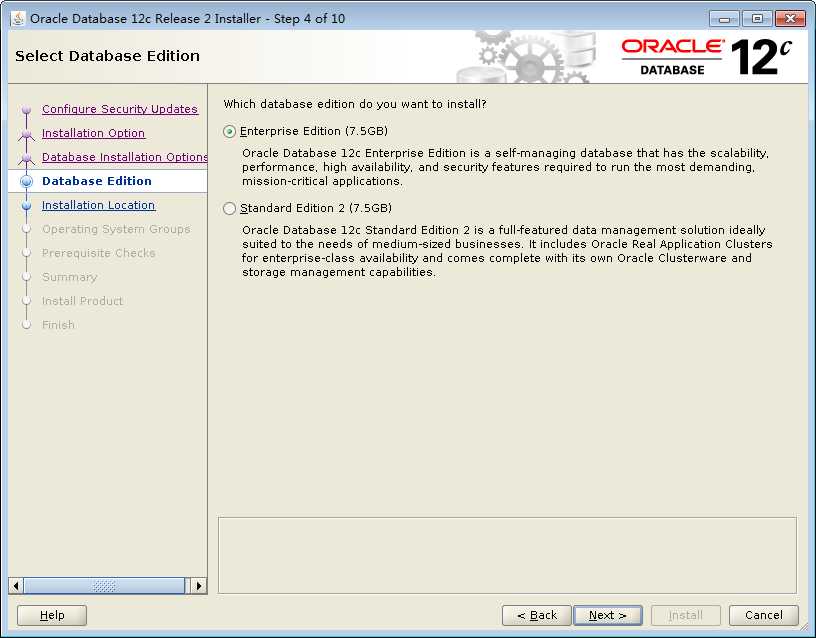
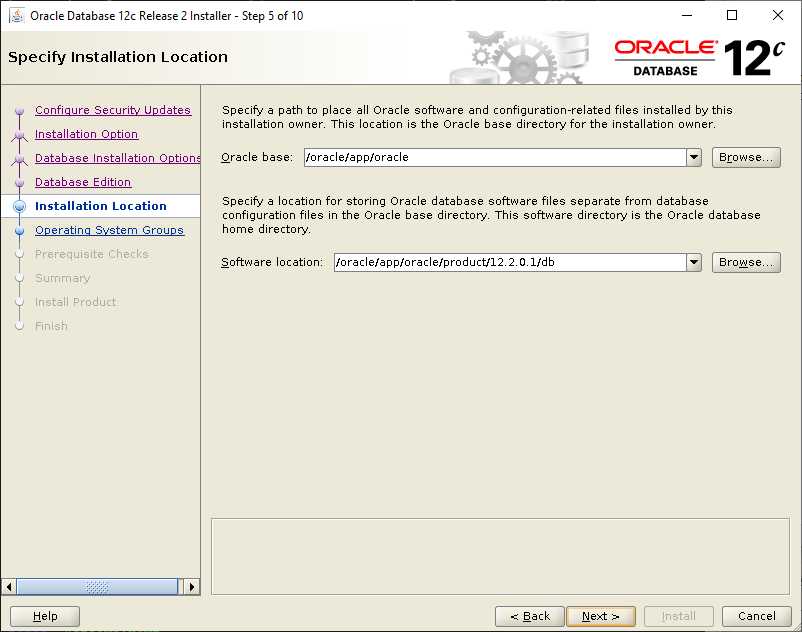
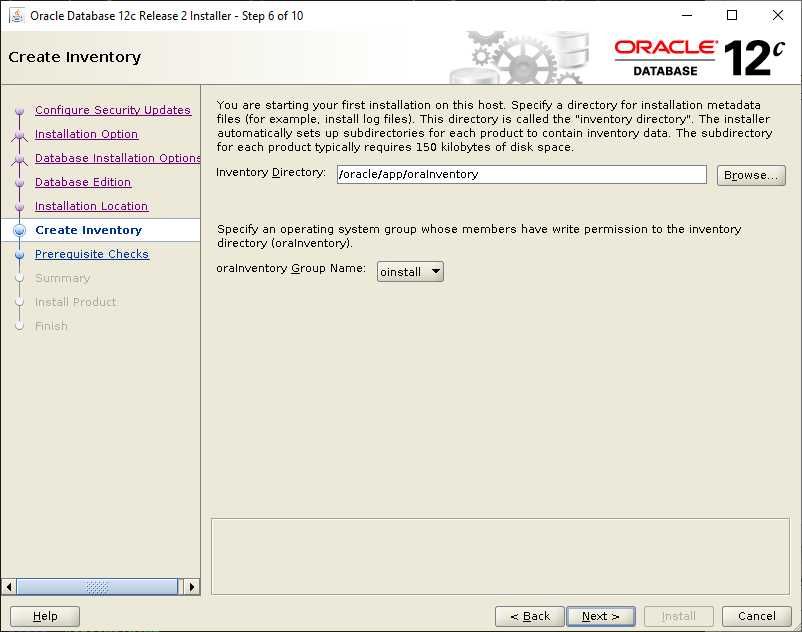
2.3.安装目录
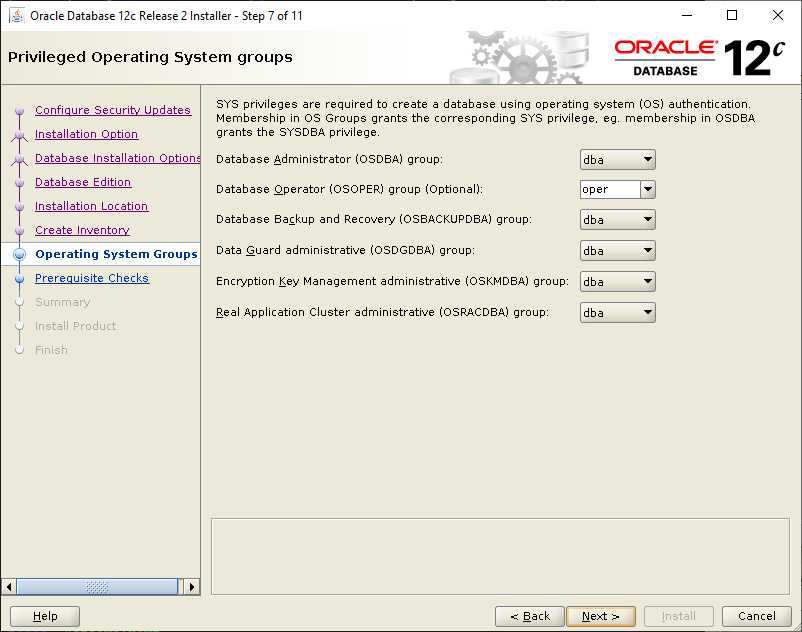
2.4.System Groups
2.5.Prerequisite Check

2.6.Summary
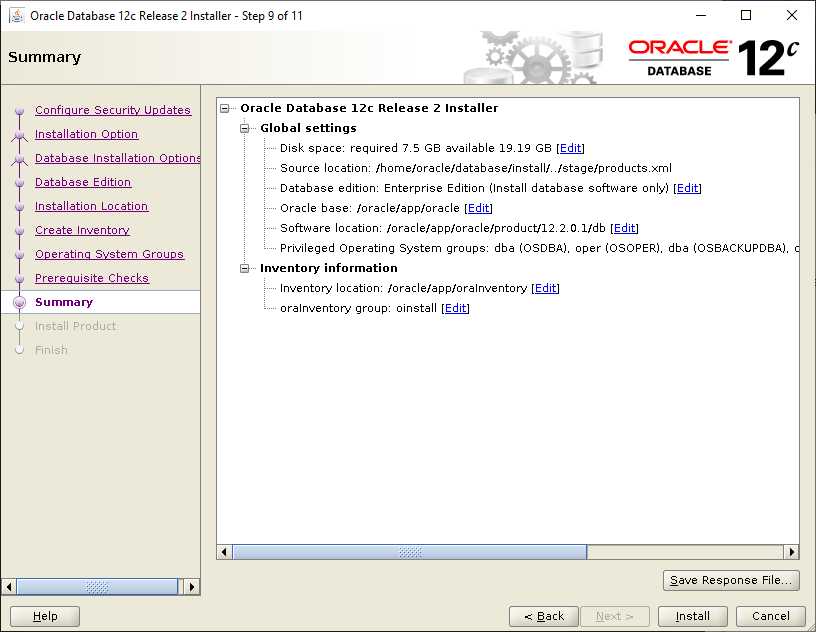
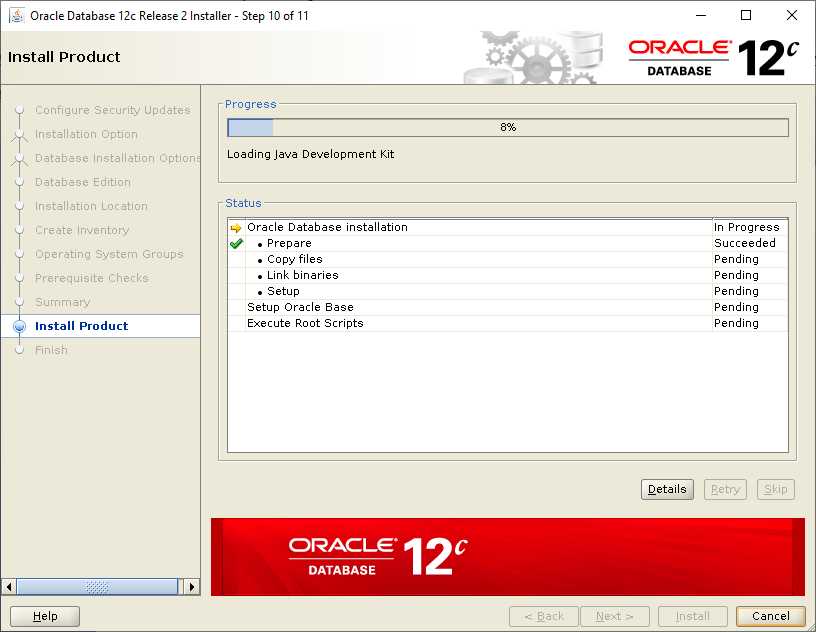
2.7.Install Progress
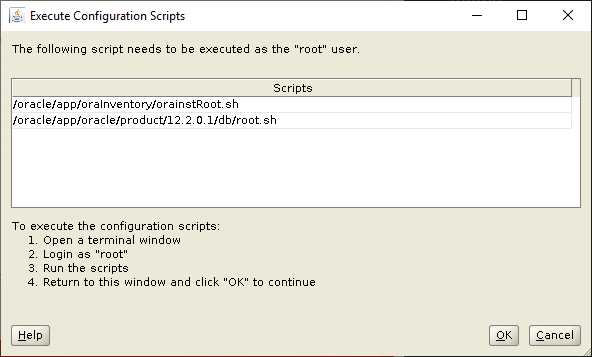
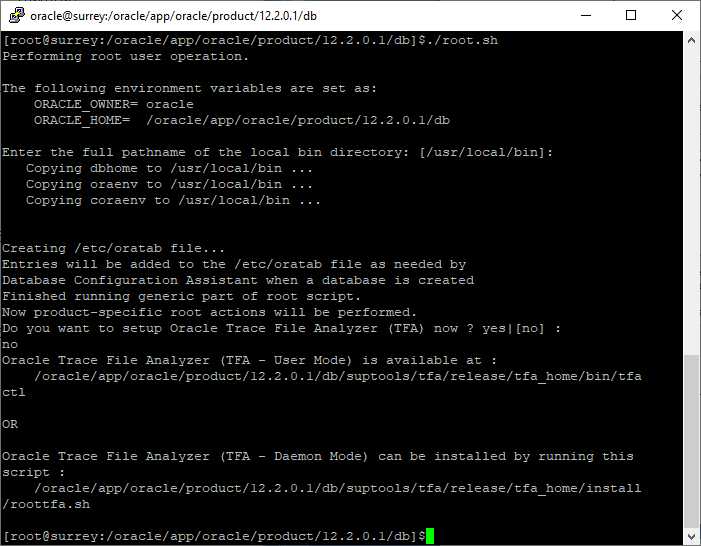
2.8.root.sh
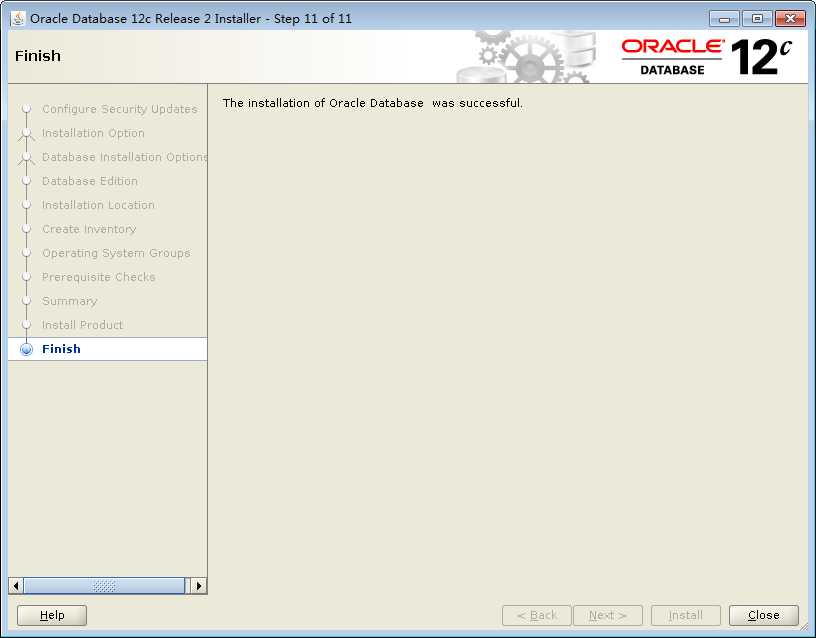
2.9.Successful
3.Create Database – GUI
Refer to: Creating a Database Using DBCA
3.1.启动dbca
$dbca
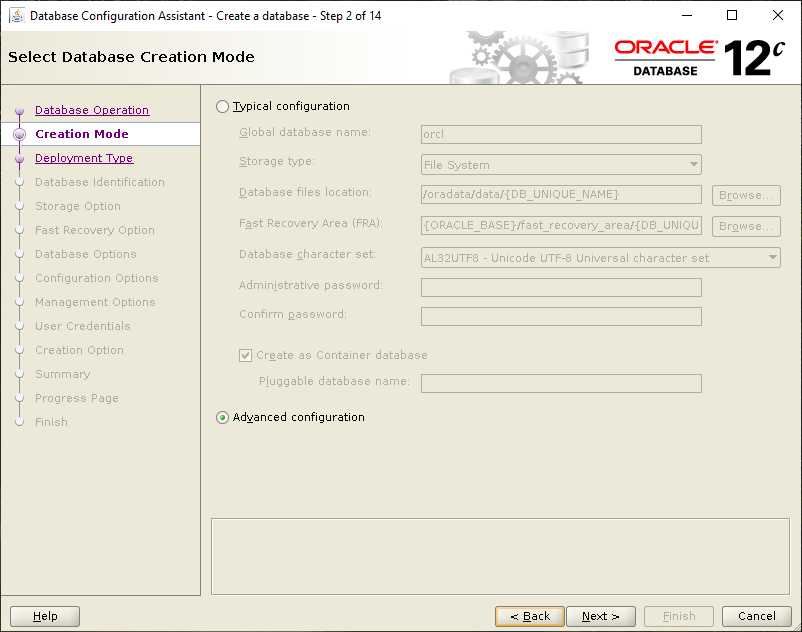
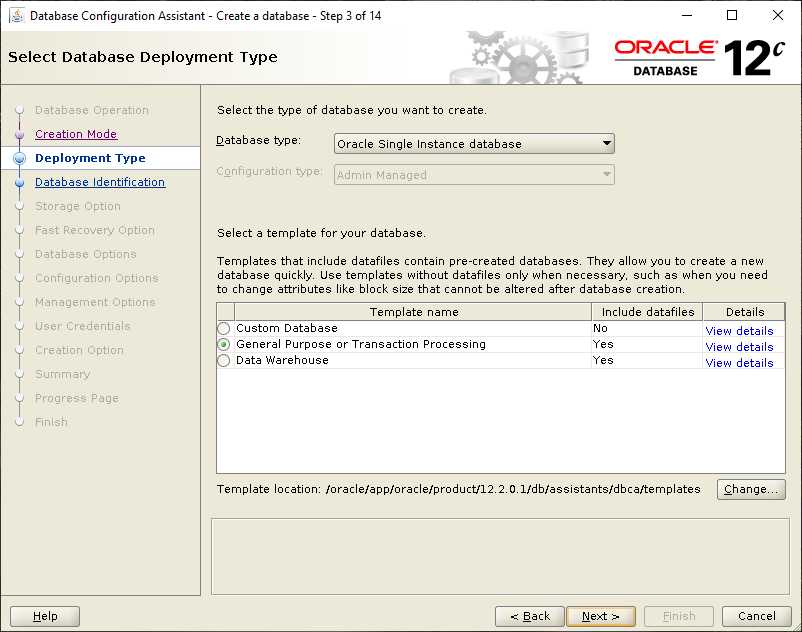
3.2.Deployment Type
3.3.Database Identification

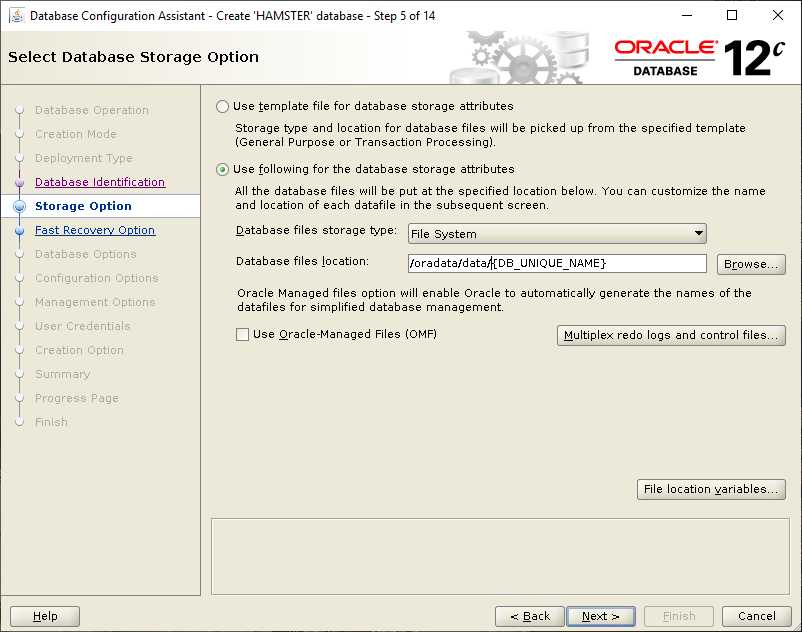
3.4.Storage Option
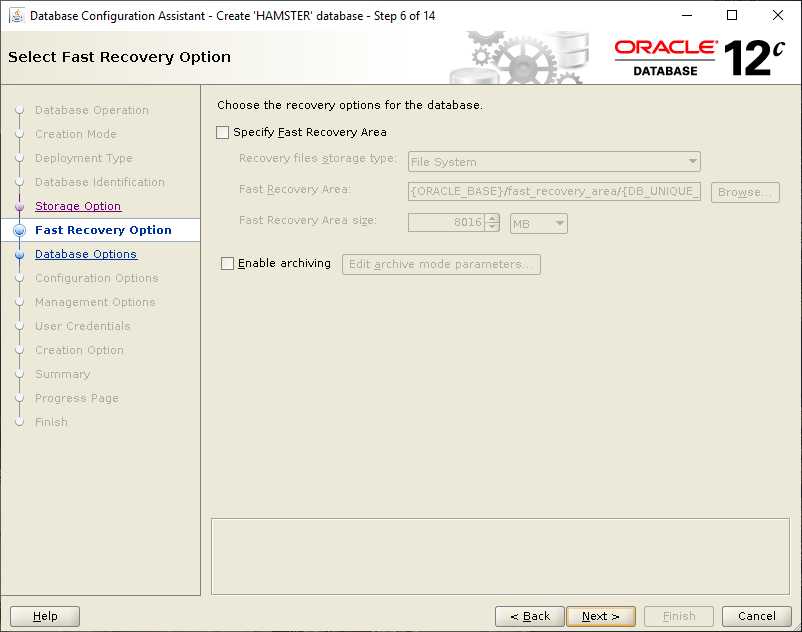
3.5.Fast Recovery Option
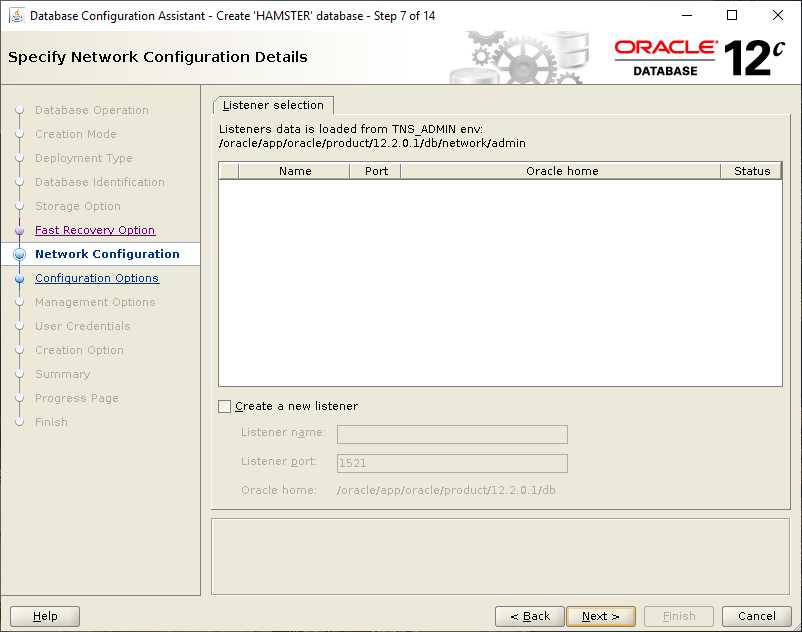
3.6.Network Configuration
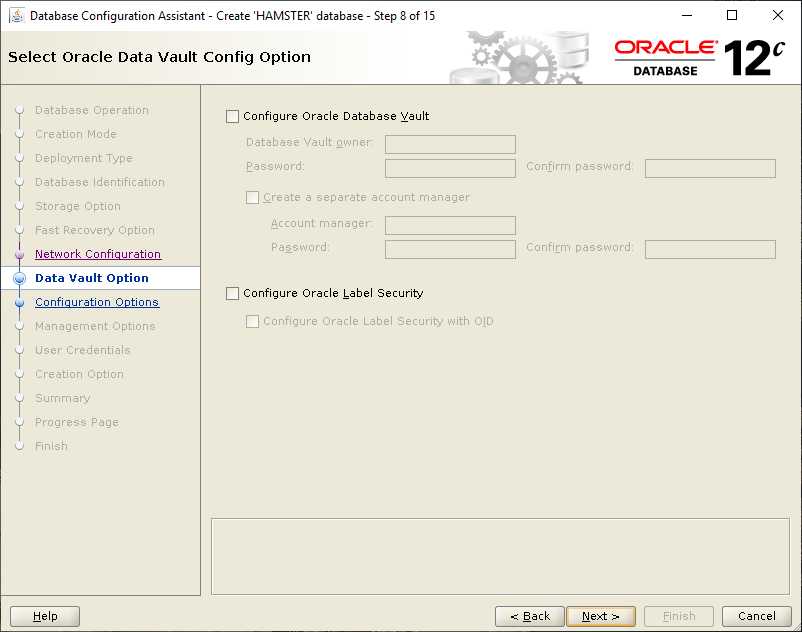
3.7.Configure Database Vault
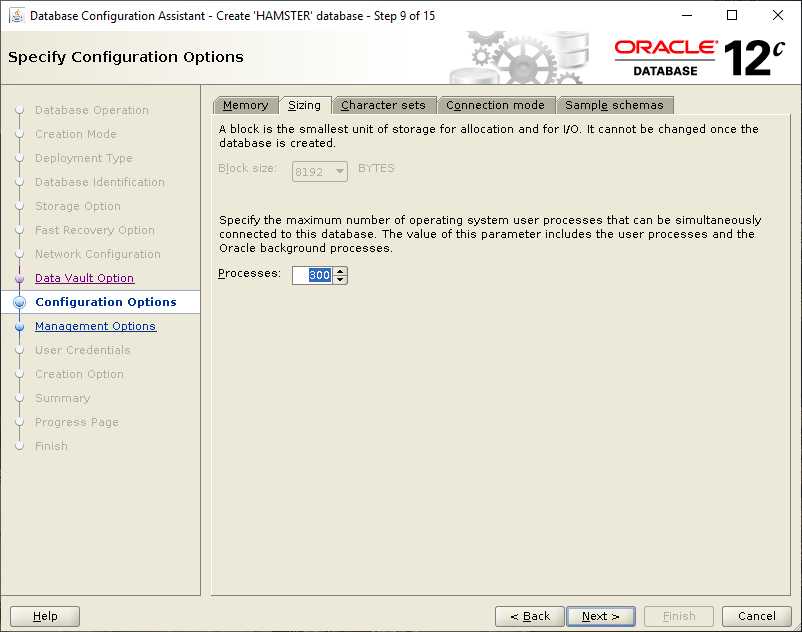
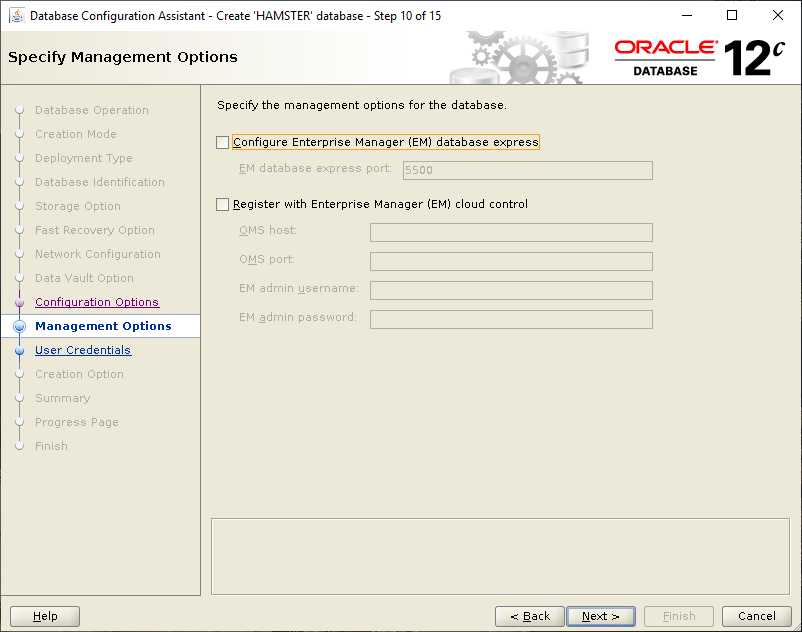
3.8.Management Options
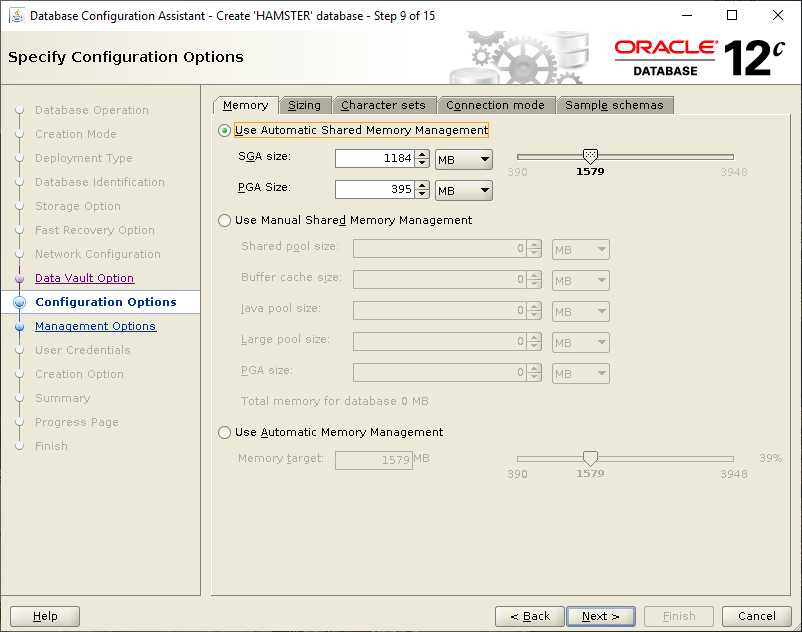
Oracle推荐使用自动内存管理(AMM)以简化内存分配。使用一个参数memory_target就能够实现SGA和PGA组件依据工作负荷进行自动内存分配。
手工内存分配:
1:使用memory_target来支持内存自动分配。
2:使用sga_target和pga_target参数来设置SGA和PGA,数据库会在这两个组件中自我优化。
3:也可以手工设置SGA中的各个组件。比如db_cache_size,shared_pool_size等组件。
参考:Fundamentals I\03 – Creating a Database\自动内存管理
3.9.Eterprise Manager(EM)
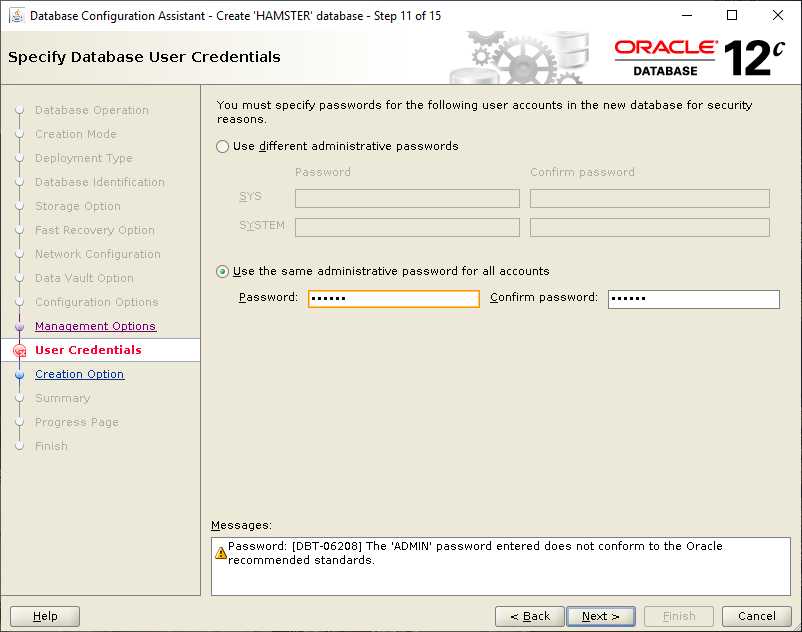
3.10.User Credentials
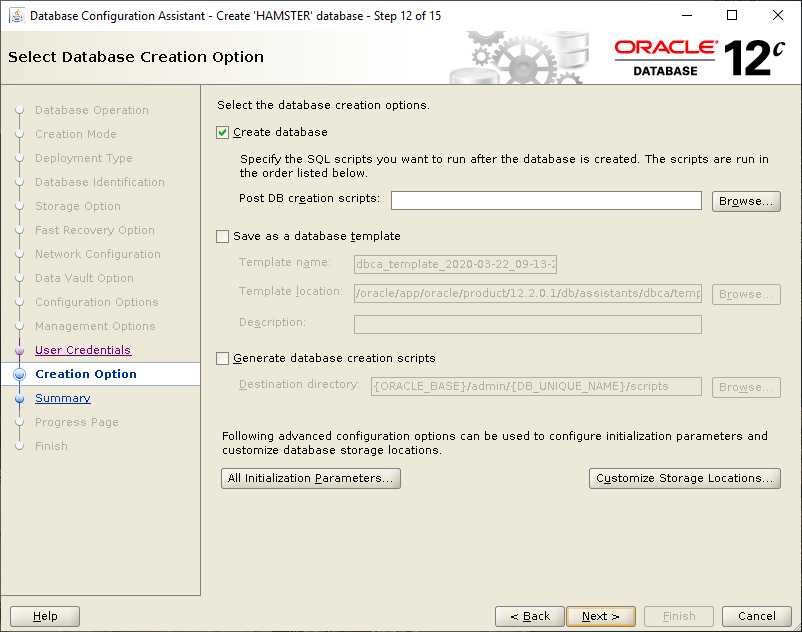
3.11.Creation Options
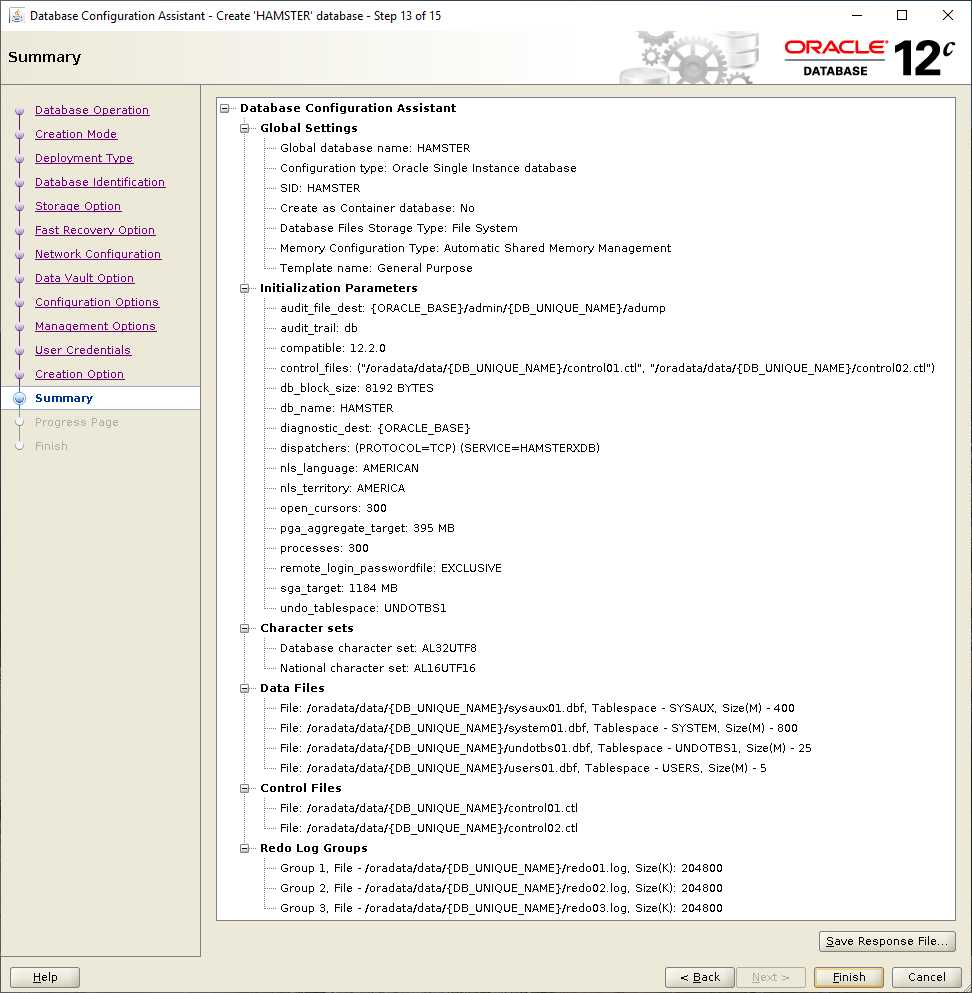
3.12.Summary
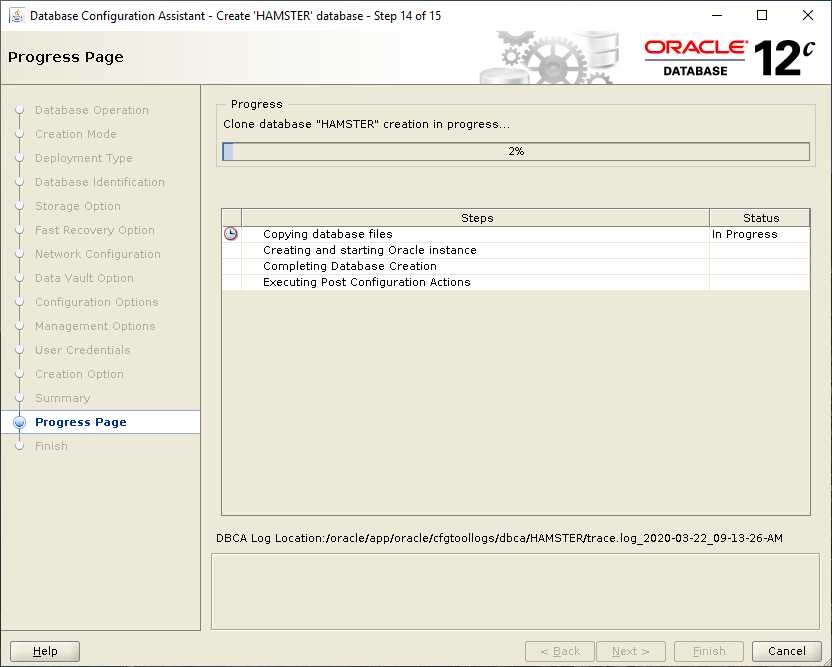
3.13.Progress
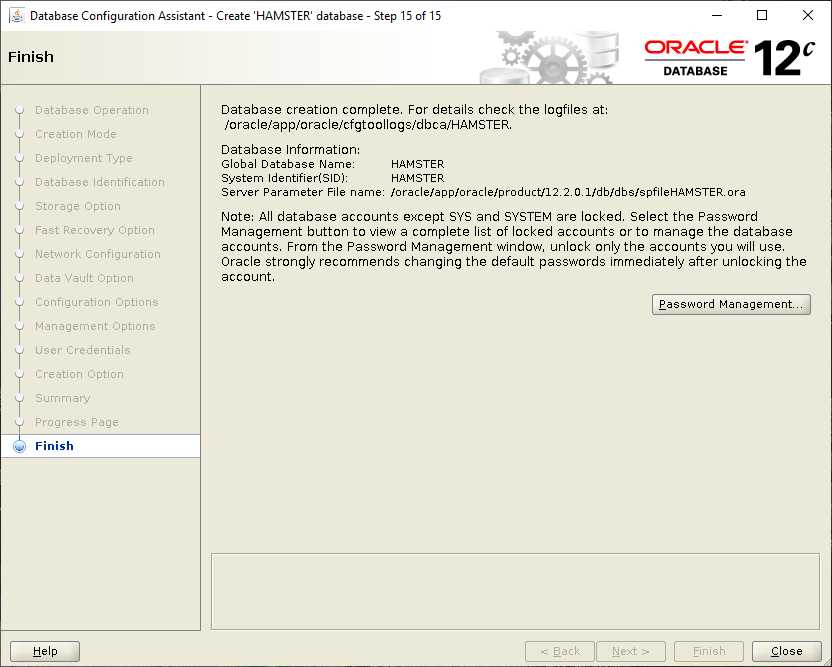
3.14.Finish
4.Create Database – Silent
4.1.OMF
Using the Oracle Managed Files feature for operating system files, you can specify a directory as the default location for the creation of data files, temporary files, redo log files, and control files. Using the Oracle Managed Files feature for Oracle ASM, you can specify a disk group, in the form of an incomplete Oracle ASM file name, as the default location for creation of these files, and additional types of files, including archived log files. As for operating system files, the name of the default disk group is stored in an initialization parameter and is used whenever a file specification (for example, DATAFILE clause) is not explicitly specified during file creation.
The following initialization parameters accept the multiple file creation context form of Oracle ASM file names as a destination:
- DB_CREATE_FILE_DEST
Specifies the default disk group location in which to create data and temp files. -
DB_CREATE_ONLINE_LOG_DEST_n
Specifies the default disk group location in which to create redo log and control files. -
DB_RECOVERY_FILE_DEST
Specifies a default disk group for a fast recovery area that contains a copy of the control file and redo log files if this parameter is specified and DB_CREATE_ONLINE_LOG_DEST_n and CONTROL_FILES are not specified. -
CONTROL_FILES
Specifies a disk group in which to create control files.
The following initialization parameters accept the multiple file creation context form of the Oracle ASM file names and Oracle ASM directory names as a destination:
- LOG_ARCHIVE_DEST_n
Specifies a default disk group or Oracle ASM directory as destination for archiving redo log files -
LOG_ARCHIVE_DEST
Optional parameter to use to specify a default disk group or Oracle ASM directory as destination for archiving redo log files. Use when specifying only one destination. -
STANDBY_ARCHIVE_DEST
Relevant only for a standby database. It specifies a default disk group or Oracle ASM directory that is the location of archive logs arriving from a primary database. Not discussed in this book. This parameter has been deprecated. See Oracle Data Guard Concepts and Administration.
Incomplete Oracle ASM File Name Form
Incomplete Oracle ASM file names are used only for file creation operations and are used for both single and multiple file creation. They consist only of the disk group name. Oracle ASM uses a system default template to determine the Oracle ASM file mirroring and striping attributes. The system template that is used is determined by the file type that is being created. For example, if you are creating a data file for a tablespace, then the DATAFILE template is used.
An example of using an incomplete Oracle ASM file name is setting the DB_CREATE_FILE_DEST initialization parameter to:
+data
With this setting, every time you create a tablespace, a data file is created in the disk group data, and each data file is assigned a different fully qualified name. See “Creating Oracle ASM Files Using a Default File Location for Disk Group Specification” for more information.
4.2.Syntax and Parameters
refer to: Creating and Configuring an Oracle Database
check help menu:
dbca -silent -<command> -h
dbca -createDatabase
    -templateName template_name
    [-cloneTemplate]
    -gdbName global_database_name
    [-sid database_system_identifier]
    [-createAsContainerDatabase {true | false}
        [-numberOfPDBs integer]
        [-pdbName pdb_name]]
    [-sysPassword sys_user_password]
    [-systemPassword system_user_password]
    [-emConfiguration {DBEXPRESS | CENTRAL | BOTH | NONE}
       -dbsnmpPassword DBSNMP_user_password
       [-omsHost EM_management_server_host_name
       -omsPort EM_management_server_port_number
       -emUser EM_admin_username
       -emPassword EM_admin_user_password]]
    [-dvConfiguration {true | false}
        -dvUserName Database_Vault_owner_username
        -dvUserPassword Database_Vault_owner_password
        -dvAccountManagerName Database_Vault_account_manager
        -dvAccountManagerPassword Database_Vault_account_manager_password]
    [-olsConfiguration {true | false}]
    [-datafileDestination directory | -datafileNames text_file_location]
    [-redoLogFileSize integer]
    [-recoveryAreaDestination destination_directory]
    [-datafileJarLocation jar_file_location]
    [-storageType {FS | ASM}
        [-asmsnmpPassword asmsnmp_password]
        -diskGroupName disk_group_name
        -recoveryGroupName recovery_area_disk_group_name]
    [-characterSet database_character_set]
    [-nationalCharacterSet database_national_character_set]
    [-registerWithDirService {true | false}
         -dirServiceUserName directory_service_user_name
         -dirServicePassword directory_service_password
         -walletPassword wallet_password]
    [-listeners list_of_listeners]
    [-variablesFile variable_file]
    [-variables variable_list]
    [-initParams parameter_list]
    [-sampleSchema {true | false}]
    [-memoryPercentage integer]
    [-automaticMemoryManagement {true | false}]
    [-totalMemory integer]
    [-databaseType {MULTIPURPOSE | DATA_WAREHOUSING | OLTP}]
    -serviceUserPassword Windows_Oracle_Home_service_user_password
4.3.Example 1
dbca -silent -createDatabase \
-templateName General_Purpose.dbc \
-responseFile NO_VALUE \
-gdbname OTTER \
-sid OTTER \
-databaseConfigType SINGLE \
-sysPassword oracle \
-systemPassword oracle \
-emConfiguration NONE \
-storageType ASM \
-asmsnmpPassword oracle \
-asmSysPassword oracle \
-diskGroupName '+DATA' \
-datafileDestination '+DATA' \
-recoveryGroupName '+FRA' \
-recoveryAreaDestination '+FRA' \
-enableArchive true \
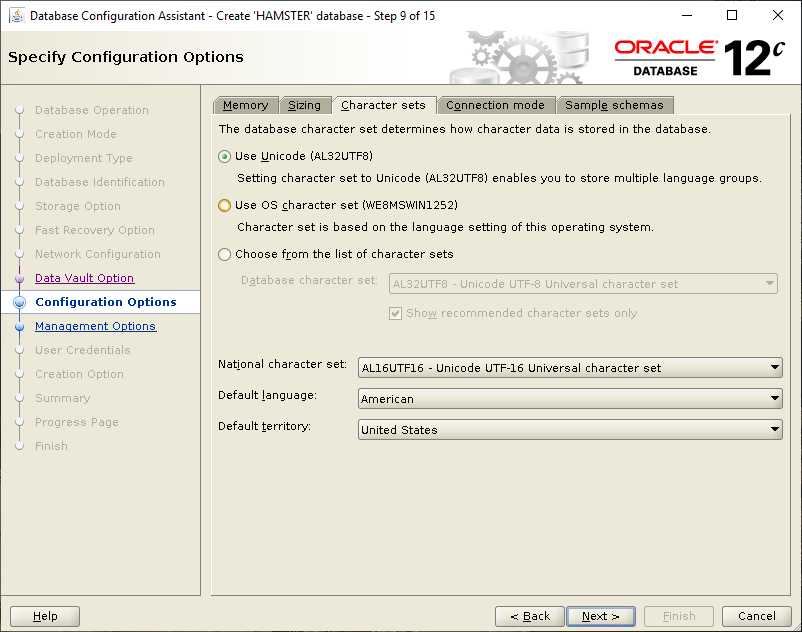
-characterSet AL32UTF8 \
-nationalCharacterSet AL16UTF16 \
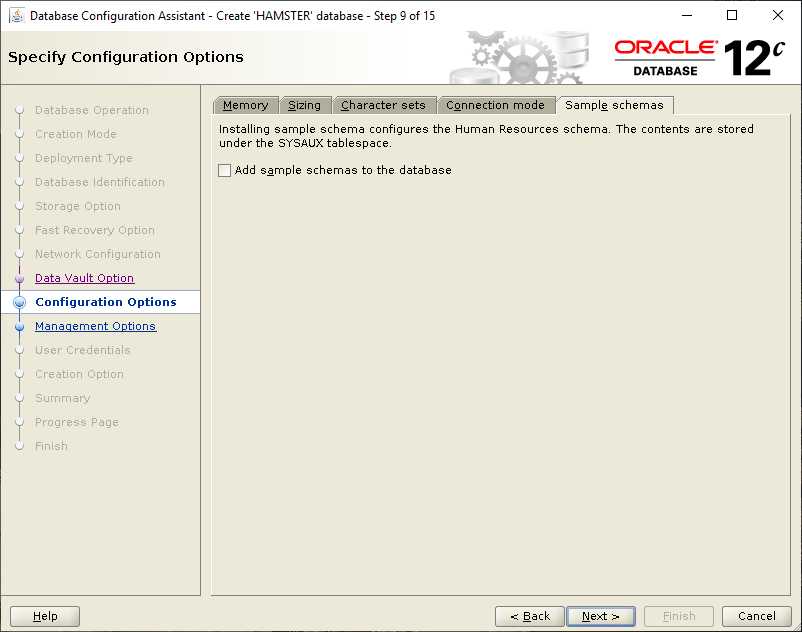
-sampleSchema false \
-automaticMemoryManagement false \
-totalMemory 1024 \
-dbOptions 'JSERVER:true,ORACLE_TEXT:true,IMEDIA:false,SPATIAL:false,CWMLITE:false,APEX:false,OMS:false,DV:false,SAMPLE_SCHEMA:false' \
-ignorePrereqFailure \
-variables 'DB_NAME=OTTER,DB_UNIQUE_NAME=OTTER,ORACLE_BASE=/oracle/app/oracle,ORACLE_HOME=/oracle/app/oracle/product/12.2.0.1/db' \
-initParams 'DB_NAME=OTTER,DB_UNIQUE_NAME=OTTER,nls_language=AMERICAN,nls_territory=AMERICA,db_recovery_file_dest_size=2048M,db_recovery_file_dest=+FRA,processes=150,open_cursors=150'
dbca -silent -deleteDatabase -sourceDB OTTER -sysDBAUserName sys -sysDBAPassword oracle
please DO NOT specified automaticMemoryManagement
  -automaticMemoryManagement true \
  -memoryPercentage 20 \
when automaticMemoryManagement is set to “FALSE” then the database will use feature of ASMM(Automatic Shared Memory Management), ASMM is SGA+PGA.
specified totalMemory:
-totalMemory: 指定实例占用内存大小,PGA和SGA会自动分配
My VM Pysical Mem = 7GB, there are 2 database, 7 X 20% =1433, will set to 1024M.
If there was only one databae, will set to 7 X 40% =2867. will set to 2867
Used AMM you will hit this error:
[FATAL] [DBT-11211] The Automatic Memory Management option is not allowed when the total physical memory is greater than 4GB.
   CAUSE: The current total physical memory is 7GB.
4.4.Example 2
dbca -silent -createDatabase \
  -templateName General_Purpose.dbc \
  -responseFile NO_VALUE \
  -gdbname OTTER \
  -sid OTTER \
  -databaseConfigType SINGLE \
  -sysPassword oracle \
  -systemPassword oracle \
  -emConfiguration NONE \
  -storageType FS \
     -datafileDestination /oradata/data \
  -enableArchive false \
  -characterSet AL32UTF8 \
  -nationalCharacterSet AL16UTF16 \
  -sampleSchema false \
  -automaticMemoryManagement false \
  -totalMemory 1024 \
  -dbOptions 'JSERVER:true,ORACLE_TEXT:true,IMEDIA:false,SPATIAL:false,CWMLITE:false,APEX:false,OMS:false,DV:false,SAMPLE_SCHEMA:false' \
  -ignorePrereqFailure \
  -variables 'DB_NAME=OTTER,DB_UNIQUE_NAME=OTTER,ORACLE_BASE=/u01/app/oracle,ORACLE_HOME=/u01/app/oracle/product/19.3/db1' \
  -initParams 'DB_NAME=OTTER,DB_UNIQUE_NAME=OTTER,nls_language=AMERICAN,nls_territory=AMERICA,processes=150,open_cursors=150'


dbca -silent -deleteDatabase -sourceDB OTTER -sysDBAUserName sys -sysDBAPassword oracle
please DO NOT specified automaticMemoryManagement
  -automaticMemoryManagement true \
  -memoryPercentage 20 \
when automaticMemoryManagement is set to “FALSE” then the database will use feature of ASMM(Automatic Shared Memory Management), ASMM is SGA+PGA.
specified totalMemory:
-totalMemory: 指定实例占用内存大小,PGA和SGA会自动分配
My VM Pysical Mem = 7GB, there are 2 database, 7 X 20% =1433, will set to 1024M.
If there was only one databae, will set to 7 X 40% =2867. will set to 2867
Used AMM you will hit this error:
[FATAL] [DBT-11211] The Automatic Memory Management option is not allowed when the total physical memory is greater than 4GB.
   CAUSE: The current total physical memory is 7GB.
5.Create Database – Response File
TO DO ……
6.Database Configuration
6.1.Test
6.2.开启归档模式和闪回模式
闪回模式不是必须开启的,如果要开启闪回模式,必须先开启归档模式。
FORCE LOGGING 归档模式不是必须的。
1)开启归档模式
启动到mount状态
设置归档日志路径
alter system set log_archive_dest_1='location=/oradata/arc';
打开归档模式
alter database archivelog;
alter database open;
修改日志文件命名格式:
alter system set log_archive_max_processes = 4;
alter system set log_archive_format = "arc_%t_%s_%r.dbf" scope=spfile;
查看状态
alter system switch logfile;
archive log list
Database log mode               Archive Mode
Automatic archival              Enabled
Archive destination             /oradata/arc
Oldest online log sequence      17
Next log sequence to archive    19
Current log sequence            19
2)开启闪回
启动到mount状态
startup mount
alter system set db_recovery_file_dest_size=2g;
alter system set db_recovery_file_dest='/oradata/fra';
alter database flashback on;
alter system set db_flashback_retention_target=1440 scope=spfile;
show parameter db_recovery
NAME                                 TYPE        VALUE
------------------------------------ ----------- ------------------------------
db_recovery_file_dest                string      /fra
db_recovery_file_dest_size           big integer 2G
3)如何开启或关闭归档(ARCHIVELOG)模式
开启归档模式
startup mount;
alter database archivelog;
alter database open;
alter system switch logfile;
关闭归档模式
startup mount;
alter database noarchivelog;
alter database open;
查看归档状态
SQL> archive log list;
4)如何开启或关闭flashback
开启Flashback
startup mount;
alter system set db_recovery_file_dest_size=2g;
alter system set db_recovery_file_dest='/oradata/fra';
alter database flashback on;

select flashback_on from v$database;
show parameter db_recovery
关闭Flashback
alter database flashback off;
alter system set db_recovery_file_dest='' scope=spfile sid='*';

select flashback_on from v$database;
show parameter db_recovery
查看flash recovery area的使用情况,查看archivelog
select * from V$FLASH_RECOVERY_AREA_USAGE;
计算flash recovery area已经占用的空间
select sum(percent_space_used)*3/100 from v$flash_recovery_area_usage;
6.3.创建自动启动停止脚本
[oracle@surrey:/oracle]$mkdir log_files
vi /oracle/dba_scripts/dbctl.sh

#!/bin/bash
LOG=/oracle/log_files/dbctl.log
export ORACLE_SID=HAMSTER
export ORACLE_HOME=/oracle/app/oracle/product/12.2.0.1

function start(){
    # Start the databases:
    echo "-------------------------------------------------"
    date +" %T %a %D : Starting Databases ......"
    echo "-------------------------------------------------"
    ¥{ORACLE_HOME}/bin/sqlplus /nolog << EOF
    conn / as sysdba
    startup
    exit
EOF
    echo "Done."

    # Start the Listener:
    echo "-------------------------------------------------"
    date +" %T %a %D : Starting Listeners ......"
    echo "-------------------------------------------------"
    ¥{ORACLE_HOME}/bin/lsnrctl start
    echo "Done."
    echo "-------------------------------------------------------"
    date +" %T %a %D : Database and Listener Started."
    echo "-------------------------------------------------------"
    echo ""
    echo ""
    echo ""


}

function stop(){
    # Stop the Listener:
    echo "-------------------------------------------------"
    date +" %T %a %D : Stoping Listener ......"
    echo "-------------------------------------------------"
    ¥{ORACLE_HOME}/bin/lsnrctl stop
    echo "Done."

    # Stop the Database:
    echo "-------------------------------------------------"
    date +" %T %a %D : Stoping Databases ......"
    echo "-------------------------------------------------"
    ¥{ORACLE_HOME}/bin/sqlplus /nolog << EOF
    conn / as sysdba
    shutdown immediate
    exit
EOF
    echo "Done."
    echo ""
    echo "-------------------------------------------------------"
    date +" %T %a %D : Database and Listener Stopped."
    echo "-------------------------------------------------------"
    echo ""
    echo ""
    echo ""


}

case "¥1" in
start)
    echo "Starting Databases ...... "
    start >> ¥LOG
    echo "Started Successfully."
    ;;
stop)
    echo "Stoping Databases ...... "
    stop >> ¥LOG
    echo "Stopped."
    ;;
restart)
    echo "Restarting Databases ...... "
    stop >> ¥LOG
    start >> ¥LOG
    echo " Restarted."
    ;;
status)
    ¥{ORACLE_HOME}/bin/lsnrctl status
    ;;
*)
    echo "Usage: ¥(basename ¥0) {start|stop|restart|status}"
    exit 1
esac

exit 0
chmod u+x dbctl.sh


cd /etc/systemd/system
[root@surrey:/etc/systemd/system]$cat oracle.service
[Unit]
Description=Oracle Database Start and Stop Service
After=network.target
After=syslog.target

[Service]
User=oracle
Group=dba
Type=oneshot
ExecStart=/oracle/dba_scripts/dbctl.sh start
ExecReload=/oracle/dba_scripts/dbctl.sh stop
ExecStop=/oracle/dba_scripts/dbctl.sh stop
RemainAfterExit=yes

[Install]
WantedBy=multi-user.target


systemctl enable oracle.service
systemctl list-unit-files|grep oracle
7.配置Listener
监听程序(Listener)就是在服务端等待客户端连接的程序,也就是说,客户端需要和数据库服务器通讯,首先需要发起建立连接的请求,服务器如何知道有来自客户端的连接请求呢?Listener就是干这个活的,Oracle数据库使用的端口是1521,Listener监听这个端口。对于专用连接来说,Listener负责建立一个与客户端对应的服务器进程来为其提供服务。
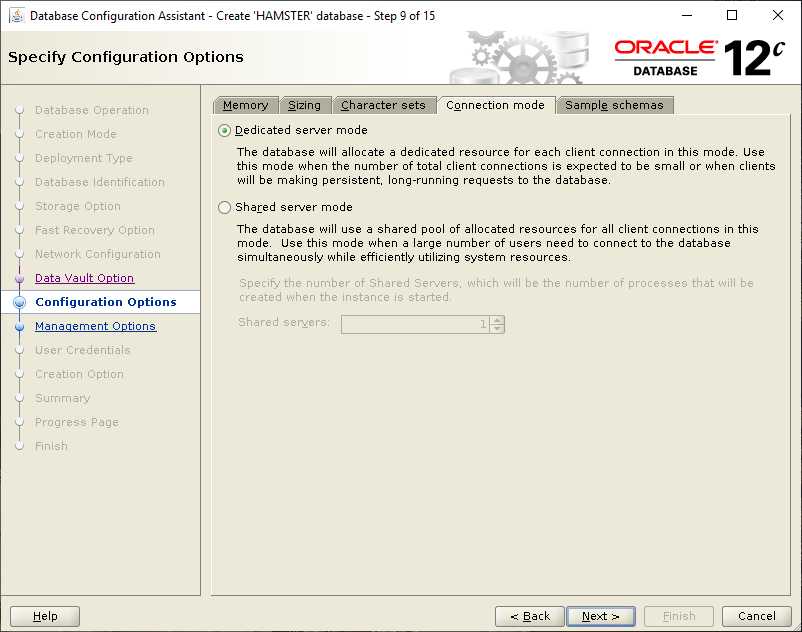
Listener收到来自user process的请求后,生成server process来提供服务, server process的配置有2种模式:
- 专有模式:每个user process都有单独的server process来建立session提供服务,专有模式是Oracle的缺省模式,大部分的数据库都是这种模式。
- 共享模式:Listener把请求放入请求队列中, 分配器(dispatch)会不停的查询请求队列,当发现有请求时就把请求转给server process,再通过server process提供服务,处理完后反馈给响应队列,dispatch再把响应队列中的数据转发给用户进程。类似于去饭馆吃饭,server process相当于厨师, dispatch相当于服务员,服务员接受请求并转发给相应的空闲厨师提供服务,厨师做好的菜放在哪儿,服务员再端给客户。这种模式用的不多。
注册:
注册就是将数据库作为一个服务注册到监听程序。客户端和数据库服务器建立连接时,监听程序通过已注册的服务名监听客户端的连接。启动数据库时,默认有两条信息注册到监听器中,分别为数据库服务器对应的实例和服务。通过对外提供的服务名,客户端不需要知道数据库名和实例名,只需知道该数据库对应的服务名就可以实现对数据库的连接,该服务名可能与实例名相同,也可以不相同。
服务:
Listener的服务有两种:
- 动态注册的服务: Oracle实例启动后,由实例向Listener注册的服务。
- 静态注册的服务:Listener启动时,通过读取listener.ora中的配置而注册的服务。
运行lsnrctl status 命令:
service的结果中,可以区分这两种服务。在结果中显示实例状态为“READY”或“BLOCKED”的服务为动态注册的监听服务;而显示状态为“UNKNOWN”的服务,为静态注册的监听服务。
7.1.静态注册
实例启动时读取文件$ORACLE_HOME/network/admin/listener.ora文件的配置,将实例和服务注册到监听程序。
实例启动时,读取listener.ora中的配置完成服务注册,并没有与Oracle实例进行交互,所以,在Listener中能看到静态服务,并不代表此服务可用。
通过lsnrctl status我们可以看到unknown状态的侦听是静态注册的侦听,因为它无法知道当前instance的状态。
若此时Oracle实例未启动,客户端请求此服务时就会报ORA-01034和ORA-27101的错误。
7.1.1.listener.ora
cd $TNS_ADMIN
vi listener.ora

LISTENER=(ADDRESS_LIST=(ADDRESS=(PROTOCOL=tcp)(HOST=192.168.138.9)(PORT=1521)))

SID_LIST_LISTENER =
(SID_LIST=
    (SID_DESC=
        (GLOBAL_DBNAME=HAMSTER)
        (SID_NAME=HAMSTER)
    )
)
7.1.2.tnsnames.ora
cd $TNS_ADMIN
vi tnsnames.ora
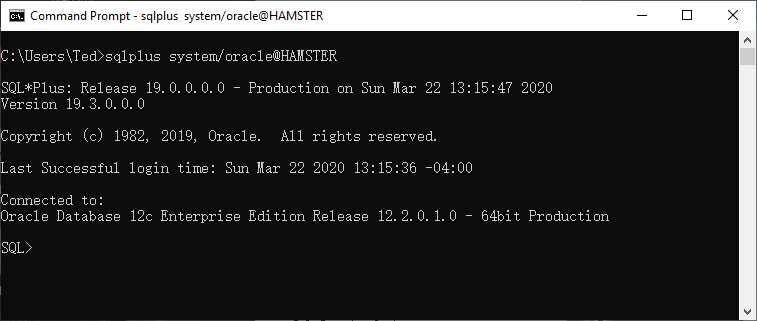
HAMSTER =
(DESCRIPTION =
(ADDRESS_LIST =
(ADDRESS = (PROTOCOL = TCP)(HOST = 192.168.138.9)(PORT = 1521))
)
(CONNECT_DATA =
(SERVICE_NAME = HAMSTER)
)
)
listener.ora文件中的GLOBAL_DBNAME对应于实例对外提供的服务名。如果GLOBAL_DBNAME = HAMSTER03,那么tnsnames.ora文件中的SERVICE_NAME = HAMSTER03。
listener.ora:GLOBAL_DBNAME = tnsnames.ora:SERVICE_NAME
GLOBAL_DBNAME 和数据库实例参数 global_name 不是一个概念:
global_name一般设置为instance_name.db_domain, 例如:
instance_name为orcldb
db_domain为sample
global_name为orcldb.sample
7.1.3.sqlnet.ora
cd $TNS_ADMIN
vi sqlnet.ora

NAMES.DIRECTORY_PATH=(TNSNAMES,EZCONNECT)

ADR_BASE = /oracle/app/oracle
7.2.动态注册
7.2.1.动态注册到默认端口
动态注册是在实例启动的时候,使用命令Alter system register,或每隔一分钟,PMON进程会向监听进行动态注册,PMON进程根据init.ora中的instance_name,service_names两个参数将实例和服务动态注册到Listener中。
实例启动的时候,向Listener进行动态注册,告知Listener已经启动的instance name和service names。
Listener会在刚启动后的一段时间内(大约不到1分钟)无法得知实例的状态:
The listener supports no services
只有等待pmon进程动态注册完成后,再次运行lsnrctl status命令,才会显示service names 信息。
如果init.ora中的instance_name,service_names两个参数没有指定值,那么系统将取默认值,注册到Listener中的实例名将取init.ora文件中的db_name值,服务名将取init.ora文件中的db_name+db_domain值。
参数文件中指定service_names(多个服务名vmdb,sn01,sn02),数据库实例启动后,会根据参数文件的service_names以及instance_name动态注册到Listener,例如:
SQL> show parameter service_names;
 NAME                     TYPE     VALUE
------------------------------------ ----------- ------------------------------
service_names                 string     vmdb,sn01,sn02
SQL> show parameter instance_name;
NAME                     TYPE     VALUE
------------------------------------ ----------- ------------------------------
instance_name                 string     vmdb
添加的service name可以手工注册,例如:
SQL> alter system set service_names = 'vmdb,sn01,sn02,sn03' scope=both;
SQL> alter system register;
7.2.2.动态注册到非默认端口
如果要向非默认监听注册,则要修改相应系统参数。将要监听的信息添加到tnsnames.ora文件(pmon动态注册监听时从tnsnames.ora文件读取信息)。
对于专用服务器模式:
LOCAL_LISTENER=listener_alias
对于共享服务器模式:
DISPATCHERS="(PROTOCOL=tcp)(LISTENER=listener_alias)"
例如对于专用服务器模式,监听端口1522:
1.修改listener.ora文件监听器的监听端口
LISTENER =
   (DESCRIPTION =
       (ADDRESS = (PROTOCOL = TCP)(HOST = CentOS)(PORT = 1522))
   )
2.修改tnsnames.ora,设置pmon动态注册的目标端口
listener_alias =
    (DESCRIPTION =
        (ADDRESS = (PROTOCOL = TCP)(HOST = CentOS)(PORT = 1522))
    )
3.修改参数LOCAL_LISTENER
alter system set local_listener=listener_alias;
alter system register;
4.查看监听状态
[oracle@CentOS admin]$ lsnrctl status

LSNRCTL for Linux: Version 11.2.0.1.0 - Production on 31-MAR-2018 06:55:42

Copyright (c) 1991, 2009, Oracle.  All rights reserved.

Connecting to (DESCRIPTION=(ADDRESS=(PROTOCOL=TCP)(HOST=CentOS)(PORT=1522)))
STATUS of the LISTENER
------------------------
Alias                     LISTENER
Version                   TNSLSNR for Linux: Version 11.2.0.1.0 - Production
Start Date                31-MAR-2018 06:55:14
Uptime                    0 days 0 hr. 0 min. 28 sec
Trace Level               off
Security                  ON: Local OS Authentication
SNMP                      OFF
Listener Parameter File   /u01/app/oracle/product/11.2.0/dbhome_1/network/admin/listener.ora
Listener Log File         /u01/app/oracle/diag/tnslsnr/CentOS/listener/alert/log.xml
Listening Endpoints Summary...
  (DESCRIPTION=(ADDRESS=(PROTOCOL=tcp)(HOST=CentOS)(PORT=1522)))
Services Summary...
Service "sn01" has 1 instance(s).
  Instance "vmdb", status READY, has 1 handler(s) for this service...
Service "sn02" has 1 instance(s).
  Instance "vmdb", status READY, has 1 handler(s) for this service...
Service "sn03" has 1 instance(s).
  Instance "vmdb", status UNKNOWN, has 1 handler(s) for this service...
Service "vmdb" has 1 instance(s).
  Instance "vmdb", status READY, has 1 handler(s) for this service...
Service "vmdbXDB" has 1 instance(s).
  Instance "vmdb", status READY, has 1 handler(s) for this service...
The command completed successfully
7.3.静态注册与动态注册的区别
动态注册只会在PMON进程启动时才会自动将服务注册到监听器(一般在启动一分钟内完成注册),如果此时监听器未启动,则动态注册失败,此时如果再启动监听器,依然不会有动态注册信息。
静态注册与实例是否启动无关,启动监听器时会读取listener.ora文件进行静态注册,此时即便数据库未启动,监听状态依然能看到静态注册信息。重启监听器也一样,只会进行静态注册,所以可能导致动态注册信息丢失。
动态注册默认只注册到默认的监听器(名称LISTENER,端口1521,协议TCP),否则PMON不能动态注册listener,除非修改参数local_listener。
7.4.Test
客户端可以安装Oracle instant client进行测试。
7.5.常用命令
启动Listener**
lsnrctl start <Listener的名字>
// 启动名为LISTENER的监听器
lsnrctl start LISTENER
关闭Listener
lsnrctl stop <Listener的名字>
// 关闭名为LISTENER的Listener
lsnrctl stop LISTENER
查看Listener的状态
lsnrctl status <Listener的名字>
// 查看名为LISTENER的Listener的运行状态
lsnrctl status LISTENER
tnsping命令
tnsping <客户端配置的别名>
// 判断是否连通db_alias别名对应服务器上的数据库
tnsping db_alias