Oracle Lab – 12c RAC Installation
1.软件下载
Linux:
Oracle Linux 7.4 UEK(Unbreakable Enterprise Kernel)
V921569-01-7.4.0.0.0-x86_64.iso
ASM:
kmod-oracleasm-2.0.8-26.el7.x86_64.rpm
oracleasmlib-2.0.12-1.el7.x86_64.rpm
oracleasm-support-2.1.11-2.el7.x86_64.rpm
Grid:
Grid version 12.2.0.1
linuxx64_12201_grid_home.zip
Database:
Database Software 12.2.0.1
linuxx64_12201_database.zip
2.VMware Workstation配置
2.1.VMware配置
RAC1 和 RAC2 的配置一样,RAM 4GB,HDD 40GB

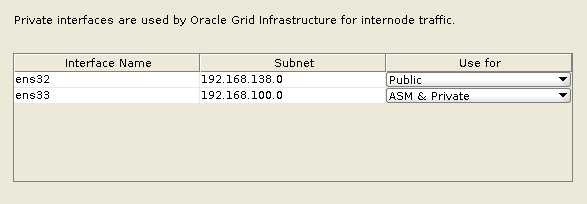
2.2.网络配置
2.3.网络配置
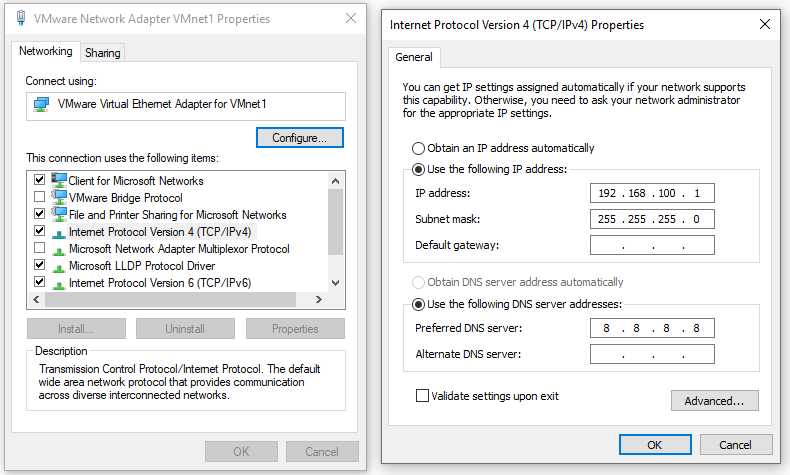
VMware Network Adapter VMnet1 (Host Only)
VMware Network Adapter VMnet8 (NAT)

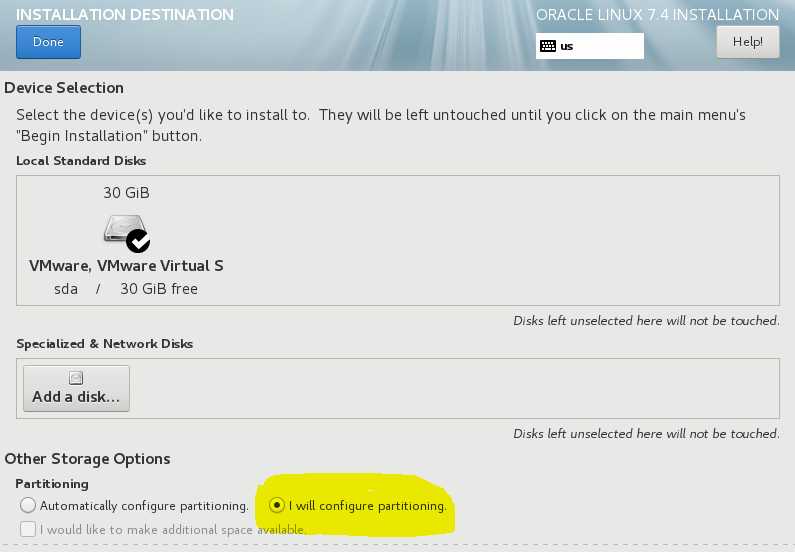
3.安装Linux
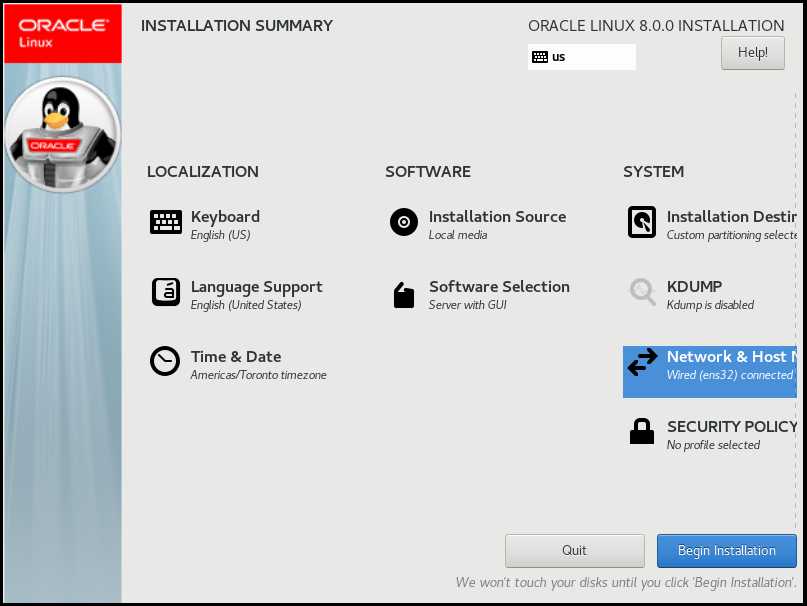
3.1.开始安装
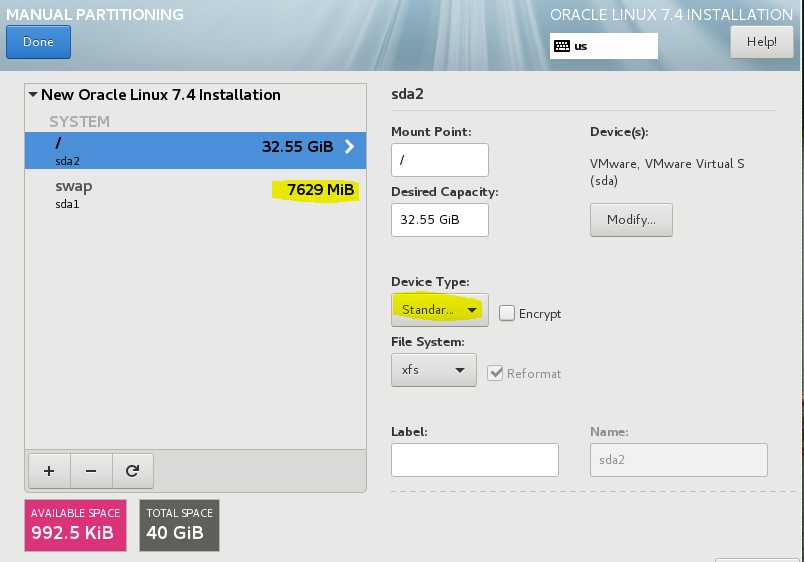
3.2.分区
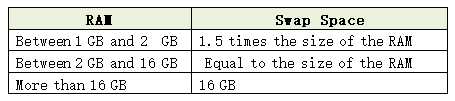
Swap分区为8GB,剩余的分给根目录
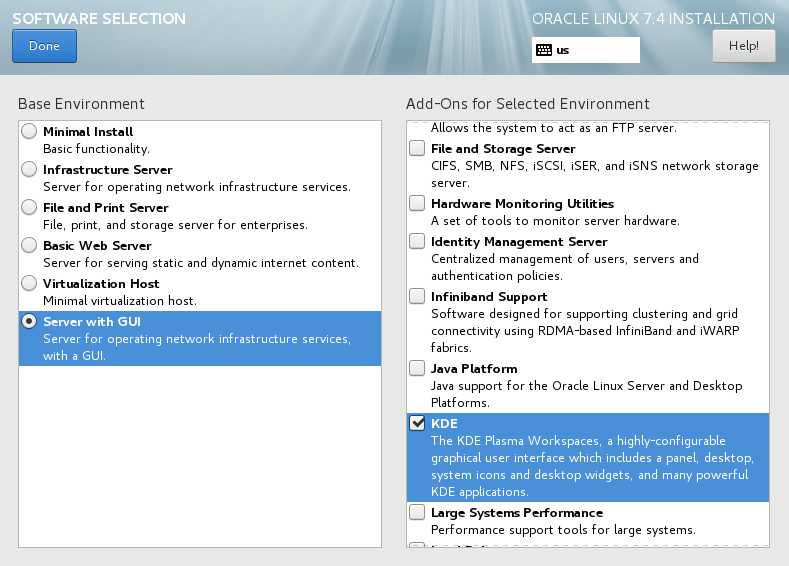
3.3.选择组件
Software Selection: Server with GUI, KDE
关闭KDUMP
3.4.关闭图形界面
systemctl set-default multi-user.target
3.5.修改网卡配置文件
如果网卡已经成功启动,请跳过这一步。
ens32(host only)网卡不要设置Gateway,也不要设置DNS
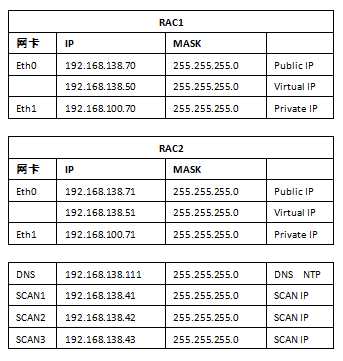
RAC1:
/etc/sysconfig/network-scripts/ifcfg-ens32
TYPE=Ethernet
BOOTPROTO=none
DEFROUTE=yes
IPV4_FAILURE_FATAL=no
IPV6INIT=no
NAME=ens32
UUID=3d5f1c9d-e3f1-4c98-a15e-f6ac292fd456
DEVICE=ens32
ONBOOT=yes
IPADDR=192.168.138.70
NETMASK=255.255.255.0
PREFIX=24
GATEWAY=192.168.138.254
DNS1=8.8.8.8
PROXY_METHOD=none
BROWSER_ONLY=no

/etc/sysconfig/network-scripts/ifcfg-ens33:
TYPE=Ethernet
BOOTPROTO=none
DEFROUTE=yes
IPV4_FAILURE_FATAL=no
IPV6INIT=no
NAME=ens33
UUID=6ec82100-e10f-4a87-87aa-3d85daba584b
DEVICE=ens33
ONBOOT=yes
IPADDR=192.168.100.70
NETMASK=255.255.255.0
PREFIX=24
RAC2:
/etc/sysconfig/network-scripts/ifcfg-ens32
TYPE=Ethernet
BOOTPROTO=none
DEFROUTE=yes
IPV4_FAILURE_FATAL=no
IPV6INIT=no
NAME=ens32
UUID= a47072c4-354c-4192-9435-2bcdaa63b6e8
DEVICE=ens32
ONBOOT=yes
IPADDR=192.168.138.71
NETMASK=255.255.255.0
PREFIX=24
GATEWAY=192.168.138.254
DNS1=8.8.8.8
PROXY_METHOD=none
BROWSER_ONLY=no

/etc/sysconfig/network-scripts/ifcfg-ens33:
TYPE=Ethernet
BOOTPROTO=none
DEFROUTE=yes
IPV4_FAILURE_FATAL=no
IPV6INIT=no
NAME=ens33
UUID= 5b9f85ef-93a5-40b1-8761-46fa0baf811d
DEVICE=ens33
ONBOOT=yes
IPADDR=192.168.100.71
NETMASK=255.255.255.0
PREFIX=24
3.6.关闭防火墙
systemctl disable firewalld
systemctl status firewalld
3.7.设置SELinux
vi /etc/selinux/config
SELINUX=disabled
sestatus
reboot
3.8.删除virbr0虚拟网卡
ifconfig virbr0 down
brctl delbr virbr0   //删除网桥
systemctl disable libvirtd.service    //禁用libvirtd服务开机自启动
systemctl mask libvirtd.service
3.9.关闭avahi-daemon进程
systemctl stop avahi-daemon
systemctl disable avahi-daemon
systemctl list-unit-files|grep avah
3.10.安装FTP
yum -y install vsftpd
systemctl start vsftpd.service
systemctl enable vsftpd.service
3.11.hosts 文件
配置DNS后不需要在主机文件中配置SCAN, 也不需要配置Public IP, Vurtual IP 和Private IP。
vi /etc/hosts
#eth0 Public IP
#192.168.138.70 rac1.lab.com rac1
#192.168.138.71 rac2.lab.com rac2

#Virtual IP
#192.168.138.50 rac1-vip.lab.com rac1-vip
#192.168.138.51 rac2-vip.lab.com rac2-vip

#eth1 Private IP
#192.168.100.70 rac1-priv.lab.com rac1-priv
#192.168.100.71 rac2-priv.lab.com rac2-priv

#Scan IP
3.12.主机名
/etc/sysconfig/network
NETWORKING=yes
NETWORKING_IPv6=no
HOSTNAME=rac1.lab.com
NOZEROCONF=yes  #开机是否激活网络
4.Oracle软件安装准备
4.1.安装RPM包
yum install compat-libstdc++-33.i686 -y
yum install compat-libstdc++-33.x86_64 -y
yum install compat-libcap1.i686 -y
yum install compat-libcap1.x86_64 -y
yum install gcc.x86_64 -y
yum install ksh.x86_64 -y
yum install libaio-devel.i686 -y
yum install libaio-devel.x86_64 -y
yum install libstdc++-devel.i686 -y
yum install libstdc++-devel.x86_64 -y
yum install unixODBC-devel.i686 -y
yum install unixODBC-devel.x86_64 -y
yum install unixODBC.i686 -y
yum install unixODBC.x86_64 -y
4.2.安装rlwrap 工具
rpm -qa | grep readline
yum search readline
yum -y install readline-devel

tar zxvf rlwrap-0.43.tar.gz
cd rlwrap-0.43
./configure
make
make install
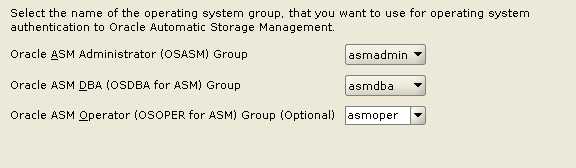
4.3.用户,组,安装目录
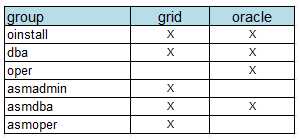
groupadd oinstall
groupadd dba
groupadd oper
groupadd asmadmin
groupadd asmdba
groupadd asmoper

useradd -g oinstall -G dba,asmadmin,asmdba,asmoper grid
usermod -g oinstall -G dba,oper,asmdba oracle
passwd grid
4.4.Linux内核参数
vi /etc/sysctl.conf

kernel.shmmax = 68719476736
kernel.shmall = 4294967296
kernel.shmmni = 4096
kernel.sem = 250 32000 100 128

fs.aio-max-nr = 1048576
fs.file-max = 6815744

net.ipv4.ip_local_port_range = 9000 65500
net.core.rmem_default = 262144
net.core.rmem_max = 4194304
net.core.wmem_default = 262144
net.core.wmem_max = 1048576

sysctl -p
4.5./etc/security/limits.conf
vi /etc/security/limits.conf

grid soft nproc 2047
grid hard nproc 16384
grid soft nofile 1024
grid hard nofile 65536
grid soft stack 10240
grid hard stack 32768
oracle soft nproc 2047
oracle hard nproc 16384
oracle soft nofile 1024
oracle hard nofile 65536
oracle soft stack 10240
oracle hard stack 32768
4.6./etc/profile
vi /etc/profile

if [ #USER = "oracle" ] || [ #USER = "grid" ] ; then
    if [ $SHELL = "/bin/ksh" ] ; then
        ulimit -p 16384
        ulimit -n 65536
    else
        ulimit -u 16384 -n 65536
    fi
    umask 022
fi
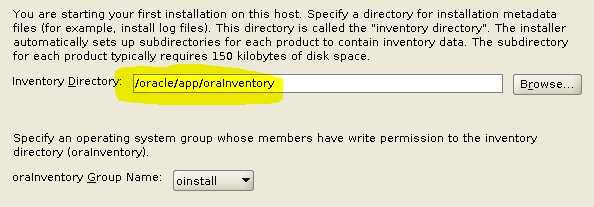
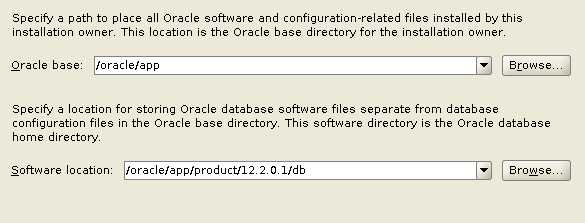
4.7.Prepare directory
Grid Infrastructure:
HOME=/home/grid
ORACLE_BASE=/oracle/app/grid
ORACLE_HOME=/oracle/app/12.2.0.1/grid
Oracle Database:
HOME=/home/oracle
ORACLE_BASE=/oracle/app
ORACLE_HOME=/oracle/app/oracle/product/12.2.0.1/db
[root@rac1 /]# cd /
[root@rac1 /]# mkdir -p /oracle/app/oracle/product/12.2.0.1/db
[root@rac1 /]# chown -R oracle:oinstall /oracle
[root@rac1 /]# chmod -R 775 /oracle

[root@rac1 /]# su – grid
[grid@rac1 12.2.0.1] cd /oracle/app
[grid@rac1 12.2.0.1] mkdir grid
[grid@rac1 12.2.0.1] chmod 775 grid

[grid@rac1 12.2.0.1] cd /oracle/app/
[grid@rac1 12.2.0.1] mkdir –p ./12.2.0.1/grid
[grid@rac1 12.2.0.1] chmod –R 775 ./12.2.0.1
4.8.grid用户 profile
登录grid (RAC1的 ORACLE_SID=+ASM1, RAC2的是+ASM2)
vi .bash_profile
export ORACLE_SID=+ASM1;
export ORACLE_BASE=/oracle/app/grid
export ORACLE_HOME=/oracle/app/12.2.0.1/grid
export GRID_HOME=/oracle/app/12.2.0.1/grid
export TNS_ADMIN=#GRID_HOME/network/admin
export LD_LIBRARY_PATH=#ORACLE_HOME/lib:#LD_LIBRARY_PATH
export NLS_LANG=AMERICAN_AMERICA.AL32UTF8

export PATH=#ORACLE_HOME/bin:#PATH

export DISPLAY=localhost:10.0

export PS1='[\u@\h:`pwd`]$'

alias sqlplus='rlwrap sqlplus'
alias rman='rlwrap rman'
alias ggsci='rlwrap ggsci'
4.9.oracle用户 profile
登录oracle (RAC1的 ORACLE_SID= RABBIT1, RAC2的是+ RABBIT2)
vi .bash_profile
export ORACLE_SID=RABBIT1
export ORACLE_UNQNAME=RABBIT
export ORACLE_BASE=/oracle/app/oracle
export ORACLE_HOME=/oracle/app/oracle/product/12.2.0.1/db
export GRID_HOME=/oracle/app/12.2.0.1/grid
export TNS_ADMIN=#GRID_HOME/network/admin
export LD_LIBRARY_PATH=#ORACLE_HOME/lib:#LD_LIBRARY_PATH
export NLS_LANG=AMERICAN_AMERICA.AL32UTF8

export PATH=#ORACLE_HOME/bin:#PATH

export DISPLAY=localhost:10.0

export PS1='[\u@\h:`pwd`]$'

alias sqlplus='rlwrap sqlplus'
alias rman='rlwrap rman'
alias ggsci='rlwrap ggsci'
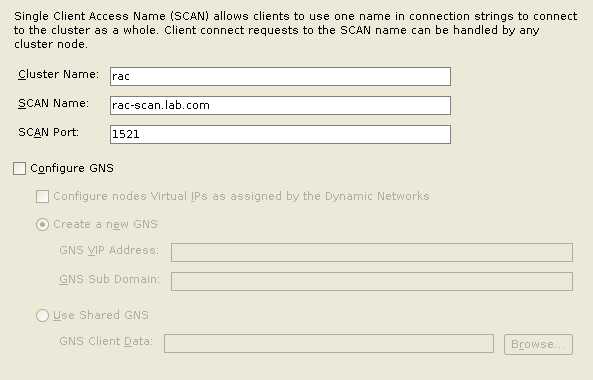
5.配置SCAN
5.1.SCAN简介
从Oracle 11gR2开始,引入SCAN(Single Client Access Name) IP的概念,相当于在客户端和数据库之间增加一层虚拟的网络服务层,即是SCAN IP和SCAN Listener。在客户端的tnsnames.ora配置文件中,只需要配置SCAN IP的配置信息即可,客户端通过SCAN IP、SCAN IP Listener来访问数据库。同之前各版本的RAC相比,使用SCAN IP的好处就是,当后台RAC数据库添加、删除节点时,客户端配置信息无需修改。可以通过配置DNS服务器或GNS来配置SCAN。
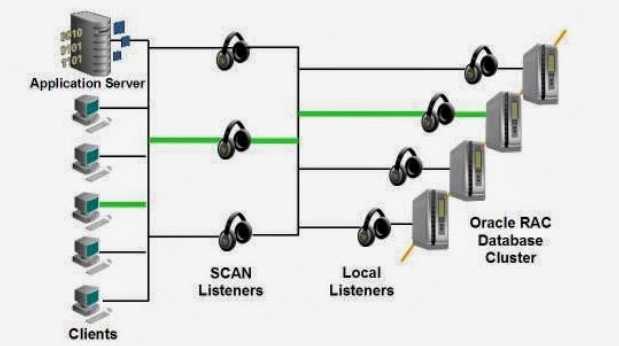
Clients are connected to the scan listeners in the first place. There are multiple scan listeners listen multiple scan IP address in the cluster. All the database services are registered with the Scan listeners.
Client sends its connection request to a scan listener.
Note that: Client only knows the scan name. DNS redirects the connection request to one of the scan listeners in the cluster. Once the scan listener takes the client’s connection request, it sends back one of the local listener’s (least crowded node) address to the client. The local listener information belongs to the local listener which services for the service name that the client requested. Then the client and local listener communicate between each other and the connection becomes established.
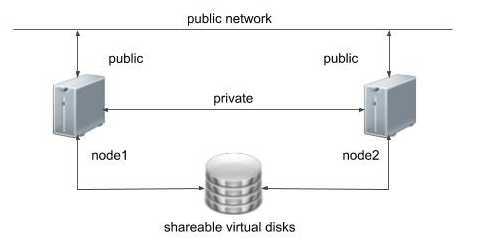
client -> scan listener -> local listener -> local instance
The following picture represents the interprocess communication between Listeners and Oracle Instance in a RAC environment.
In a 2-node RAC environment (like an Exadata Quarter Machine) we have 3 scan listeners and 2 local listeners. Scan listeners register the database services via IPC/TCP through PMON and Local listeners registers both the database and ASM instances via IPC/TCP through PMON.
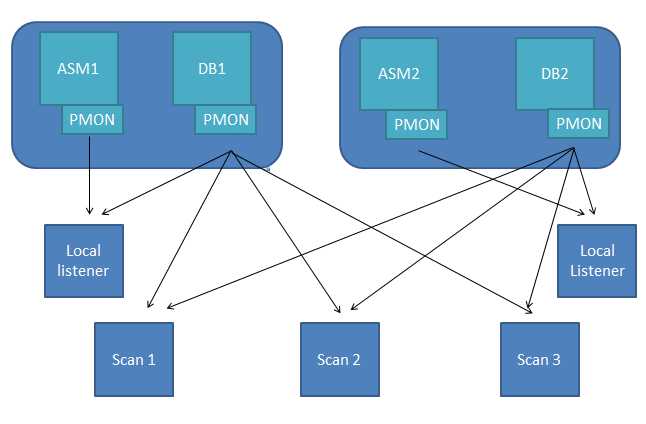
Both remote and local listeners are started from the Grid Home and when look into the listener processes, they use the same binaries.
[oracle@rac1:/home/oracle]$ps -ef |grep inherit|grep -v 'grep'
grid      19097      1  0 13:35 ?  00:00:03 /oracle/app/12.2.0.1/grid/bin/tnslsnr ASMNET1LSNR_ASM -no_crs_notify -inherit
grid      72258      1  0 14:42 ?  00:00:00 /oracle/app/12.2.0.1/grid/bin/tnslsnr LISTENER_SCAN1 -no_crs_notify –inherit
Furthermore “oraagent” process manages these listeners. Actually, oraagent process starts a bunch of grid components such as Clustered ASM instance, ONS, eONS, SCAN LISTENER and LOCAL LISTENER.
[oracle@rac1:/home/oracle]$ps -ef |grep oraagent|grep -v 'grep'
grid       2047      1  0 09:29 ?        00:02:58 /oracle/app/12.2.0.1/grid/bin/oraagent.bin
grid      28482      1  2 13:40 ?        00:02:08 /oracle/app/12.2.0.1/grid/bin/oraagent.bin
oracle    67896      1  0 14:36 ?        00:00:08 /oracle/app/12.2.0.1/grid/bin/oraagent.bin
5.2.安装DNS软件包
DNS服务器的IP地址是192.168.138.200
需要安装的包: bind 、 bind-chroot 、bind-utils
yum install bind.x86_64 bind-chroot.x86_64 –y
[root@columbus/home/oracle]$rpm -qa|grep "^bind"
bind-libs-9.11.4-9.P2.el7.x86_64
bind-libs-lite-9.11.4-9.P2.el7.x86_64
bind-utils-9.11.4-9.P2.el7.x86_64
bind-export-libs-9.11.4-9.P2.el7.x86_64
bind-9.11.4-9.P2.el7.x86_64
bind-license-9.11.4-9.P2.el7.noarch
bind-chroot-9.11.4-9.P2.el7.x86_64
5.3.修改/etc/named.conf主配置文件
/etc/named.conf是主配置文件,用于配置全局选项以及创建查找区域。比如要创建一个linuxe.cn的查找区域就需要在该配置文件中完成。为避免主配置文件过于臃肿,还有一个/etc/named.rfc1912.zones文件被包含进主配置文件,所以要新增查找区域的话推荐在该文件中配置。
listen-on port 53 { any; };    #监听端口
allow-query     { any; };      #查询地址
在session-keyfile这行后面添加:
forwarders { 8.8.8.8; };
/var/named/:存放区域配置文件的目录,每个域的zone文件(就是详细的解析信息文件)默认否存放于此。
5.4.修改/etc/named.rfc1912.zones
添加:
zone "lab.com" IN {
        type master;
        file "lab.com.zone";
        allow-update { none; };
};

zone "100.168.192.in-addr.arpa" IN {
        type master;
        file "100.168.192.arpa";
        allow-update { none; };
};
5.5.修改/var/named/lab.com.zone
vi  /var/named/lab.com.zone
TTL    3600
@      IN    SOA  dns.lab.com.  root.lab.com. (
                          2020030401     ; #serial序列号,标识是第几个版本
                          1D             ; #refresh刷新时间
                          1H             ; #retry重试时间
                          1W             ; #expire过期时间
                          3H)            ; #否定回答时间
           IN     NS      dns.lab.com.
dns        IN     A       192.168.138.111
rac1       IN     A       192.168.138.70
rac2       IN     A       192.168.138.71
rac1-priv  IN     A       192.168.100.70
rac2-priv  IN     A       192.168.100.71
rac1-vip   IN     A       192.168.138.50
rac2-vip   IN     A       192.168.138.51
rac-scan   IN     A       192.168.138.41
rac-scan   IN     A       192.168.138.42
rac-scan   IN     A       192.168.138.43TTL   86400  :-- 最小的存活的时间是86400S(24H)
@    IN SOA  SOA  dns.lab.com.  root.lab.com.(
       --这是一笔SOA记录,只允许存在一个SOA记录
@:代表要解析的这个域本身(lab.com)
IN:Internet记录。
SOA: 是初始授权记录,指定网络中第一台DNS Server。
dns.lab.com:  DNS服务器的名字。
root.lab.com: 是指管理员的邮箱。
区域解析库文件:每个域名都有一个自己的区域解析库文件(zone文件),由一条条资源记录来定义具体指向
SOA记录:起始授权记录,一个区域解析库只能有一个SOA记录,而且必须为第一条。打个比方,建了个海岛,需要对外宣布世界上多了一个海岛,这个事情就是SOA在做
NS记录:域名服务记录,一个区域解析库可以有多个NS记录,其中一个为主服务器。结合上面的例子,NS记录可以理解为用来宣布岛主是谁
A记录:地址记录,从域名解析为IP的记录
AAAA:IPv6的地址记录
PRT:反向解析记录,从IP解析为域名
MX:邮件交换记录。我们平时发邮件都是直接发到qq.com、163.com等域名上,但是这些域名肯定是有多台服务器的,MX记录就是指明了哪个服务器会负责邮件。MX服务可以存在多个,由优先级来区分先后,0-99,数字越小优先级越高
CNAME记录:给一个地址设置一个别名

这部分主要是用来配置主DNS和辅助DNS同步用的.
42:   序列号,当主DNS数据改变时,这个序列号就要被增加1,而辅助DNS通过序列号来和主DNS同步。
3H    刷新,主DNS和辅助DNS每隔三小时同步一次。
15M   重试,3H之内,没有同步,每隔15M在尝试同步
1W    过期,1W之内,还没有同步,就不同步了
1D     生存期,没有这条记录,缓存的时间。
@     IN  NS    dns.lab.com.   这是一笔NS记录,指定nameserver为dns.lab.com
5.6.修改100.168.192.arpa
vi /var/named/100.168.192.arpa
$TTL    86400
@               IN SOA  dns.lab.com.      root.lab.com. (
                                      1997022700 ; Serial
                                      28800      ; Refresh
                                      14400      ; Retry
                                      3600000    ; Expire
                                      86400)     ; Minimum
      IN       NS     dns.lab.com.
70    IN      PTR     rac1.lab.com.
71    IN      PTR     rac2.lab.com.
50    IN      PTR     rac1-vip.lab.com.
51    IN      PTR     rac2-vip.lab.com.
41    IN      PTR     rac-scan.lab.com.
42    IN      PTR     rac-scan.lab.com.
43    IN      PTR     rac-scan.lab.com.
5.7.检查配置文语法
[root@columbus/var/named]#named-checkconf /etc/named.conf
[root@columbus/var/named]#named-checkzone zonename lab.com.zone
zone zonename/IN: loaded serial 42
OK

[root@webserver ~]# netstat -anp|grep :53
tcp        0      0 192.168.100.111:53      0.0.0.0:*               LISTEN                           852/named
tcp        0      0 127.0.0.1:53            0.0.0.0:*               LISTEN                           852/named
tcp6       0      0 ::1:53                  :::*                    LISTEN                           852/named
udp        0      0 192.168.100.111:53      0.0.0.0:*                                                852/named
udp        0      0 127.0.0.1:53            0.0.0.0:*                                                852/named
udp6       0      0 ::1:53                  :::*                                                     852/named
5.8.启动dns服务
systemctl start named
systemctl restart named
systemctl enable named
5.9.验证DNS配置
RAC1:
vi /etc/resolv.conf
domain lab.com
nameserver 192.168.138.111
options rotate
options timeout:2
options attempts:5

[root@rac1 ~]# nslookup rac-scan.lab.com
Server:         192.168.138.111
Address:        192.168.138.111#53

Name:   rac-scan.lab.com
Address: 192.168.138.41
Name:   rac-scan.lab.com
Address: 192.168.138.43
Name:   rac-scan.lab.com
Address: 192.168.138.42
RAC2:
vi /etc/resolv.conf
domain lab.com
nameserver 192.168.100.111
options rotate
options timeout:2
options attempts:5

[root@rac2 ~]# nslookup rac-scan.lab.com
Server:         192.168.138.111
Address:        192.168.138.111#53

Name:   rac-scan.lab.com
Address: 192.168.138.41
Name:   rac-scan.lab.com
Address: 192.168.138.43
Name:   rac-scan.lab.com
Address: 192.168.138.42
5.10.在客户端连接该集群
设置系统环境变量: TNS_ADMIN
连接测试:
SQL> conn hr/oracle@RABBIT
6.配置SSH
6.1.解压缩grid安装包
cd /oracle/home
unzip linuxx64_12201_grid_home.zip -d /oracle/product/12.2.0.1/grid
6.2.sshUserSetup.sh
RAC1:
grid用户:
su – grid
cd /u01/app/12.2.0/grid/deinstall
./sshUserSetup.sh -user grid -hosts "rac1 rac2 rac1-priv rac2-priv" -advanced –noPromptPassphrase
oracle用户:
su - oracle
cd /u01/app/12.2.0/grid/deinstall
./sshUserSetup.sh -user oracle -hosts "rac1 rac2 rac1-priv rac2-priv" -advanced –noPromptPassphrase
RAC2:
操作类似RAC1
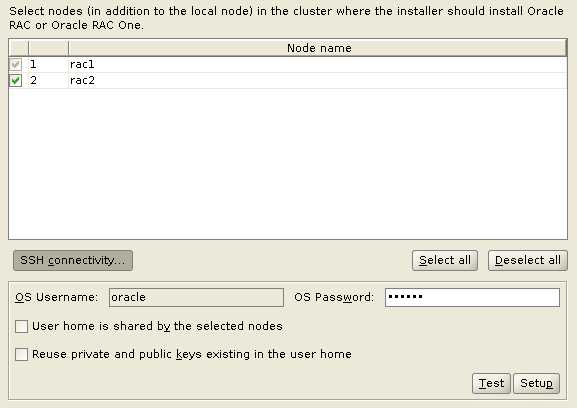
6.3.测试
RAC1:
ssh rac2 date
ssh rac2-priv date
RAC2:
ssh rac1 date
ssh rac1-priv date
7.NTP服务
7.1.NTP简介
Oracle是用SCN来记录数据库事务操作的, SCN就是时间戳。设想:RAC中如果节点间的时间有差别,可能导致数据不一致。因此,如果出现节点时间不一致,就会导致集群重构(让某个节点重启)。一个大幅度的时间跳跃也会让集群认为发生了节点挂起,触发节点fencing. 因此,对RAC时间同步是非常有必要的。也可以使用GRID自己提供的时间同步服务。
7.2.查看系统中是否安装了NTP包
rpm -q ntp
7.3.安装NTP包
yum install ntp ntpdate -y
再次查看
rpm -q ntp
7.4.在主节点上配置时间服务器(服务端配置)
vi /etc/ntp.conf
在restrict指定的两行下面追加一行
#只允许192.168.100.*网段的客户机进行时间同步
restrict 192.168.138.0  mask 255.255.255.255 nomodify notrap
不要注释以下4行:
server 0.rhel.pool.ntp.org iburst
server 1.rhel.pool.ntp.org iburst
server 2.rhel.pool.ntp.org iburst
server 3.rhel.pool.ntp.org iburst
添加:
server 127.127.1.0  #当所有服务器都不能使用时,使用本机作为同步服务器
fudge 127.127.1.0 stratum 10
7.5.在其他机器上配置(客户端配置)
同样执行上面的一些命令对ntp进行安装、启动、自启配置、状态查看等操作,
配置文件依然是:/etc/ntp.conf
在restrict指定的两行下面追加一行
#只允许192.168.100.*网段的客户机进行时间同步
restrict 192.168.138.0  mask 255.255.255.255 nomodify notrap
不要注释以下4行:
server 0.rhel.pool.ntp.org iburst
server 1.rhel.pool.ntp.org iburst
server 2.rhel.pool.ntp.org iburst
server 3.rhel.pool.ntp.org iburst
添加:
server 192.168.138.111 iburst
server 127.127.1.0  #当所有服务器都不能使用时,使用本机作为同步服务器
fudge 127.127.1.0 stratum 10
7.6.编辑两节点的ntpd参数
分别在节点1和节点2设置:
vi /etc/sysconfig/ntpd
#Set to 'yes' to sycn hw clock after successful ntpdate
SYNC_HWCLOCK=yes      #此选项用于自动校准系统时钟与硬件时钟
OPTIONS="-x -u ntp:ntp -p /var/run/ntpd.pid -g"
#在Linux系统中分为系统时钟和硬件时钟.
#系统时钟指当前Linux kernel中的时钟,而硬件时钟指的是BIOS时钟,由主板电池供电的那个时钟

#当Linux启动时,硬件时钟会读取系统时钟的设置,之后系统时钟就独立于硬件时钟运作
7.7.设置ntp为开机启动
systemctl is-enabled ntpd
结果为enabled或 disabled
设置开机启动
systemctl enable ntpd
启动, 停止,查看状态
systemctl start ntpd
systemctl status ntpd
systemctl stop ntpd
systemctl restart ntpd
7.8.重启ntp服务
service ntpd restart
7.9.与服务器同步
ntpdate 192.168.138.111
查看状态
ntpq –p
ntpstat
ntpq -c peers
7.10.cluvfy命令
安装grid软件后,可以运行以下命令检查ntp服务
cluvfy comp clocksync -n all
安装grid软件后,运行以下命令检查CTSS的运行模式
crsctl check ctss

run below command to verify NTP peers.
ntpq -pn
[root@rac1:/etc]#ntpq -pn
     remote           refid      st t when poll reach   delay   offset  jitter
==============================================================================
 162.159.200.1   10.14.8.68       3 u    2   64    1   66.442  43424.8   0.000
 207.34.49.172   .INIT.          16 u    -   64    0    0.000    0.000   0.000
 198.27.64.215   .INIT.          16 u    -   64    0    0.000    0.000   0.000
 192.168.138.200 .INIT.          16 u    -   64    0    0.000    0.000   0.000
 127.127.1.0     .LOCL.          10 l    -   64    0    0.000    0.000   0.000

[root@rac2 etc]# ntpq -pn
     remote           refid      st t when poll reach   delay   offset  jitter
==============================================================================
 162.159.200.1   10.14.8.68       3 u   48   64    1   55.937  43287.9  26.803
*205.206.70.2    206.108.0.131    2 u   54   64    3   87.066  43045.0  89.052
+154.11.146.39   172.21.138.4     2 u  112   64    2  106.391  43055.7  11.331
 127.127.1.0     .LOCL.          10 l  121   64    2    0.000    0.000   0.000
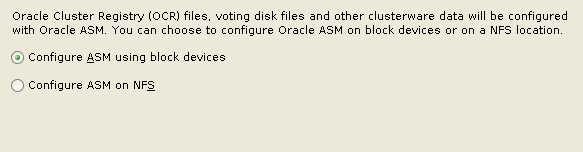
8.配置共享存储
8.1.GIMR
Oracle 12c R2 相比 Oracle 12c R1,GIMR 为必选项,给 OCR_VOTE 分配空间,如果不为 GIMR 单独指定空间,需要至少 38767M 的空间。
8.2.共享磁盘
打开Command Prompt窗口,CD到VMware安装目录,运行以下命令:
vmware-vdiskmanager.exe -c -s 20g -a lsilogic -t 2 D:\VMachines\Share\crs1.vmdk
vmware-vdiskmanager.exe -c -s 20g -a lsilogic -t 2 D:\VMachines\Share\crs2.vmdk
vmware-vdiskmanager.exe -c -s 10g -a lsilogic -t 2 D:\VMachines\Share\data.vmdk
vmware-vdiskmanager.exe -c -s 5g -a lsilogic -t 2 D:\VMachines\Share\fra.vmdk
8.3.虚拟机加载共享磁盘
关闭虚拟机,关闭RAC1和RAC2窗口
用记事本分别打开rac1.vmx和rac2.vmx
添加以下:
#shared disks configure
disk.locking = "FALSE"
diskLib.dataCacheMaxSize = "0"
diskLib.dataCacheMaxReadAheadSize = "0"
diskLib.dataCacheMinReadAheadSize = "0"
diskLib.maxUnsyncedWrites = "0"

scsi1.present = "TRUE"
scsi1.virtualDev = "lsilogic"
scsil.sharedBus = "VIRTUAL"

scsi1:0.present = "TRUE"
scsi1:0.mode = "independent-persistent"
scsi1:0.fileName = "D:\VMachines\Share\crs1.vmdk"
scsi1:0.deviceType = "disk"
scsi1:0.redo = ""

scsi1:1.present = "TRUE"
scsi1:1.mode = "independent-persistent"
scsi1:1.fileName = "D:\VMachines\Share\crs2.vmdk"
scsi1:1.deviceType = "disk"
scsi1:1.redo = ""

scsi1:2.present = "TRUE"
scsi1:2.mode = "independent-persistent"
scsi1:2.fileName = "D:\VMachines\Share\data.vmdk"
scsi1:2.deviceType = "disk"
scsi1:2.redo = ""

scsi1:3.present = "TRUE"
scsi1:3.mode = "independent-persistent"
scsi1:3.fileName = "D:\VMachines\Share\fra.vmdk"
scsi1:3.deviceType = "disk"
scsi1:3.redo = ""
8.4.重新打开虚拟机vmx文件
9.安装ASM
9.1.ASM安装包
[oracle@rac1/home/oracle]$yum search oracleasm
Loaded plugins: langpacks, ulninfo
============================ N/S matched: oracleasm ============================
kmod-oracleasm.x86_64 : oracleasm kernel module(s)
oracleasm-support.x86_64 : The Oracle Automatic Storage Management support
                         : programs.
9.2.安装oracleasm
yum -y install kmod-oracleasm.x86_64
yum -y install oracleasm-support.x86_64
rpm -ivh oracleasmlib-2.0.12-1.el7.x86_64.rpm
9.3.初始化ASM
 [root@rac1/home/oracle]$oracleasm configure -i
Configuring the Oracle ASM library driver.
This will configure the on-boot properties of the Oracle ASM library
driver.  The following questions will determine whether the driver is
loaded on boot and what permissions it will have.  The current values
will be shown in brackets ('[]').  Hitting <ENTER> without typing an
answer will keep that current value.  Ctrl-C will abort.

Default user to own the driver interface []: grid
Default group to own the driver interface []: asmadmin
Start Oracle ASM library driver on boot (y/n) [n]: y
Scan for Oracle ASM disks on boot (y/n) [y]: y
Writing Oracle ASM library driver configuration: done
[root@rac1/home/oracle]$oracleasm init
Creating /dev/oracleasm mount point: /dev/oracleasm
Loading module "oracleasm": oracleasm
Configuring "oracleasm" to use device physical block size
Mounting ASMlib driver filesystem: /dev/oracleasm
查看设置结果:
[root@rac1/home/oracle]$oracleasm configure
9.4.ASM磁盘分区(只需要在RAC1执行)
cd /dev
[root@rac1/dev]$ls -l sd*
brw-rw---- 1 root disk 8,  0 Feb 29 19:06 sda
brw-rw---- 1 root disk 8,  1 Feb 29 19:06 sda1
brw-rw---- 1 root disk 8,  2 Feb 29 19:06 sda2
brw-rw---- 1 root disk 8, 16 Feb 29 19:06 sdb
brw-rw---- 1 root disk 8, 32 Feb 29 19:06 sdc
brw-rw---- 1 root disk 8, 48 Feb 29 19:06 sdd
[root@rac1/dev]$fdisk sdb
Welcome to fdisk (util-linux 2.23.2).

Changes will remain in memory only, until you decide to write them.
Be careful before using the write command.

Device does not contain a recognized partition table
Building a new DOS disklabel with disk identifier 0x906c3ce9.

Command (m for help): m
Command action
   a   toggle a bootable flag
   b   edit bsd disklabel
   c   toggle the dos compatibility flag
   d   delete a partition
   g   create a new empty GPT partition table
   G   create an IRIX (SGI) partition table
   l   list known partition types
   m   print this menu
   n   add a new partition
   o   create a new empty DOS partition table
   p   print the partition table
   q   quit without saving changes
   s   create a new empty Sun disklabel
   t   change a partition's system id
   u   change display/entry units
   v   verify the partition table
   w   write table to disk and exit
   x   extra functionality (experts only)

Command (m for help): n
Partition type:
   p   primary (0 primary, 0 extended, 4 free)
   e   extended
Select (default p): p
Partition number (1-4, default 1): 1
First sector (2048-4194303, default 2048):
Using default value 2048
Last sector, +sectors or +size{K,M,G} (2048-4194303, default 4194303):
Using default value 4194303
Partition 1 of type Linux and of size 2 GiB is set

Command (m for help): w
The partition table has been altered!

Calling ioctl() to re-read partition table.
Syncing disks.
/dev/sdc, /dev/sdd执行相同的操作
9.5.创建ASM磁盘
只需要在RAC1执行
[root@rac1/dev]#ls -l sd*
brw-rw---- 1 root disk 8,  0 Feb 29 19:06 sda
brw-rw---- 1 root disk 8,  1 Feb 29 19:06 sda1
brw-rw---- 1 root disk 8,  2 Feb 29 19:06 sda2
brw-rw---- 1 root disk 8, 16 Mar  1 13:31 sdb
brw-rw---- 1 root disk 8, 17 Mar  1 13:31 sdb1
brw-rw---- 1 root disk 8, 32 Mar  1 13:34 sdc
brw-rw---- 1 root disk 8, 33 Mar  1 13:34 sdc1
brw-rw---- 1 root disk 8, 48 Mar  1 13:34 sdd
brw-rw---- 1 root disk 8, 49 Mar  1 13:34 sdd1
[root@rac1 dev]# oracleasm createdisk CRS1 sdb1
Writing disk header: done
Instantiating disk: done
[root@rac1 dev]# oracleasm createdisk CRS2 sdc1
Writing disk header: done
Instantiating disk: done
[root@rac1 dev]# oracleasm createdisk DATA sdd1
Writing disk header: done
Instantiating disk: done
[root@rac1 dev]# oracleasm createdisk FRA sde1
Writing disk header: done
删除磁盘命令,仅供参考:
oracleasm deletedisk CRS1
Instantiating disk: done
9.6.验证
[root@rac1/dev]#oracleasm scandisks
Reloading disk partitions: done
Cleaning any stale ASM disks...
Scanning system for ASM disks...
[root@rac1/dev]#oracleasm listdisks
DATA
FRA
OCR_VOTE

[root@rac2/home/oracle]#oracleasm scandisks
Reloading disk partitions: done
Cleaning any stale ASM disks...
Scanning system for ASM disks...
Instantiating disk "DATA"
Instantiating disk "FRA"
Instantiating disk "OCR_VOTE"
[root@rac2/home/oracle]$oracleasm listdisks
DATA
FRA
OCR_VOTE
10.预安装检查
If you do not use an Oracle Preinstallation RPM, and you want to use the Cluster Verification Utility, then you must install the cvuqdisk RPM.
Without cvuqdisk, Cluster Verification Utility cannot discover shared disks, and you receive the error message “Package cvuqdisk not installed” when you run Cluster Verification Utility. Use the cvuqdisk RPM for your hardware (for example, x86_64).
10.1.解压Grid安装包
拷贝安装包到grid 用户的$ORACLE_HOME目录
chown grid:oinstall linuxx64_12201_grid_home.zip
su - grid
unzip linuxx64_12201_grid_home.zip
rm linuxx64_12201_grid_home.zip
需要在RAC1, RAC2解压安装
10.2.安装cvuqdisk
Locate the cvuqdisk RPM package, which is located in the directory Grid_home/cv/rpm. Where Grid_home is the Oracle Grid Infrastructure home directory. Ex: /oracle/product/12.2.0.1/grid
Copy the cvuqdisk package to each node on the cluster. You should ensure that each node is running the same version of Linux.
Set the environment variable CVUQDISK_GRP to point to the group that owns cvuqdisk, typically oinstall.
For example:
export CVUQDISK_GRP=asmadmin
Log in as root. In the directory where you have saved the cvuqdisk RPM, install the cvuqdisk package. For example:
rpm -ivh cvuqdisk-1.0.10-1.rpm
If you have an existing version of cvuqdisk, then enter the following command to deinstall the existing version:
rpm -e cvuqdisk
10.3.运行runcluvfy.sh
./runcluvfy.sh stage -pre crsinst -n rac1,rac2 -verbose
Pre-check for cluster services setup was successful.

CVU operation performed:      stage -pre crsinst
Date:                         Mar 2, 2020 11:39:05 AM
CVU home:                     /home/grid/cvuqdisk/
User:                         grid
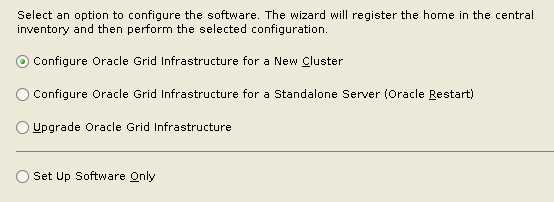
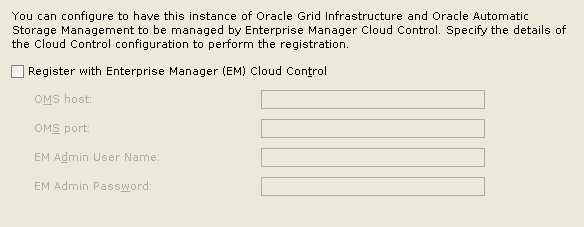
11.安装Grid软件
11.1.启动安装程序
./gridSetup.sh

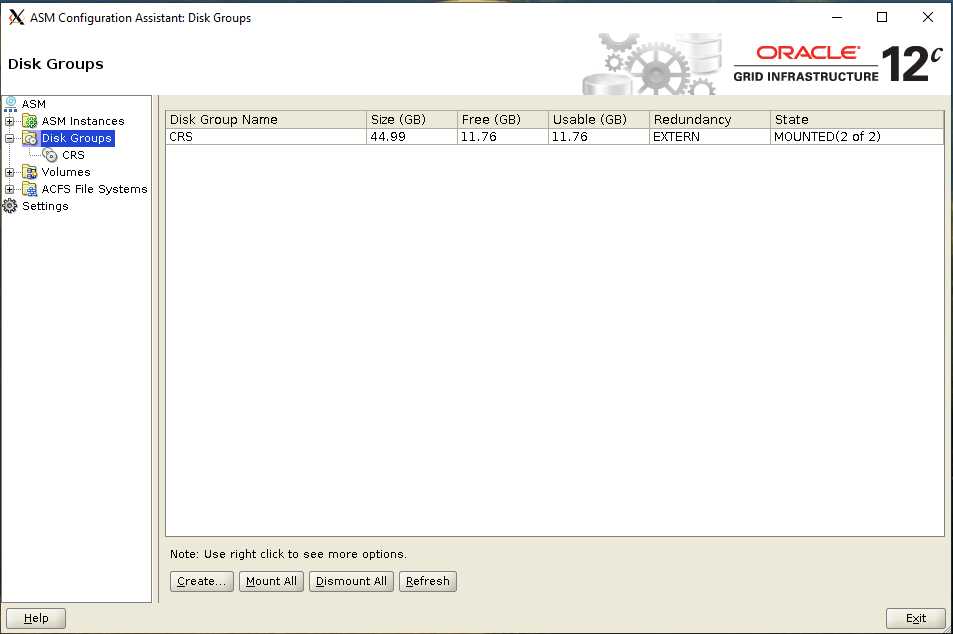
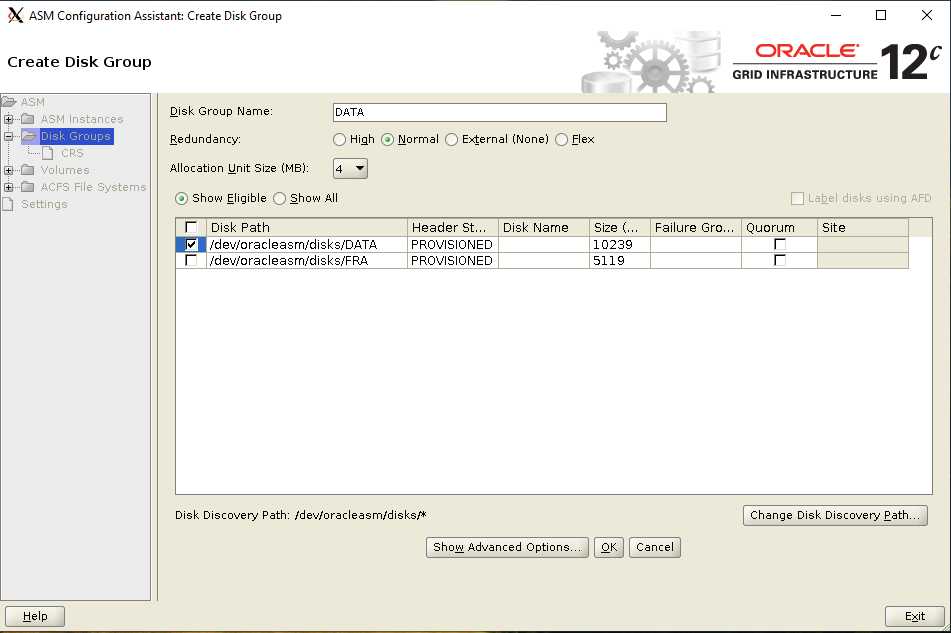
11.2.CRS磁盘组
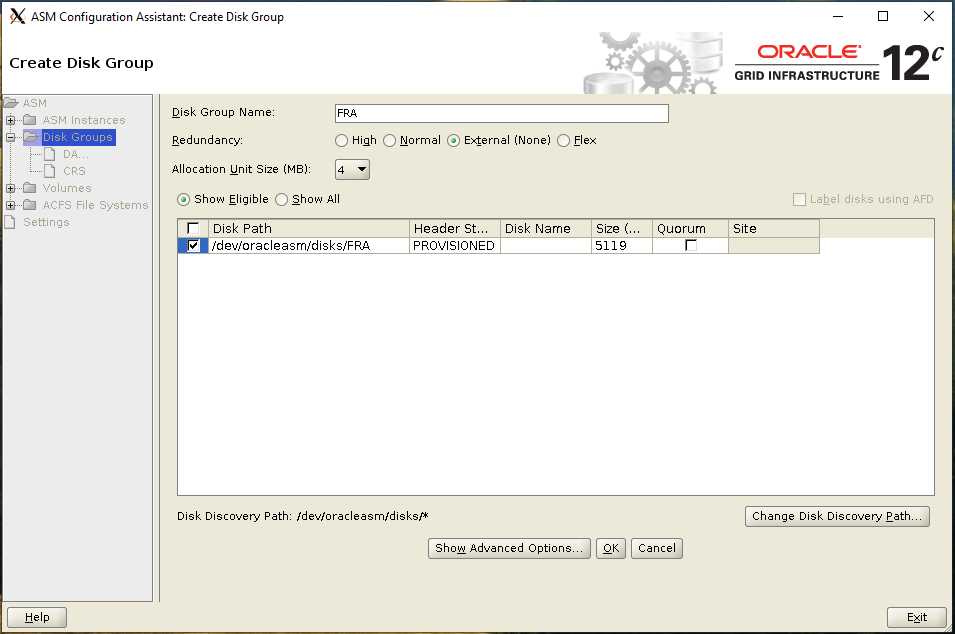
disk group name: CRS
Set the redundancy to “External” and select your disks

NORMAL REDUNDANCY – Two-way mirroring, requiring two failure groups.
HIGH REDUNDANCY – Three-way mirroring, requiring three failure groups.
EXTERNAL REDUNDANCY – No mirroring for disks that are already protected using hardware RAID or mirroring

If you don’t see your disks straight away then click the “Change Discovery Path” button and set the path to “/dev/oracleasm/disks/*”

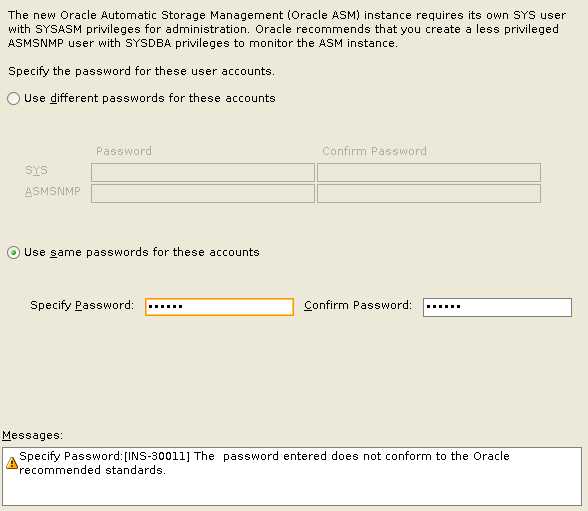
11.3.ASMSNMP
ASMSNMP Password: oracle
11.4.Oracle Base

11.5.Verifying
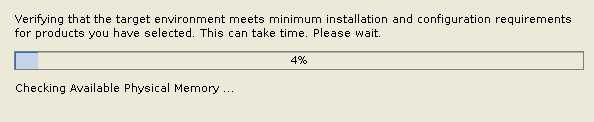
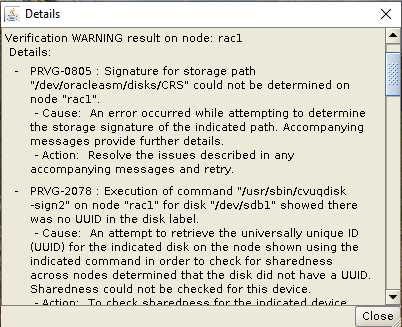
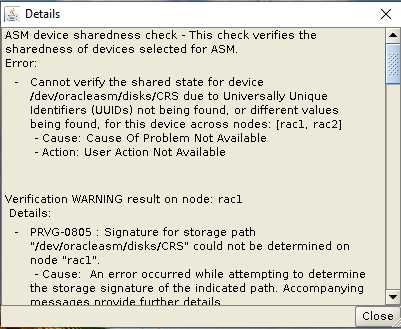
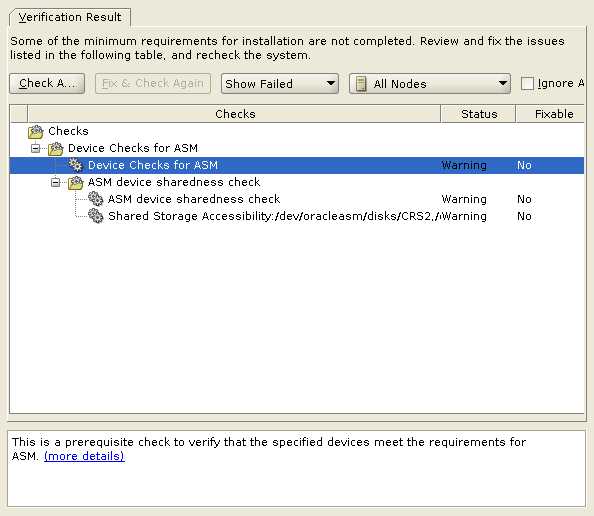
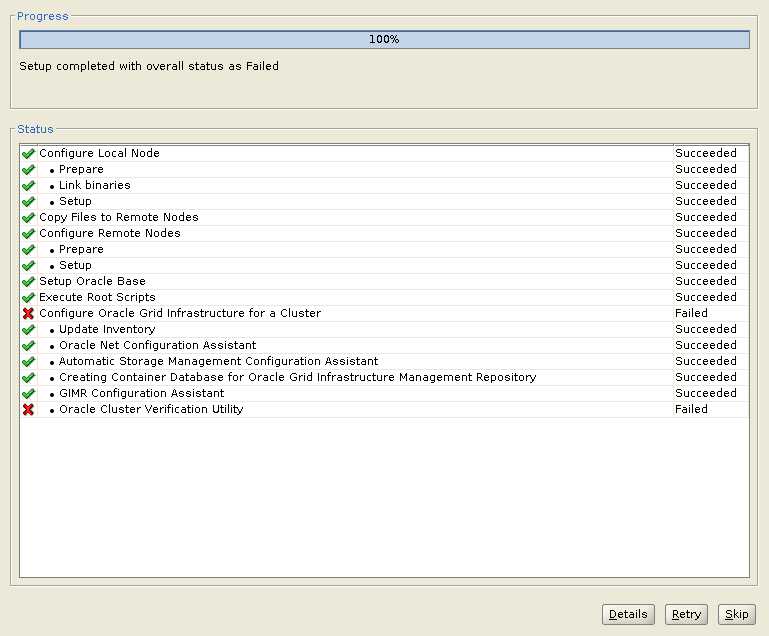
以下2个错误可以忽略
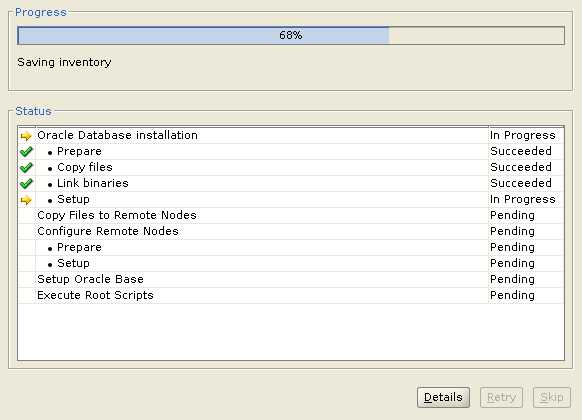
11.6.Progress
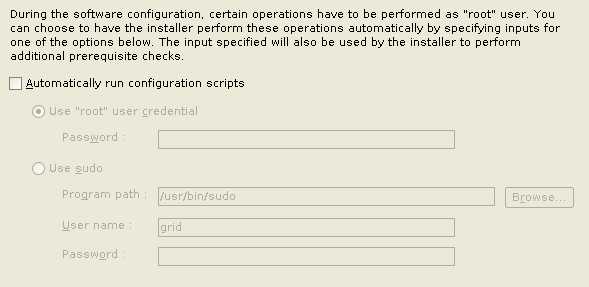
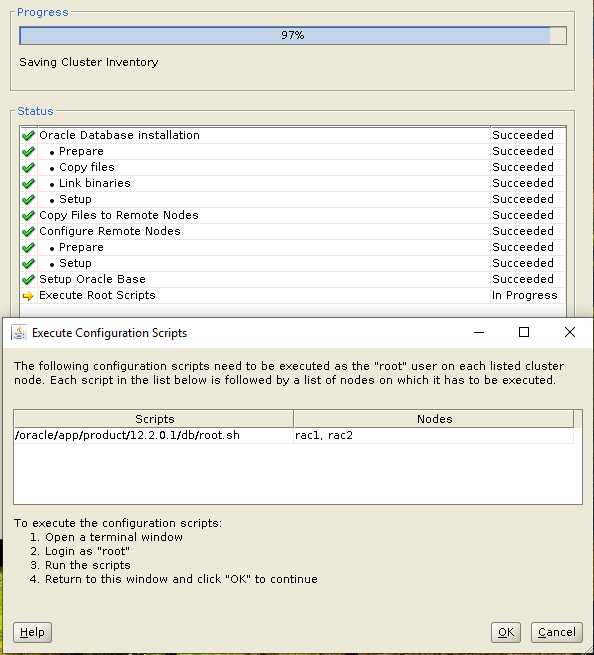
11.7.root.sh
如果grid软件安装失败,可能需要重新安装,这时候需要删除grid软件,还需要删除grid的配置信息。
如果执行root.sh失败,可以删除配置信息重新执行root.sh文件。
cd $GRID_HOME/deinstall
./rootcrs.pl -deconfig -force
如果需要删除GRID软件:
cd $GRID_HOME/crs/install/
./deinstall
还要删除相关的目录,
rm /etc/ora*
删除base和home下文件,以及/usr/local/bin/dbhome, oraenv, coraenv等文件
rm –rf /oracle oracle目录的owner被更改了。
11.8.NTP和DNS Warning
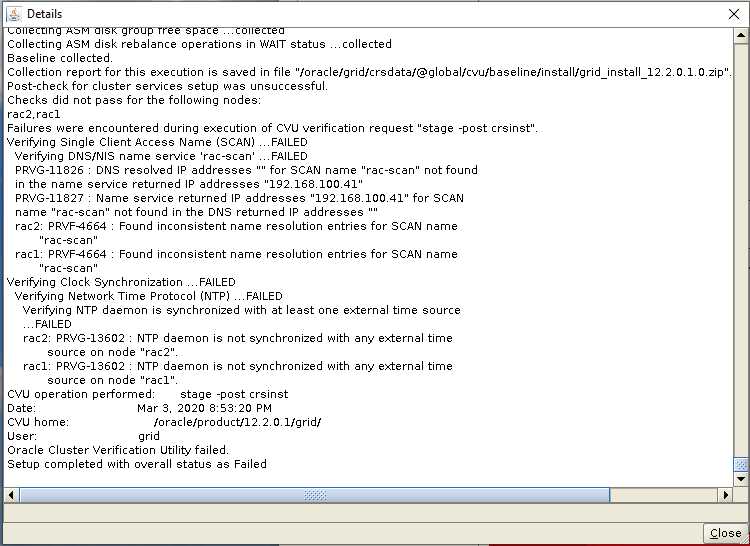
PRVG-11826 : DNS resolved IP addresses "" for SCAN name "rac-scan" not found in the name service returned IP addresses "192.168.100.41"
导致这个错误的原因是在/etc/hosts中配置了SCAN的地址,尝试ping这个地址,如果可以ping成功,则这个错误可以忽略。
rac2: PRVG-13602 : NTP daemon is not synchronized with any external time source on node "rac2".
rac1: PRVG-13602 : NTP daemon is not synchronized with any external time source on node "rac1".
使用grid用户执行crsctl check ctss命令来查看CTSS的运行模式,命令结果显示为观察模式
[grid@rac1:/home/grid]#crsctl check ctss
CRS-4700: The Cluster Time Synchronization Service is in Observer mode.
之前配置NTP服务没有正确配置。
[grid@rac1:/home/grid]#crsctl check crs
CRS-4638: Oracle High Availability Services is online
CRS-4537: Cluster Ready Services is online
CRS-4529: Cluster Synchronization Services is online
CRS-4533: Event Manager is online
正确配置DNS和NTP,应该不会出现以上错误。
11.9.Finish

The ASM’s owner has correct permission on GI_BASE and GI_HOME 775
drwxr-xr-x 8 grid oinstall 4096 Oct 10 01:42 /oracle/app/grid
drwxr-xr-x 66 root oinstall 4096 Oct 3 09:40 /oracle/app/11.2.0/grid
make sure the option of crs_home set to correct GI home in file /etc/oracle/olr.loc
[grid@rac1:/home/grid]#crs_stat -t -v
Name           Type           R/RA   F/FT   Target    State     Host
----------------------------------------------------------------------
ora....SM.lsnr ora....er.type 0/5    0/     ONLINE    ONLINE    rac1
ora.CRS.dg     ora....up.type 0/5    0/     ONLINE    ONLINE    rac1
ora.DATA.dg    ora....up.type 0/5    0/     ONLINE    ONLINE    rac1
ora.FRA.dg     ora....up.type 0/5    0/     ONLINE    ONLINE    rac1
ora....ER.lsnr ora....er.type 0/5    0/     ONLINE    ONLINE    rac1
ora....AF.lsnr ora....er.type 0/5    0/     OFFLINE   OFFLINE
ora....N1.lsnr ora....er.type 0/5    0/0    ONLINE    ONLINE    rac2
ora....N2.lsnr ora....er.type 0/5    0/0    ONLINE    ONLINE    rac1
ora....N3.lsnr ora....er.type 0/5    0/0    ONLINE    ONLINE    rac1
ora.MGMTLSNR   ora....nr.type 0/0    0/0    ONLINE    ONLINE    rac1
ora.asm        ora.asm.type   0/5    0/0    ONLINE    ONLINE    rac1
ora.chad       ora.chad.type  0/5    0/     ONLINE    ONLINE    rac1
ora.cvu        ora.cvu.type   0/5    0/0    ONLINE    ONLINE    rac1
ora.mgmtdb     ora....db.type 0/2    0/1    ONLINE    ONLINE    rac1
ora....network ora....rk.type 0/5    0/     ONLINE    ONLINE    rac1
ora.ons        ora.ons.type   0/3    0/     ONLINE    ONLINE    rac1
ora.proxy_advm ora....vm.type 0/5    0/     OFFLINE   OFFLINE
ora.qosmserver ora....er.type 0/1    0/2    ONLINE    ONLINE    rac1
ora....C1.lsnr application    0/5    0/0    ONLINE    ONLINE    rac1
ora.rac1.ons   application    0/3    0/0    ONLINE    ONLINE    rac1
ora.rac1.vip   ora....t1.type 0/0    0/0    ONLINE    ONLINE    rac1
ora....C2.lsnr application    0/5    0/0    ONLINE    ONLINE    rac2
ora.rac2.ons   application    0/3    0/0    ONLINE    ONLINE    rac2
ora.rac2.vip   ora....t1.type 0/0    0/0    ONLINE    ONLINE    rac2
ora.scan1.vip  ora....ip.type 0/0    0/0    ONLINE    ONLINE    rac2
ora.scan2.vip  ora....ip.type 0/0    0/0    ONLINE    ONLINE    rac1
ora.scan3.vip  ora....ip.type 0/0    0/0    ONLINE    ONLINE    rac1
[grid@rac1:/home/grid]#crs_stat -t
CRS-0184: Cannot communicate with the CRS daemon.
[grid@rac1:/home/grid]#crsctl check crs
CRS-4638: Oracle High Availability Services is online
CRS-4535: Cannot communicate with Cluster Ready Services
CRS-4529: Cluster Synchronization Services is online
CRS-4533: Event Manager is online
[grid@rac1:/home/grid]#ps -ef|grep crsd.bin
grid      63472  62952  0 20:24 pts/1    00:00:00 grep --color=auto crsd.bin
[grid@rac1:/home/grid]# crsctl status res -t -init
--------------------------------------------------------------------------------
Name           Target  State        Server                   State details
--------------------------------------------------------------------------------
Cluster Resources
--------------------------------------------------------------------------------
ora.asm          1        ONLINE  ONLINE       rac1         AbnormalTermination,STABLE
ora.cluster_interconnect.haip 1   ONLINE  ONLINE rac1                   STABLE
ora.crf          1        ONLINE  ONLINE       rac1                     STABLE
ora.crsd         1        ONLINE  OFFLINE                               STABLE
ora.cssd         1        ONLINE  ONLINE       rac1                     STABLE
ora.cssdmonitor  1        ONLINE  ONLINE       rac1                     STABLE
ora.ctssd        1        ONLINE  ONLINE       rac1                     OBSERVER,STABLE
ora.diskmon      1        OFFLINE OFFLINE                               STABLE
ora.drivers.acfs 1        ONLINE  ONLINE       rac1                     STABLE
ora.evmd         1        ONLINE  ONLINE       rac1                     STABLE
ora.gipcd        1        ONLINE  ONLINE       rac1                     STABLE
ora.gpnpd        1        ONLINE  ONLINE       rac1                     STABLE
ora.mdnsd        1        ONLINE  ONLINE       rac1                     STABLE
ora.storage      1        ONLINE  ONLINE       rac1                     STABLE
--------------------------------------------------------------------------------
[grid@rac1:/home/grid]#crsctl start res ora.crsd -init
CRS-2672: Attempting to start 'ora.crsd' on 'rac1'
CRS-2676: Start of 'ora.crsd' on 'rac1' succeeded
It may take few mins to start
[grid@rac1:/home/grid]# crsctl status res -t -init
--------------------------------------------------------------------------------
Name           Target  State        Server                   State details
--------------------------------------------------------------------------------
Cluster Resources
--------------------------------------------------------------------------------
ora.asm          1        ONLINE  ONLINE       rac1         AbnormalTermination,STABLE
ora.cluster_interconnect.haip 1   ONLINE  ONLINE rac1                   STABLE
ora.crf          1        ONLINE  ONLINE       rac1                     STABLE
ora.crsd         1        ONLINE  ONLINE       rac1                     STABLE
ora.cssd         1        ONLINE  ONLINE       rac1                     STABLE
ora.cssdmonitor  1        ONLINE  ONLINE       rac1                     STABLE
ora.ctssd        1        ONLINE  ONLINE       rac1                     OBSERVER,STABLE
ora.diskmon      1        OFFLINE OFFLINE                               STABLE
ora.drivers.acfs 1        ONLINE  ONLINE       rac1                     STABLE
ora.evmd         1        ONLINE  ONLINE       rac1                     STABLE
ora.gipcd        1        ONLINE  ONLINE       rac1                     STABLE
ora.gpnpd        1        ONLINE  ONLINE       rac1                     STABLE
ora.mdnsd        1        ONLINE  ONLINE       rac1                     STABLE
ora.storage      1        ONLINE  ONLINE       rac1                     STABLE
--------------------------------------------------------------------------------
As Grid Infrastructure daemon diskmon.bin is used for Exadata fencing, started from 11.2.0.3, resource ora.diskmon will be offline in non-Exadata environment. Grid Infrastructure diskmon will be Offline by Default in Non-Exadata Environment.
[grid@rac1:/home/grid]#crsctl check cluster -all
**************************************************************
rac1:
CRS-4537: Cluster Ready Services is online
CRS-4529: Cluster Synchronization Services is online
CRS-4533: Event Manager is online
**************************************************************
rac2:
CRS-4537: Cluster Ready Services is online
CRS-4529: Cluster Synchronization Services is online
CRS-4533: Event Manager is online
**************************************************************
[grid@rac1:/home/grid]#crsctl check crs
CRS-4638: Oracle High Availability Services is online
CRS-4537: Cluster Ready Services is online
CRS-4529: Cluster Synchronization Services is online
CRS-4533: Event Manager is online
停止,启动CRS
$ORACLE_HOME/bin/crsctl stop cluster
#ORACLE_HOME/bin/crsctl start cluster
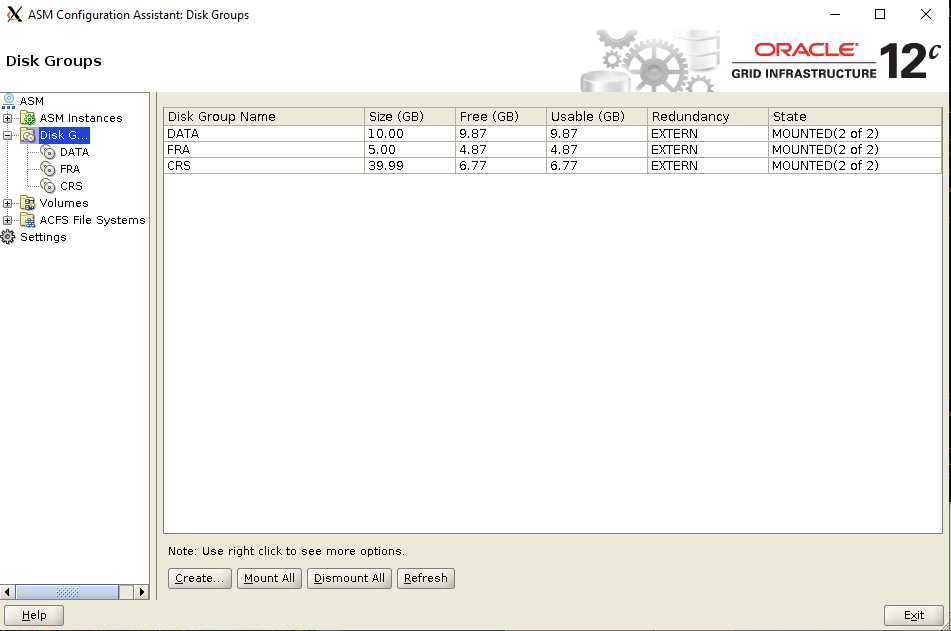
12.配置ASM磁盘组
12.1.启动asmca
在节点1上运行:
[grid@rac1:/home/grid]$asmca
12.2.Create Disk Group
13.安装Oracle 12c
13.1.启动安装程序
在节点1上以Oracle用户登录
解压缩安装文件
[oracle@rac1:/home/oracle/database]$./runInstaller

13.2.Oracle Base
13.3.Finish
echo "oracle soft memlock 3145728" >>/etc/security/limits.conf
echo "oracle hard memlock 3145728" >>/etc/security/limits.conf
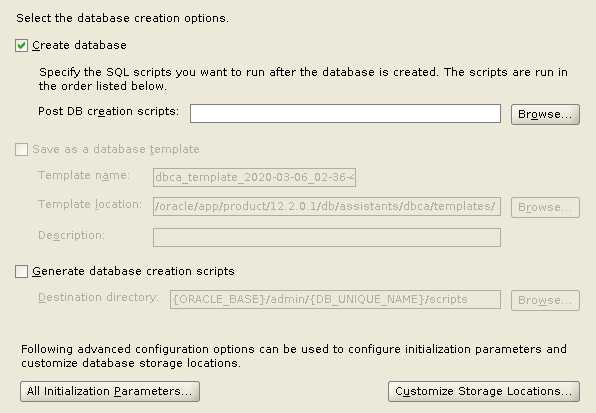
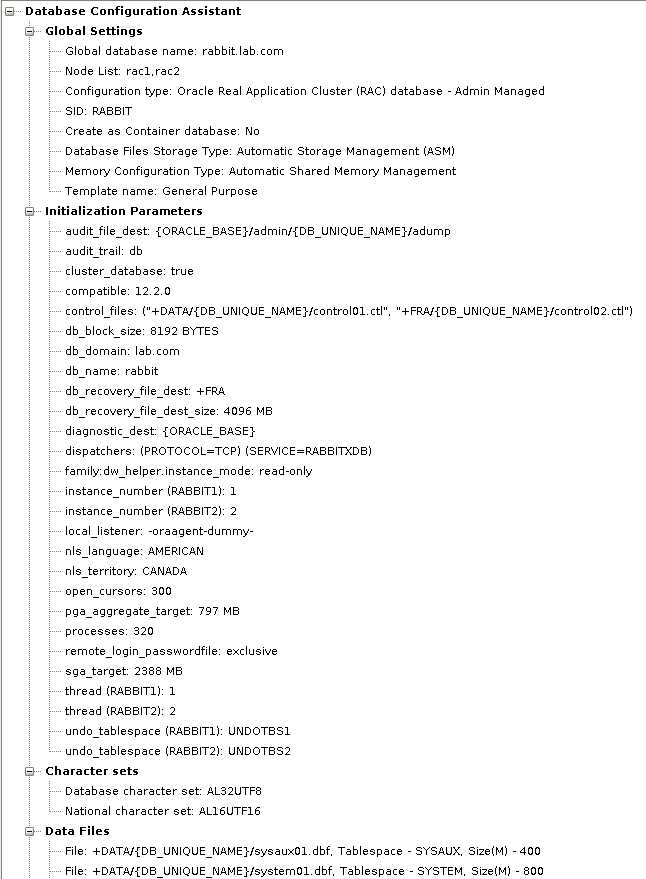
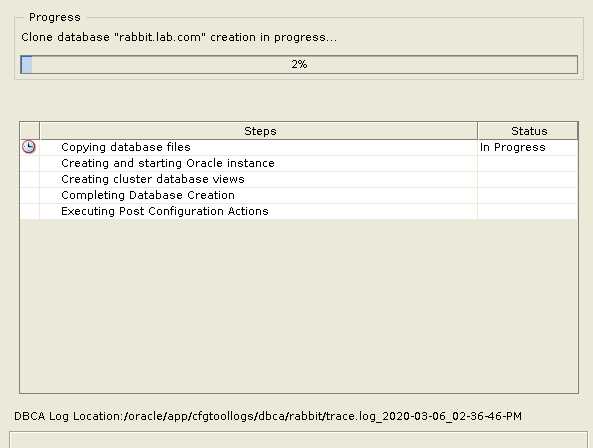
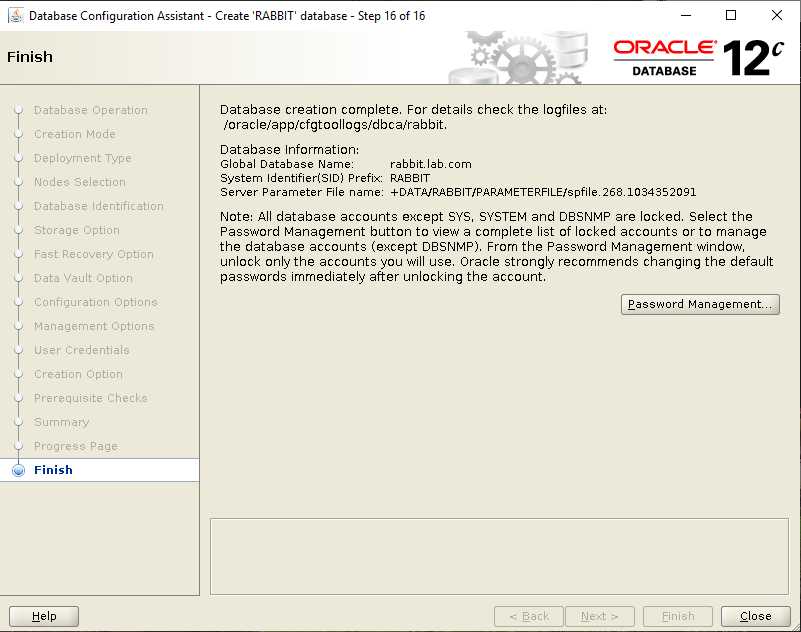
14.建数据库
14.1.启动dbca
在节点1上运行dbca

14.2.Global database name
14.3.ASM Disk Group
Cannot view “DATA” disk group?
You need to have the setuid bit set even though both user oracle and grid have a common group membership.
Log into RAC1 and RAC2 as root
cd /oracle/app
[root@rac1:/oracle/app]#chmod 6751 oracle
[root@rac1:/oracle/app]#ls –l
drwsr-s--x  3 oracle oinstall   21 Mar  6 10:08 oracle
cd /oracle/app/12.2.0.1/grid/bin
[root@rac1:/oracle/app/12.2.0.1/grid/bin]#chmod 6751 oracle
[root@rac1:/oracle/app/12.2.0.1/grid/bin]#ls –l
-rwsr-s--x 1 grid oinstall 372714136 Mar  6 12:03 oracle
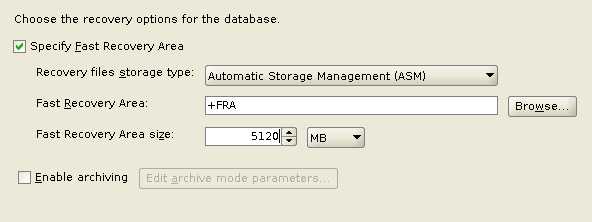
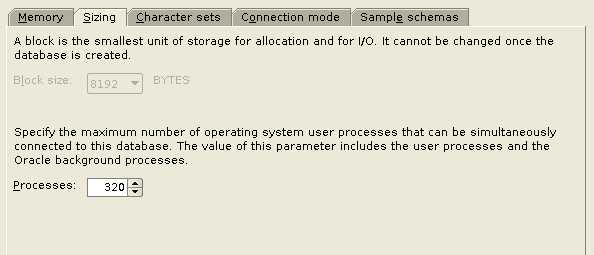
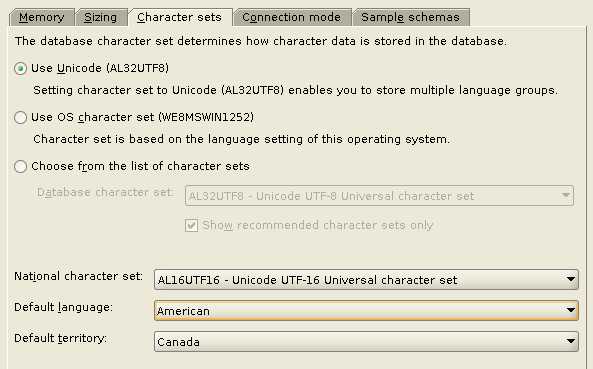
14.4.Memory and Character sets

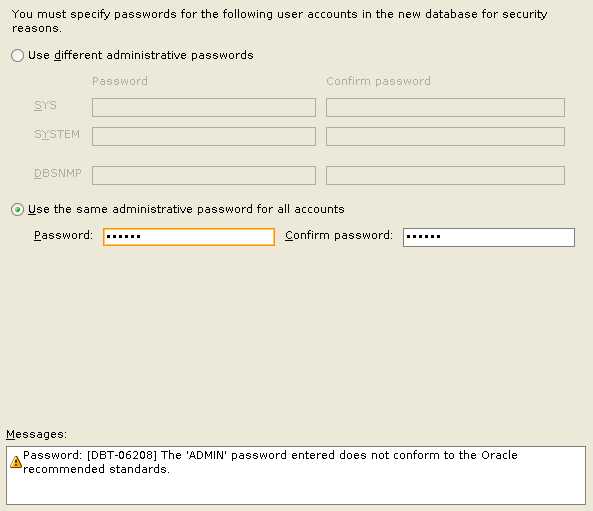
14.5.Administrator Password

14.6.Finish
15.集群管理
Oracle Clusterware的命令集可以分为以下4种:
节点层:osnodes
网络层:oifcfg
集群层:crsctl, ocrcheck,ocrdump,ocrconfig
应用层:srvctl,onsctl,crs_stat
15.1.RAC 启动和停止,查看状态
必须以root用户运行
crsctl stop cluster    or crsctl stop crs 停止当前节点
crsctl stop cluster –all or crsctl stop crs -a停止所有节点
crsctl start cluster
crsctl stop cluster –all
查看状态,以grid用户运行
crsctl check cluster -all   or crsctl check crs
[grid@rac1:/home/grid]$olsnodes -n
rac1    1
rac2    2
15.2.检查cluster所有资源状态
[grid@rac1:/home/grid]#crsctl status res -t
--------------------------------------------------------------------------------
Name           Target  State        Server                   State details
--------------------------------------------------------------------------------
Local Resources
--------------------------------------------------------------------------------
ora.ASMNET1LSNR_ASM.lsnr
               ONLINE  ONLINE       rac1                     STABLE
               ONLINE  ONLINE       rac2                     STABLE
ora.CRS.dg
               ONLINE  ONLINE       rac1                     STABLE
               ONLINE  ONLINE       rac2                     STABLE
ora.DATA.dg
               ONLINE  ONLINE       rac1                     STABLE
               ONLINE  ONLINE       rac2                     STABLE
ora.FRA.dg
               ONLINE  ONLINE       rac1                     STABLE
               ONLINE  ONLINE       rac2                     STABLE
ora.LISTENER.lsnr
               ONLINE  ONLINE       rac1                     STABLE
               ONLINE  ONLINE       rac2                     STABLE
ora.chad
               ONLINE  ONLINE       rac1                     STABLE
               ONLINE  ONLINE       rac2                     STABLE
ora.net1.network
               ONLINE  ONLINE       rac1                     STABLE
               ONLINE  ONLINE       rac2                     STABLE
ora.ons
               ONLINE  ONLINE       rac1                     STABLE
               ONLINE  ONLINE       rac2                     STABLE
ora.proxy_advm
               OFFLINE OFFLINE      rac1                     STABLE
               OFFLINE OFFLINE      rac2                     STABLE
--------------------------------------------------------------------------------
Cluster Resources
--------------------------------------------------------------------------------
ora.LISTENER_SCAN1.lsnr
      1        ONLINE  ONLINE       rac2                     STABLE
ora.LISTENER_SCAN2.lsnr
      1        ONLINE  ONLINE       rac1                     STABLE
ora.LISTENER_SCAN3.lsnr
      1        ONLINE  ONLINE       rac1                     STABLE
ora.MGMTLSNR
      1        ONLINE  ONLINE       rac1                     169.254.187.236 192.
                                                             168.100.70,STABLE
ora.asm
      1        ONLINE  ONLINE       rac1                     Started,STABLE
      2        ONLINE  ONLINE       rac2                     Started,STABLE
      3        OFFLINE OFFLINE                               STABLE
ora.cvu
      1        ONLINE  ONLINE       rac1                     STABLE
ora.mgmtdb
      1        ONLINE  ONLINE       rac1                     Open,STABLE
ora.qosmserver
      1        ONLINE  ONLINE       rac1                     STABLE
ora.rabbit.db
      1        ONLINE  ONLINE       rac1                     Open,HOME=/oracle/ap
                                                             p/product/12.2.0.1/d
                                                             b,STABLE
      2        ONLINE  ONLINE       rac2                     Open,HOME=/oracle/ap
                                                             p/product/12.2.0.1/d
                                                             b,STABLE
ora.rac1.vip
      1        ONLINE  ONLINE       rac1                     STABLE
ora.rac2.vip
      1        ONLINE  ONLINE       rac2                     STABLE
ora.scan1.vip
      1        ONLINE  ONLINE       rac2                     STABLE
ora.scan2.vip
      1        ONLINE  ONLINE       rac1                     STABLE
ora.scan3.vip
      1        ONLINE  ONLINE       rac1                     STABLE
--------------------------------------------------------------------------------
[grid@rac1:/home/grid]$crs_stat -t -v
Name           Type           R/RA   F/FT   Target    State     Host
----------------------------------------------------------------------
ora....SM.lsnr ora....er.type 0/5    0/     ONLINE    ONLINE    rac1
ora.CRS.dg     ora....up.type 0/5    0/     ONLINE    ONLINE    rac1
ora.DATA.dg    ora....up.type 0/5    0/     ONLINE    ONLINE    rac1
ora.FRA.dg     ora....up.type 0/5    0/     ONLINE    ONLINE    rac1
ora....ER.lsnr ora....er.type 0/5    0/     ONLINE    ONLINE    rac1
ora....AF.lsnr ora....er.type 0/5    0/     OFFLINE   OFFLINE
ora....N1.lsnr ora....er.type 0/5    0/0    ONLINE    ONLINE    rac2
ora....N2.lsnr ora....er.type 0/5    0/0    ONLINE    ONLINE    rac1
ora....N3.lsnr ora....er.type 0/5    0/0    ONLINE    ONLINE    rac1
ora.MGMTLSNR   ora....nr.type 0/0    0/0    ONLINE    ONLINE    rac1
ora.asm        ora.asm.type   0/5    0/0    ONLINE    ONLINE    rac1
ora.chad       ora.chad.type  0/5    0/     ONLINE    ONLINE    rac1
ora.cvu        ora.cvu.type   0/5    0/0    ONLINE    ONLINE    rac1
ora.mgmtdb     ora....db.type 0/2    0/1    ONLINE    ONLINE    rac1
ora....network ora....rk.type 0/5    0/     ONLINE    ONLINE    rac1
ora.ons        ora.ons.type   0/3    0/     ONLINE    ONLINE    rac1
ora.proxy_advm ora....vm.type 0/5    0/     OFFLINE   OFFLINE
ora.qosmserver ora....er.type 0/1    0/2    ONLINE    ONLINE    rac1
ora.rabbit.db  ora....se.type 0/2    0/1    ONLINE    ONLINE    rac1
ora....C1.lsnr application    0/5    0/0    ONLINE    ONLINE    rac1
ora.rac1.ons   application    0/3    0/0    ONLINE    ONLINE    rac1
ora.rac1.vip   ora....t1.type 0/0    0/0    ONLINE    ONLINE    rac1
ora....C2.lsnr application    0/5    0/0    ONLINE    ONLINE    rac2
ora.rac2.ons   application    0/3    0/0    ONLINE    ONLINE    rac2
ora.rac2.vip   ora....t1.type 0/0    0/0    ONLINE    ONLINE    rac2
ora.scan1.vip  ora....ip.type 0/0    0/0    ONLINE    ONLINE    rac2
ora.scan2.vip  ora....ip.type 0/0    0/0    ONLINE    ONLINE    rac1
ora.scan3.vip  ora....ip.type 0/0    0/0    ONLINE    ONLINE    rac1
15.3.查看数据库,启动和停止数据库实例
[grid@rac1:/home/grid]$srvctl status database -d RABBIT
Instance RABBIT1 is running on node rac1
Instance RABBIT2 is running on node rac2
[oracle@rac1:/home/oracle]$srvctl status nodeapps
VIP 192.168.138.50 is enabled
VIP 192.168.138.50 is running on node: rac1
VIP 192.168.138.51 is enabled
VIP 192.168.138.51 is running on node: rac2
Network is enabled
Network is running on node: rac1
Network is running on node: rac2
ONS is enabled
ONS daemon is running on node: rac1
ONS daemon is running on node: rac2
[oracle@rac1:/home/oracle]$srvctl config database -d RABBIT -a
Database unique name: rabbit
Database name: rabbit
Oracle home: /oracle/app/product/12.2.0.1/db
Oracle user: oracle
Spfile: +DATA/RABBIT/PARAMETERFILE/spfile.268.1034352091
Password file: +DATA/RABBIT/PASSWORD/pwdrabbit.256.1034351629
Domain: lab.com
Start options: open
Stop options: immediate
Database role: PRIMARY
Management policy: AUTOMATIC
Server pools:
Disk Groups: FRA,DATA
Mount point paths:
Services:
Type: RAC
Start concurrency:
Stop concurrency:
Database is enabled
Database is individually enabled on nodes:
Database is individually disabled on nodes:
OSDBA group: dba
OSOPER group: oper
Database instances: RABBIT1,RABBIT2
Configured nodes: rac1,rac2
CSS critical: no
CPU count: 0
Memory target: 0
Maximum memory: 0
Default network number for database services:
Database is administrator managed
[oracle@rac1:/home/oracle]$srvctl status asm
ASM is running on rac1,rac2
启动和停止数据库实例
[grid@rac1:/home/grid]#srvctl stop database -d RABBIT
[grid@rac1:/home/grid]#ps -ef|grep pmon
grid      44233      1  0 12:13 ?        00:00:01 asm_pmon_+ASM1
grid      67698  59672  0 16:55 pts/0    00:00:00 grep --color=auto pmon
grid      90304      1  0 12:52 ?        00:00:01 mdb_pmon_-MGMTDB
[grid@rac1:/home/grid]#srvctl start database -d RABBIT
[grid@rac1:/home/grid]#ps -ef|grep pmon
grid      44233      1  0 12:13 ?        00:00:01 asm_pmon_+ASM1
oracle    67841      1  0 16:56 ?        00:00:00 ora_pmon_RABBIT1
grid      68477  59672  0 16:57 pts/0    00:00:00 grep --color=auto pmon
grid      90304      1  0 12:52 ?        00:00:01 mdb_pmon_-MGMTDB
SQL> set linesize 500
SQL> col host_name format a10;
SQL> select host_name,inst_id,instance_name,version from gv$instance;
HOST_NAME     INST_ID INSTANCE_NAME    VERSION
---------- ---------- ---------------- -----------------
rac1                1 +ASM1            12.2.0.1.0
rac2                2 +ASM2            12.2.0.1.0
SELECT
    inst_id
  , instance_number inst_no
  , instance_name inst_name
  , parallel
  , status
  , database_status db_status
  , active_state state
  , host_name host
FROM gv$instance
ORDER BY inst_id;

   INST_ID    INST_NO INST_NAME        PAR STATUS       DB_STATUS         STATE     HOST
---------- ---------- ---------------- --- ------------ ----------------- --------- ----------
         1          1 RABBIT1          YES OPEN         ACTIVE            NORMAL    rac1
         2          2 RABBIT2          YES OPEN         ACTIVE            NORMAL    rac2
srvctl stop database -d RABBIT -o immediate
srvctl start database -d RABBIT -o nomount
alter database open;
select open_mode,inst_id from gv$database;
SQL> SELECT inst_name FROM v$active_instances;
INST_NAME
--------------------------------------------------------------------------------
rac1:RABBIT1
rac2:RABBIT2
15.4.查看SCAN信息
[oracle@rac1:/home/oracle]$srvctl status scan
SCAN VIP scan1 is enabled
SCAN VIP scan1 is running on node rac2
SCAN VIP scan2 is enabled
SCAN VIP scan2 is running on node rac1
SCAN VIP scan3 is enabled
SCAN VIP scan3 is running on node rac1
15.5.查看VIP信息
[grid@rac1:/home/grid]$srvctl status vip -n rac1
VIP 192.168.138.50 is enabled
VIP 192.168.138.50 is running on node: rac1
[grid@rac1:/home/grid]$srvctl config vip -n rac1
VIP exists: network number 1, hosting node rac1
VIP Name: rac1-vip.lab.com
VIP IPv4 Address: 192.168.138.50
VIP IPv6 Address:
VIP is enabled.
VIP is individually enabled on nodes:
VIP is individually disabled on nodes:
15.6.查看Listener信息
查看本地监听器
[grid@rac1:/home/grid]#srvctl status listener
Listener LISTENER is enabled
Listener LISTENER is running on node(s): rac1,rac2

[grid@rac1:/home/grid]#srvctl config listener -a
Name: LISTENER
Type: Database Listener
Network: 1, Owner: grid
Home: <CRS home>
  /oracle/app/12.2.0.1/grid on node(s) rac2,rac1
End points: TCP:1521
Listener is enabled.
Listener is individually enabled on nodes:
Listener is individually disabled on nodes:
[grid@rac1:/home/grid]$ps -ef | grep lsnr | grep -v 'grep'
grid      46420      1  0 12:14 ?        00:00:07 /oracle/app/12.2.0.1/grid/bin/tnslsnr ASMNET1LSNR_ASM -no_crs_notify -inherit
grid      47095      1  0 12:15 ?        00:00:01 /oracle/app/12.2.0.1/grid/bin/tnslsnr LISTENER_SCAN2 -no_crs_notify -inherit
grid      47147      1  0 12:15 ?        00:00:00 /oracle/app/12.2.0.1/grid/bin/tnslsnr LISTENER_SCAN3 -no_crs_notify -inherit
grid      50674      1  0 12:16 ?        00:00:00 /oracle/app/12.2.0.1/grid/bin/tnslsnr LISTENER -no_crs_notify -inherit
grid      90266      1  0 12:52 ?        00:00:00 /oracle/app/12.2.0.1/grid/bin/tnslsnr MGMTLSNR -no_crs_notify –inherit
查看SCAN Listener的状态:
[oracle@rac1:/home/oracle]$srvctl status scan_listener
SCAN Listener LISTENER_SCAN1 is enabled
SCAN listener LISTENER_SCAN1 is running on node rac2
SCAN Listener LISTENER_SCAN2 is enabled
SCAN listener LISTENER_SCAN2 is running on node rac1
SCAN Listener LISTENER_SCAN3 is enabled
SCAN listener LISTENER_SCAN3 is running on node rac1
查看SCAN Listener的配置:
[oracle@rac1:/home/oracle]$srvctl  config  scan_listener
SCAN Listener LISTENER_SCAN1 exists. Port: TCP:1521
Registration invited nodes:
Registration invited subnets:
SCAN Listener is enabled.
SCAN Listener is individually enabled on nodes:
SCAN Listener is individually disabled on nodes:
SCAN Listener LISTENER_SCAN2 exists. Port: TCP:1521
Registration invited nodes:
Registration invited subnets:
SCAN Listener is enabled.
SCAN Listener is individually enabled on nodes:
SCAN Listener is individually disabled on nodes:
SCAN Listener LISTENER_SCAN3 exists. Port: TCP:1521
Registration invited nodes:
Registration invited subnets:
SCAN Listener is enabled.
SCAN Listener is individually enabled on nodes:
SCAN Listener is individually disabled on nodes:
[oracle@rac1:/home/oracle]$sqlplus / as sysdba
SQL> show parameter local_listener
NAME                                 TYPE        VALUE
------------------------------------ ----------- ------------------------------
local_listener                       string       (ADDRESS=(PROTOCOL=TCP)(HOST=
                                                 192.168.138.50)(PORT=1521))
LOCAL_LISTENER设置为向本地VIP地址进行注册,由于本地监听器是在本地的PUBLIC IP和VIP上监听,所以向VIP监听注册就能保证成功向本地监听器注册。
查看本地监听器的状态:
[oracle@rac1:/home/oracle]$lsnrctl status listener
LSNRCTL for Linux: Version 12.2.0.1.0 - Production on 07-MAR-2020 21:30:30
Copyright (c) 1991, 2016, Oracle.  All rights reserved.
Connecting to (ADDRESS=(PROTOCOL=tcp)(HOST=)(PORT=1521))
STATUS of the LISTENER
------------------------
Alias                     LISTENER
Version                   TNSLSNR for Linux: Version 12.2.0.1.0 - Production
Start Date                07-MAR-2020 21:03:43
Uptime                    0 days 0 hr. 26 min. 47 sec
Trace Level               off
Security                  ON: Local OS Authentication
SNMP                      OFF
Listener Parameter File   /oracle/app/12.2.0.1/grid/network/admin/listener.ora
Listener Log File         /oracle/app/grid/diag/tnslsnr/rac1/listener/alert/log.xml
Listening Endpoints Summary...
  (DESCRIPTION=(ADDRESS=(PROTOCOL=ipc)(KEY=LISTENER)))
  (DESCRIPTION=(ADDRESS=(PROTOCOL=tcp)(HOST=192.168.138.70)(PORT=1521)))
  (DESCRIPTION=(ADDRESS=(PROTOCOL=tcp)(HOST=192.168.138.50)(PORT=1521)))
Services Summary...
Service "+ASM" has 1 instance(s).
  Instance "+ASM1", status READY, has 1 handler(s) for this service...
Service "+ASM_CRS" has 1 instance(s).
  Instance "+ASM1", status READY, has 1 handler(s) for this service...
Service "+ASM_DATA" has 1 instance(s).
  Instance "+ASM1", status READY, has 1 handler(s) for this service...
Service "+ASM_FRA" has 1 instance(s).
  Instance "+ASM1", status READY, has 1 handler(s) for this service...
Service "RABBITXDB.lab.com" has 1 instance(s).
  Instance "RABBIT1", status READY, has 1 handler(s) for this service...
Service "rabbit.lab.com" has 1 instance(s).
  Instance "RABBIT1", status READY, has 1 handler(s) for this service...
The command completed successfully
查看本地监听器信息的时候每个节点只能看到其上运行的实例。
SCAN监听器的注册是由REMOTE_LISTENER参数控制的,任何实例都会向所有的SCAN监听器注册:
[oracle@rac1:/home/oracle]$sqlplus / as sysdba
SQL>  show parameter remote_listener
NAME                                 TYPE        VALUE
------------------------------------ ----------- ------------------------------
remote_listener                      string       rac-scan.lab.com:1521
15.7.查看ASM信息
[oracle@rac1:/home/oracle]#srvctl status asm
ASM is running on rac1,rac2
[oracle@rac1:/home/oracle]#srvctl config asm -a
ASM home: <CRS home>
Password file: +CRS/orapwASM
Backup of Password file:
ASM listener: LISTENER
ASM is enabled.
ASM is individually enabled on nodes:
ASM is individually disabled on nodes:
ASM instance count: 3
Cluster ASM listener: ASMNET1LSNR_ASM
启动和停止磁盘组
[grid@rac1:/home/grid]#srvctl start diskgroup -g DATA
[grid@rac1:/home/grid]#srvctl start diskgroup -g FRA
SQL> set pages 5000
SQL> set linesize 500
SQL> col NAME for a50
select name from v$datafile
union
select member from v#logfile
union
select name from v#controlfile
union
select name from v#tempfile;
NAME
--------------------------------------------------
+DATA/rabbit/control01.ctl
+DATA/rabbit/redo01.log
+DATA/rabbit/redo02.log
+DATA/rabbit/redo03.log
+DATA/rabbit/redo04.log
+DATA/rabbit/sysaux01.dbf
+DATA/rabbit/system01.dbf
+DATA/rabbit/temp01.dbf
+DATA/rabbit/undotbs01.dbf
+DATA/rabbit/undotbs02.dbf
+DATA/rabbit/users01.dbf
+FRA/rabbit/control02.ctl

12 rows selected.
15.8.查看和备份OCR(Oracle Cluster Registry)
[grid@rac1:/home/grid]$ocrcheck
Status of Oracle Cluster Registry is as follows :
         Version                  :          4
         Total space (kbytes)     :     409568
         Used space (kbytes)      :       2168
         Available space (kbytes) :     407400
         ID                       : 1742554689
         Device/File Name         :       +CRS
                                    Device/File integrity check succeeded
                                    Device/File not configured
                                    Device/File not configured
                                    Device/File not configured
                                    Device/File not configured
         Cluster registry integrity check succeeded
         Logical corruption check bypassed due to non-privileged user
[root@rac1:/home/grid]#ocrconfig -showbackup
rac1     2020/03/06 16:30:17     +CRS:/rac/OCRBACKUP/backup00.ocr.282.1034353809     0
rac1     2020/03/06 16:30:17     +CRS:/rac/OCRBACKUP/day.ocr.283.1034353817     0
rac1     2020/03/06 16:30:17     +CRS:/rac/OCRBACKUP/week.ocr.284.1034353819     0
PROT-25: Manual backups for the Oracle Cluster Registry are not available
[root@rac1:/home/grid]#ocrconfig -manualbackup
rac1     2020/03/06 18:25:37     +CRS:/rac/OCRBACKUP/backup_20200306_182537.ocr.285.1034360737     0
15.9.查看voting Disk
[grid@rac1:/home/grid]$crsctl query css votedisk
##  STATE    File Universal Id                File Name Disk group
--  -----    -----------------                --------- ---------
 1. ONLINE   cfa430ed00114fdbbfd6e3390c6b21aa (/dev/oracleasm/disks/CRS2) [CRS]
Located 1 voting disk(s).
16.Add disk to diskgroup
There are 3 ways to do this.
16.1.OEM
You can add disks to a disk group to increase the storage space in a disk group. If you add multiple disks in a single operation, then Oracle ASM rebalances the disk group to evenly distribute the data on all disks, including the newly added disks.
You can control the power of a rebalance operation with the setting of the Rebalance Power. The higher the number, the faster the rebalance operation completes. Lower numbers cause rebalancing to take longer, but consume fewer processing and I/O resources. This leaves these resources available for the database. The default value of 1 minimizes disruption to the database.
A value of 0 blocks the rebalance operation. Manual or automatic rebalance can then occur later. You might want to postpone rebalancing until there are fewer demands on the database, or when you have completed all of your disk group changes.
For information about controlling rebalance operations, refer to “Manually Rebalancing Disk Groups” and “Tuning Rebalance Operations”. For information about rebalance power settings and the ASM_POWER_LIMIT initialization parameter, refer to “ASM_POWER_LIMIT”.
To add one or more disks to a disk group:
1. Access the Oracle Automatic Storage Management home page.
For instructions, refer to “Accessing the Oracle Automatic Storage Management Home Page”.
To access the Oracle Automatic Storage Management home page on a single-instance system:
- Log in to Oracle Enterprise Manager Cloud Control.
- Under the Targets drop down menu at the top of the page, select All Targets.
- In the lists of targets on the All Targets page, click the target for the Oracle ASM instance.
- If prompted for Oracle ASM login credentials, then enter the user SYS, provide the SYS password that was set for the Oracle ASM instance during installation, and connect as SYSASM. The Oracle Automatic Storage Management home page displays similar to the page in Figure 7-1.
- Click the Disk Groups link to display the Disk Groups property page.
-
If the Oracle ASM Login page appears, then log in as the SYS user, connecting as SYSASM. Provide the SYS password for the Oracle ASM instance. This password was set up when the Oracle ASM instance was created.
- Click a link in the Name column to select the disk group to which you want to add disks. The Disk Group page similar to the page in Figure 7-6 appears, displaying a list of disks that are in the disk group.
- Click Add and Oracle Enterprise Manager displays the Add Disks page. This page displays a list of Oracle ASM disks that are available to be added to the disk group. This includes disks with the header status of CANDIDATE, PROVISIONED, or FORMER, and so on.
- To display not only disks that are available to be added to a disk group, but all of the Oracle ASM disks, including disks that belong to a disk group (header status = MEMBER), select All Disks from the Select Member Disks drop-down list on the right hand side of the page. Oracle Enterprise Manager re-displays the page with the complete list of Oracle ASM disks that were discovered by the Oracle ASM instance.
- Optionally change the rebalance power by selecting a value from the Rebalance Power list.
- Select disks as follows:
- Check the box to the left of each disk to be added to the disk group.
- To force the inclusion of a disk in the disk group, select the Force Reuse box in the right-most column.
Caution:
The Force Reuse box causes the disk to be added to the disk group even if the disk belongs to another disk group and has valid database data. The existing data is then lost. You must be certain that you are selecting a disk that can legitimately be added to the disk group. Refer to “Adding Disks to a Disk Group” for an example of the FORCE option. - Optionally enter an Oracle ASM disk name for each disk. Oracle ASM provides a name if you do not.
- Click OK to add the selected disks.
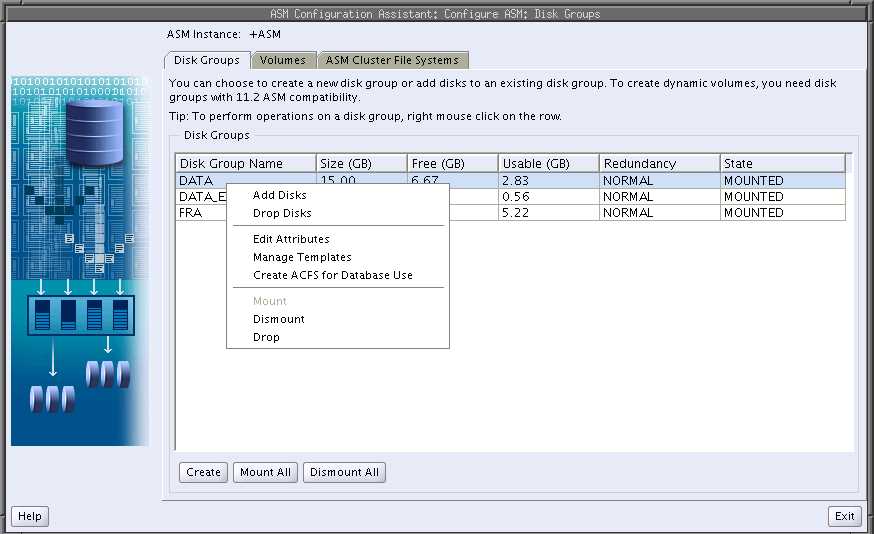
16.2.asmca
16.3.ALTER DISKGROUP SQL Statement
The SQL statements presented in the following example demonstrate the interactions of disk discovery with the ADD DISK operation.
Assume that disk discovery identifies the following disks in directory
/devices:
/devices/diska1 -- member of data1
/devices/diska2 -- member of data1
/devices/diska3 -- member of data1
/devices/diska4 -- member of data1
/devices/diska5 -- candidate disk
/devices/diska6 -- candidate disk
/devices/diska7 -- candidate disk
/devices/diska8 -- candidate disk

/devices/diskb1 -- member of data1
/devices/diskb2 -- member of data1
/devices/diskb3 -- member of data1
/devices/diskb4 -- member of data2

/devices/diskc1 -- member of data2
/devices/diskc2 -- member of data2
/devices/diskc3 -- member of data3
/devices/diskc4 -- candidate disk

/devices/diskd1 -- candidate disk
/devices/diskd2 -- candidate disk
/devices/diskd3 -- candidate disk
/devices/diskd4 -- candidate disk
/devices/diskd5 -- candidate disk
/devices/diskd6 -- candidate disk
/devices/diskd7 -- candidate disk
/devices/diskd8 -- candidate disk
You can query the V$ASM_DISK view to display the status of Oracle ASM disks.
The following statement would fail because /devices/diska1 through /devices/diska4 currently belong to the disk group data1.
ALTER DISKGROUP data1 ADD DISK
     '/devices/diska*';
The following statement successfully adds disks /devices/diska5 through /devices/diska8 to data1. Because no FAILGROUP clauses are included in the ALTER DISKGROUP statement, each disk is assigned to its own failure group. The NAME clauses assign names to the disks, otherwise they would have been assigned system-generated names.
ALTER DISKGROUP data1 ADD DISK
     '/devices/diska5' NAME diska5,
     '/devices/diska6' NAME diska6,
     '/devices/diska7' NAME diska7,
     '/devices/diska8' NAME diska8;
The following statement would fail because the search string matches disks that are contained in other disk groups. Specifically, /devices/diska4 belongs to disk group data1 and /devices/diskb4 belongs to disk group data2.
ALTER DISKGROUP data1 ADD DISK
     '/devices/disk*4';
The following statement would successfully add /devices/diskd1 through /devices/diskd8 to disk group data1. This statement runs with a rebalance power of 5, and does not return until the rebalance operation is complete.
ALTER DISKGROUP data1 ADD DISK
      '/devices/diskd*'
       REBALANCE POWER 5 WAIT;
If /devices/diskc3 was previously a member of a disk group that no longer exists, then you could use the FORCE option to add the disk as a member of another disk group. For example, the following use of the FORCE clause enables /devices/diskc3 to be added to data2, even though it is a current member of data3. For this statement to succeed, data3 cannot be mounted.
ALTER DISKGROUP data2 ADD DISK
     '/devices/diskc3' FORCE;
17.KFOD KFED AMDU
17.1.ASM工具包
ASM(Automatic Storage Management)是Oracle目前主推的软集群存储策略。一般而言,管理ASM的工具包括使用sqlplus命令行、ASMCA图形化界面。此外,ASM Disk的配置和创建,可以通过oracleasm程序命令行进行配置。进入11g之后,集群件GI的crsctl和srvctl也可以提供ASM实例Instance和Disk Group级别的修改。
一般情况下,ASM安装管理借助上述工具就够了,况且Oracle Restate和Cluster ware可以确保ASM组建的HA架构。
一些特殊场景,如磁盘数据损坏、底层修复和ASM盘发现,需要额外的一些命令行工具。ASM工具包括:kfod、kfed和AMDU。在早期的ASM版本(10gR2)中,一部分工具还需要额外的重新编译和链接才能使用。在11g,这部分工具已经成为默认设置,可以直接使用。
与图形化界面不同,kfod属于底层的功能命令行工具。最常用的场景是从操作系统层面刺激磁盘的扫描动作,用于辅助ASM发现可用的ASM DISK。Oracle官方门户中,对于kfod的描述包括如下几个方面:
Oracle ASM和Database安装过程中,kfod是会自动被调用,用于进行磁盘发现过程(Disk Discovery);
如果在安装Grid过程没有成功,kfod也会在安装stage文件夹中被找到。目录地址为:/grid/stage/ext/bin/。如果有这样的情况,Oracle就要求我们设置环境变量LD_LIBRARY_PATH到/grid/stage/ext/bin/;
简单的说,kfod查看检索的意义更大,并不像其他有破坏性工具那样存在很大风险。使用帮助命令参数,可以看到kfod的功能说明。
[grid@rac1:/home/grid]$kfed help
as/mlib         ASM Library [asmlib='lib']
aun/um          AU number to examine or update [AUNUM=number]
aus/z           Allocation Unit size in bytes [AUSZ=number]
blkn/um         Block number to examine or update [BLKNUM=number]
blks/z          Metadata block size in bytes [BLKSZ=number]
ch/ksum         Update checksum before each write [CHKSUM=YES/NO]
cn/t            Count of AUs to process [CNT=number]
de/v            ASM device to examine or update [DEV=string]
dm/pall         Don't suppress repeated lines when dumping corrupt blocks [DMPALL=YES/NO]
ds/klbl         KFED Disk Label to stamp [dsklbl=string]
fg/lbl          KFED Failgroup Label to stamp [fglbl=string]
fo/rce          Force option to stamp the labels [force=YES|NO]
o/p             KFED operation type [OP=READ/WRITE/MERGE/REPAIR/NEW/FORM/FIND/STRUCT/STAMP]
p/rovnm         Name for provisioning purposes [PROVNM=string]
se/ek           AU number to seek to [SEEK=number]
si/telbl                KFED Site Label to stamp [sitelbl=string]
te/xt           File name for translated block text [TEXT=string]
tr/ace          Tracing [trace=YES|NO]
ty/pe           ASM metadata block type number [TYPE=number]
verb            Verbose execution [verbose=YES|NO]
verlb/l         KFED Label Version to stamp [verlbl=number]
KFED-00101: LRM error [102] while parsing command line arguments
17.2.KFED
KFED的全称为Kernel File Metadata Editor。KFED的使用场景比较严峻,就是当ASM Diskgroup不能成功mount的时候,通过KFED来分析ASM磁盘头信息,来诊断问题。
从Oracle 11.1开始,KFED就已经正式成为安装组件的一部分。一些旧的版本中,就需要手工进行build构建。与Kfod的区别是,KFED只有在完全安装完之后,才能使用,在stage阶段无法使用。
[grid@rac1:/home/grid]$kfed help
as/mlib         ASM Library [asmlib='lib']
aun/um          AU number to examine or update [AUNUM=number]
aus/z           Allocation Unit size in bytes [AUSZ=number]
blkn/um         Block number to examine or update [BLKNUM=number]
blks/z          Metadata block size in bytes [BLKSZ=number]
ch/ksum         Update checksum before each write [CHKSUM=YES/NO]
cn/t            Count of AUs to process [CNT=number]
de/v            ASM device to examine or update [DEV=string]
dm/pall         Don't suppress repeated lines when dumping corrupt blocks [DMPALL=YES/NO]
ds/klbl         KFED Disk Label to stamp [dsklbl=string]
fg/lbl          KFED Failgroup Label to stamp [fglbl=string]
fo/rce          Force option to stamp the labels [force=YES|NO]
o/p             KFED operation type [OP=READ/WRITE/MERGE/REPAIR/NEW/FORM/FIND/STRUCT/STAMP]
p/rovnm         Name for provisioning purposes [PROVNM=string]
se/ek           AU number to seek to [SEEK=number]
si/telbl                KFED Site Label to stamp [sitelbl=string]
te/xt           File name for translated block text [TEXT=string]
tr/ace          Tracing [trace=YES|NO]
ty/pe           ASM metadata block type number [TYPE=number]
verb            Verbose execution [verbose=YES|NO]
verlb/l         KFED Label Version to stamp [verlbl=number]
KFED-00101: LRM error [102] while parsing command line arguments
最常用的场景,是借助kfed去读ASM Disk的磁盘头信息。
[root@rac1:/dev]$kfed read /dev/sdb1
kfbh.endian:                          1 ; 0x000: 0x01
kfbh.hard:                          130 ; 0x001: 0x82
kfbh.type:                            1 ; 0x002: KFBTYP_DISKHEAD
kfbh.datfmt:                          1 ; 0x003: 0x01
kfbh.block.blk:                       0 ; 0x004: blk=0
kfbh.block.obj:              2147483649 ; 0x008: disk=1
kfbh.check:                  2890399052 ; 0x00c: 0xac47fd4c
kfbh.fcn.base:                        0 ; 0x010: 0x00000000
kfbh.fcn.wrap:                        0 ; 0x014: 0x00000000
针对ASM Disk头块损坏的问题,Oracle推出了自动backup策略,备份块就在510位置上。
kfed read /dev/sdb1 blkn=510
自动命令repair,也就是将这个块的信息写回到头块位置上。
17.3.AMDU
AMDU全称为:ASM Metadata Dump Utility。AMDU最大的作用在于可以将ASM Disk Group和DISK所有可用元数据信息导出,并且整理为可读的格式内容。
AMDU最大的一个好处,在于其工作不受到Disk Group是否mount访问的影响。这个工具之所以被正式公布,主要在于Oracle Support在进行远程支持的时候,需要客户提供上载文件。
[root@rac1:/dev]$amdu help=y
al/lides                Dump indirect blks unconditionally
-allides: AMDU ordinarily skips over empty indirect blocks. Specifying
    this option tells AMDU to dump those blocks unconditionally. Be
    warned that this can make the resulting AMDU dump quite large.

au/size         AU size for corrupt disks
-ausize <bytes>: This option must be set when -baddisks is set. It
    must be a power of 2. This size is required to scan a disk looking
    for metadata, and it is normally read from the disk header. The
    value applies to all disks that do not have a valid header. The
    value from the disk header will be used if a valid header is
    found.
每次执行amdu命令,就会在当前目录上创建出一个带有当前时间信息的文件夹结构。
进入其中,可以查看report.txt文件,作为信息收集结果。
[grid@rac1:/home/grid]#amdu
amdu_2020_10_14_17_22_15/
[grid@rac1:/home/grid]#cd amdu_2020_10_14_17_22_15/
[grid@rac1:/home/grid/amdu_2020_10_14_17_22_15]#ls
report.txt
[grid@rac1:/home/grid/amdu_2020_10_14_17_22_15]#less report.txt
通过加入参数,可以实现转储特定Disk Group的内部信息。
[grid@rac1:/home/grid/amdu_2020_10_14_17_22_15]#cd /dev/oracleasm/disks
[grid@rac1:/dev/oracleasm/disks]#ls -l
total 0
brw-rw---- 1 grid asmadmin 8, 17 Oct 14 17:23 CRS1
brw-rw---- 1 grid asmadmin 8, 33 Oct 14 17:23 CRS2
brw-rw---- 1 grid asmadmin 8, 49 Oct 14 17:23 DATA
brw-rw---- 1 grid asmadmin 8, 65 Oct 14 17:23 FRA
[grid@rac1:/dev/oracleasm/disks]#cd ~

[grid@rac1:/home/grid]#amdu -diskstring '/dev/oracleasm/disks/DATA*' -dump 'DATA'
amdu_2020_10_14_17_24_43/
AMDU-00204: Disk N0001 is in currently mounted diskgroup DATA.
AMDU-00201: Disk N0001: '/dev/oracleasm/disks/DATA'

[grid@rac1:/home/grid]#ls
amdu_2020_10_14_17_22_15  amdu_2020_10_14_17_24_43  oracleasmlib-2.0.12-1.el7.x86_64.rpm

[grid@rac1:/home/grid]#cd amdu_2020_10_14_17_24_43
[grid@rac1:/home/grid/amdu_2020_10_14_17_24_43]#ls -l
total 119840
-rw-r--r-- 1 grid oinstall 122707968 Oct 14 17:24 DATA_0001.img
-rw-r--r-- 1 grid oinstall      2960 Oct 14 17:24 DATA.map
-rw-r--r-- 1 grid oinstall      3255 Oct 14 17:24 report.txt
[grid@rac1:/home/grid/amdu_2020_10_14_17_24_43]#more DATA.map
N0001 D0000 R00 A00000000 F00000000 I0 E00000000 U00 C01024 S0001 B0000000000
N0001 D0000 R00 A00000001 F00000000 I0 E00000000 U00 C01024 S0001 B0004194304
N0001 D0000 R00 A00000002 F00000002 I0 E00000000 U00 C00256 S0001 B0008388608
N0001 D0000 R00 A00000003 F00000003 I0 E00000000 U00 C01024 S0001 B0009437184
N0001 D0000 R00 A00000004 F00000003 I0 E00000003 U00 C01024 S0001 B0013631488
N0001 D0000 R00 A00000005 F00000003 I0 E00000004 U00 C01024 S0001 B0017825792
N0001 D0000 R00 A00000006 F00000003 I0 E00000005 U00 C01024 S0001 B0022020096
N0001 D0000 R00 A00000007 F00000003 I0 E00000006 U00 C01024 S0001 B0026214400
使用-extract命令,可以直接从ASM Disk Group中抽取文件。
SQL> show parameter control
NAME                                 TYPE        VALUE
------------------------------------ ----------- ------------------------------
control_file_record_keep_time        integer     7
control_files                        string      +DATA/rabbit/control01.ctl, +F
                                                 RA/rabbit/control02.ctl
尝试抽取出控制文件。
amdu -extract DATA.260
amdu_2015_06_05_10_27_46/
AMDU-00204: Disk N0001 is in currently mounted diskgroup DATA
AMDU-00201: Disk N0001: 'ORCL:DATA1'
关闭实例和ASM。
[oracle@rac1:/home/oracle]#srvctl stop database -d RABBIT
[oracle@rac1:/home/oracle]#srvctl stop asm -f
PRCR-1065 : Failed to stop resource ora.asm
CRS-2530: Unable to stop 'ora.asm' because 'ora.mgmtdb' has a stop-time 'hard' dependency on it
CRS-0245:  User doesn't have enough privilege to perform the operation
CRS-2530: Unable to stop 'ora.asm' because 'ora.mgmtdb' has a stop-time 'hard' dependency on it
CRS-0245:  User doesn't have enough privilege to perform the operation
抽取成功,进入目录。以ASCII格式打开control file。
strings DATA_260.f | grep +DATA
strings DATA_260.f | grep +RECO
18.常见 RAC 问题
18.1.常见问题和解决方法
常见问题
RAC node resource issues: This could be a CPU or RAM shortage on a node
Network Interconnect issues: This can have troubleshooting via the CRS commands.
Shared disk issues: All storage must be shared. You can troubleshoot disk issues with standard OS commands.
Install and configuration issues: Installing RAC can be very complex and it is imperative that you have enough system resources.
解决方法
Review of alert log and trace files
Run a RAC AWR report: awrgrpt.
Check ADR for alerts: automatic_diagnostic
Run ADRCI diagnostic commands: ARDCI
Run CRS to check cluster status (svrctl): srvctl
Run cluster verify: cluvfy
Run oracheck: orachk
Run RAC check: Oracle provide the RACcheck tool (MOSC Note 1268927.1]) to audit RAC
18.2.ORA-12514
listener does not currently know of service
[oracle@columbus/home/oracle]#sqlplus hr/oracle@RABBIT
ORA-12514: TNS:listener does not currently know of service requested in connect descriptor
[oracle@rac2:/home/oracle]#lsnrctl status listener

LSNRCTL for Linux: Version 12.2.0.1.0 - Production on 08-MAR-2020 15:26:23
Copyright (c) 1991, 2016, Oracle.  All rights reserved.
Connecting to (DESCRIPTION=(ADDRESS=(PROTOCOL=IPC)(KEY=LISTENER)))
STATUS of the LISTENER
------------------------
Alias                     LISTENER
Version                   TNSLSNR for Linux: Version 12.2.0.1.0 - Production
Start Date                08-MAR-2020 14:42:05
Uptime                    0 days 0 hr. 44 min. 19 sec
Trace Level               off
Security                  ON: Local OS Authentication
SNMP                      OFF
Listener Parameter File   /oracle/app/12.2.0.1/grid/network/admin/listener.ora
Listener Log File         /oracle/app/grid/diag/tnslsnr/rac2/listener/alert/log.                                            xml
Listening Endpoints Summary...
  (DESCRIPTION=(ADDRESS=(PROTOCOL=ipc)(KEY=LISTENER)))
  (DESCRIPTION=(ADDRESS=(PROTOCOL=tcp)(HOST=192.168.138.71)(PORT=1521)))
  (DESCRIPTION=(ADDRESS=(PROTOCOL=tcp)(HOST=192.168.138.51)(PORT=1521)))
Services Summary...
Service "+ASM" has 1 instance(s).
  Instance "+ASM2", status READY, has 1 handler(s) for this service...
Service "+ASM_CRS" has 1 instance(s).
  Instance "+ASM2", status READY, has 1 handler(s) for this service...
Service "+ASM_DATA" has 1 instance(s).
  Instance "+ASM2", status READY, has 1 handler(s) for this service...
Service "+ASM_FRA" has 1 instance(s).
  Instance "+ASM2", status READY, has 1 handler(s) for this service...
Service "RABBITXDB.lab.com" has 1 instance(s).
  Instance "RABBIT2", status READY, has 1 handler(s) for this service...
Service "rabbit.lab.com" has 1 instance(s).
  Instance "RABBIT2", status READY, has 1 handler(s) for this service...
The command completed successfully
[oracle@rac2:/home/oracle]$lsnrctl status listener|grep rabbit.lab.com
Service "rabbit.lab.com" has 1 instance(s).


[oracle@rac1:/oracle/app/12.2.0.1/grid/network/admin]#srvctl status scan_listener
SCAN Listener LISTENER_SCAN1 is enabled
SCAN listener LISTENER_SCAN1 is running on node rac1
SCAN Listener LISTENER_SCAN2 is enabled
SCAN listener LISTENER_SCAN2 is running on node rac2
SCAN Listener LISTENER_SCAN3 is enabled
SCAN listener LISTENER_SCAN3 is running on node rac2

[oracle@rac1:/home/oracle]#lsnrctl status listener_scan1
LSNRCTL for Linux: Version 12.2.0.1.0 - Production on 08-MAR-2020 15:53:34
Copyright (c) 1991, 2016, Oracle.  All rights reserved.
Connecting to (DESCRIPTION=(ADDRESS=(PROTOCOL=IPC)(KEY=LISTENER_SCAN1)))
STATUS of the LISTENER
------------------------
Alias                     LISTENER_SCAN1
Version                   TNSLSNR for Linux: Version 12.2.0.1.0 - Production
Start Date                08-MAR-2020 15:51:07
Uptime                    0 days 0 hr. 2 min. 27 sec
Trace Level               off
Security                  ON: Local OS Authentication
SNMP                      OFF
Listener Parameter File   /oracle/app/12.2.0.1/grid/network/admin/listener.ora
Listener Log File         /oracle/app/grid/diag/tnslsnr/rac1/listener_scan1/alert/log.xml
Listening Endpoints Summary...
  (DESCRIPTION=(ADDRESS=(PROTOCOL=ipc)(KEY=LISTENER_SCAN1)))
  (DESCRIPTION=(ADDRESS=(PROTOCOL=tcp)(HOST=192.168.138.43)(PORT=1521)))
The listener supports no services
The command completed successfully

[oracle@rac1:/home/oracle]#lsnrctl status listener_scan2
LSNRCTL for Linux: Version 12.2.0.1.0 - Production on 08-MAR-2020 15:53:38
Copyright (c) 1991, 2016, Oracle.  All rights reserved.
Connecting to (DESCRIPTION=(ADDRESS=(PROTOCOL=IPC)(KEY=LISTENER_SCAN2)))
STATUS of the LISTENER
------------------------
Alias                     LISTENER_SCAN2
Version                   TNSLSNR for Linux: Version 12.2.0.1.0 - Production
Start Date                08-MAR-2020 15:51:10
Uptime                    0 days 0 hr. 2 min. 27 sec
Trace Level               off
Security                  ON: Local OS Authentication
SNMP                      OFF
Listener Parameter File   /oracle/app/12.2.0.1/grid/network/admin/listener.ora
Listener Log File         /oracle/app/grid/diag/tnslsnr/rac1/listener_scan2/alert/log.xml
Listening Endpoints Summary...
  (DESCRIPTION=(ADDRESS=(PROTOCOL=ipc)(KEY=LISTENER_SCAN2)))
  (DESCRIPTION=(ADDRESS=(PROTOCOL=tcp)(HOST=192.168.138.41)(PORT=1521)))
The listener supports no services
The command completed successfully

[oracle@rac1:/home/oracle]#lsnrctl status listener_scan3
LSNRCTL for Linux: Version 12.2.0.1.0 - Production on 08-MAR-2020 15:53:40
Copyright (c) 1991, 2016, Oracle.  All rights reserved.
Connecting to (DESCRIPTION=(ADDRESS=(PROTOCOL=IPC)(KEY=LISTENER_SCAN3)))
TNS-12541: TNS:no listener
 TNS-12560: TNS:protocol adapter error
  TNS-00511: No listener
   Linux Error: 111: Connection refused

[oracle@rac2:/home/oracle]#lsnrctl status listener_scan1
LSNRCTL for Linux: Version 12.2.0.1.0 - Production on 08-MAR-2020 15:52:32
Copyright (c) 1991, 2016, Oracle.  All rights reserved.
Connecting to (DESCRIPTION=(ADDRESS=(PROTOCOL=IPC)(KEY=LISTENER_SCAN1)))
TNS-12541: TNS:no listener
 TNS-12560: TNS:protocol adapter error
  TNS-00511: No listener
   Linux Error: 2: No such file or directory

[oracle@rac2:/home/oracle]#lsnrctl status listener_scan2
LSNRCTL for Linux: Version 12.2.0.1.0 - Production on 08-MAR-2020 15:52:37
Copyright (c) 1991, 2016, Oracle.  All rights reserved.
Connecting to (DESCRIPTION=(ADDRESS=(PROTOCOL=IPC)(KEY=LISTENER_SCAN2)))
TNS-12541: TNS:no listener
 TNS-12560: TNS:protocol adapter error
  TNS-00511: No listener
   Linux Error: 2: No such file or directory

[oracle@rac2:/home/oracle]#lsnrctl status listener_scan3
LSNRCTL for Linux: Version 12.2.0.1.0 - Production on 08-MAR-2020 15:52:40
Copyright (c) 1991, 2016, Oracle.  All rights reserved.
Connecting to (DESCRIPTION=(ADDRESS=(PROTOCOL=IPC)(KEY=LISTENER_SCAN3)))
STATUS of the LISTENER
------------------------
Alias                     LISTENER_SCAN3
Version                   TNSLSNR for Linux: Version 12.2.0.1.0 - Production
Start Date                08-MAR-2020 15:51:08
Uptime                    0 days 0 hr. 1 min. 32 sec
Trace Level               off
Security                  ON: Local OS Authentication
SNMP                      OFF
Listener Parameter File   /oracle/app/12.2.0.1/grid/network/admin/listener.ora
Listener Log File         /oracle/app/grid/diag/tnslsnr/rac2/listener_scan3/alert/log.xml
Listening Endpoints Summary...
  (DESCRIPTION=(ADDRESS=(PROTOCOL=ipc)(KEY=LISTENER_SCAN3)))
  (DESCRIPTION=(ADDRESS=(PROTOCOL=tcp)(HOST=192.168.138.42)(PORT=1521)))
The listener supports no services
The command completed successfully
it’s an oracle bug:
Bug 12887685 - INSTANCE CAN'T BE REGISTERED IN LISTENER_SCAN1
Bug 12665692 - PMON DOES NOT REGISTER TO ONE OF THE SCAN LISTENER.
Bug 12392343 - INSTANCE/SERVICE DOES NOT REGISTER TO ALL SCAN LISTENERS
Bug 12659561 - INSTANCE DOES NOT REGISTER SERVICES WHEN SCAN FAILOVERED
Bug 10194101 - SOME INSTANCES INTERMITTENTLY DO NOT CROSS-REGISTER WITH THE SCAN LISTENER
Bug 7420414  - SCAN LISTENER LOSE SERVICE REGISTRATION INFORMATION AFTER SERVICE RELOCATION
The workaround:
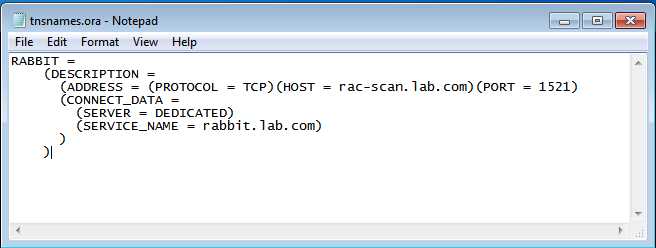
1) Add SCAN IP to tnsnames.ora for RDBMS $ORACLE_HOME on all RAC nodes.
REMOTE_LISTENERS_SCAN=
    (DESCRIPTION =
      (ADDRESS = (PROTOCOL = TCP)(HOST =  192.168.138.41)(PORT = 1521))
      (ADDRESS = (PROTOCOL = TCP)(HOST =  192.168.138.42)(PORT = 1521))
      (ADDRESS = (PROTOCOL = TCP)(HOST =  192.168.138.43)(PORT = 1521))
)
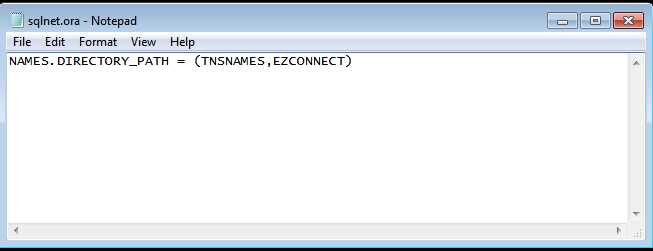
2) Modify the sqlnet.ora to allow ezconnect
NAMES.DIRECTORY_PATH= (TNSNAMES,EZCONNECT)
3) Modify the remote_listener parameter
alter system set REMOTE_LISTENER='REMOTE_LISTENERS_SCAN' scope=both sid='*';
alter system register;
4) Test
[oracle@columbus/home/oracle]#sqlplus hr/oracle@rabbit
Before:
SQL*Plus: Release 12.2.0.1.0 Production on Sun Mar 8 17:24:53 2020
Copyright (c) 1982, 2016, Oracle.  All rights reserved.
ERROR:
ORA-12514: TNS:listener does not currently know of service requested in connect
descriptor
Enter user-name:
After:
[oracle@columbus/home/oracle]#sqlplus hr/oracle@rabbit
SQL*Plus: Release 12.2.0.1.0 Production on Sun Mar 8 17:41:26 2020
Copyright (c) 1982, 2016, Oracle.  All rights reserved.
Last Successful login time: Sun Mar 08 2020 17:40:16 -05:00
Connected to:
Oracle Database 12c Enterprise Edition Release 12.2.0.1.0 - 64bit Production
SQL>

[oracle@columbus/oracle/product/12.2.0.1/network/admin]#tnsping RABBIT
TNS Ping Utility for Linux: Version 12.2.0.1.0 - Production on 08-MAR-2020 18:17:55
Copyright (c) 1997, 2016, Oracle.  All rights reserved.
Used parameter files:
/oracle/product/12.2.0.1/network/admin/sqlnet.ora
Used TNSNAMES adapter to resolve the alias
Attempting to contact (DESCRIPTION = (ADDRESS = (PROTOCOL = TCP)(HOST = rac-scan.lab.com)(PORT = 1521)) (CONNECT_DATA = (SERVER = DEDICATED) (SERVICE_NAME = rabbit.lab.com)))
OK (10 msec)
[oracle@columbus/oracle/product/12.2.0.1/network/admin]ping rac-scan.lab.com
PING rac-scan.lab.com (192.168.138.42) 56(84) bytes of data.
64 bytes from 192.168.138.42 (192.168.138.42): icmp_seq=1 ttl=64 time=0.609 ms
64 bytes from 192.168.138.42 (192.168.138.42): icmp_seq=2 ttl=64 time=0.455 ms

[oracle@rac1:/home/oracle]#lsnrctl status listener_scan1
LSNRCTL for Linux: Version 12.2.0.1.0 - Production on 08-MAR-2020 19:04:36
Copyright (c) 1991, 2016, Oracle.  All rights reserved.
Connecting to (DESCRIPTION=(ADDRESS=(PROTOCOL=IPC)(KEY=LISTENER_SCAN1)))
TNS-12541: TNS:no listener
 TNS-12560: TNS:protocol adapter error
  TNS-00511: No listener
   Linux Error: 2: No such file or directory
[oracle@rac1:/home/oracle]#lsnrctl status listener_scan2
LSNRCTL for Linux: Version 12.2.0.1.0 - Production on 08-MAR-2020 19:04:39
Copyright (c) 1991, 2016, Oracle.  All rights reserved.
Connecting to (DESCRIPTION=(ADDRESS=(PROTOCOL=IPC)(KEY=LISTENER_SCAN2)))
STATUS of the LISTENER
------------------------
Alias                     LISTENER_SCAN2
Version                   TNSLSNR for Linux: Version 12.2.0.1.0 - Production
Start Date                08-MAR-2020 16:14:09
Uptime                    0 days 2 hr. 50 min. 30 sec
Trace Level               off
Security                  ON: Local OS Authentication
SNMP                      OFF
Listener Parameter File   /oracle/app/12.2.0.1/grid/network/admin/listener.ora
Listener Log File         /oracle/app/grid/diag/tnslsnr/rac1/listener_scan2/alert/log.xml
Listening Endpoints Summary...
  (DESCRIPTION=(ADDRESS=(PROTOCOL=ipc)(KEY=LISTENER_SCAN2)))
  (DESCRIPTION=(ADDRESS=(PROTOCOL=tcp)(HOST=192.168.138.41)(PORT=1521)))
Services Summary...
Service "RABBITXDB.lab.com" has 2 instance(s).
  Instance "RABBIT1", status READY, has 1 handler(s) for this service...
  Instance "RABBIT2", status READY, has 1 handler(s) for this service...
Service "rabbit.lab.com" has 2 instance(s).
  Instance "RABBIT1", status READY, has 1 handler(s) for this service...
  Instance "RABBIT2", status READY, has 1 handler(s) for this service...
The command completed successfully

[oracle@rac1:/home/oracle]#lsnrctl status listener_scan3
LSNRCTL for Linux: Version 12.2.0.1.0 - Production on 08-MAR-2020 19:04:42
Copyright (c) 1991, 2016, Oracle.  All rights reserved.
Connecting to (DESCRIPTION=(ADDRESS=(PROTOCOL=IPC)(KEY=LISTENER_SCAN3)))
STATUS of the LISTENER
------------------------
Alias                     LISTENER_SCAN3
Version                   TNSLSNR for Linux: Version 12.2.0.1.0 - Production
Start Date                08-MAR-2020 16:14:09
Uptime                    0 days 2 hr. 50 min. 33 sec
Trace Level               off
Security                  ON: Local OS Authentication
SNMP                      OFF
Listener Parameter File   /oracle/app/12.2.0.1/grid/network/admin/listener.ora
Listener Log File         /oracle/app/grid/diag/tnslsnr/rac1/listener_scan3/alert/log.xml
Listening Endpoints Summary...
  (DESCRIPTION=(ADDRESS=(PROTOCOL=ipc)(KEY=LISTENER_SCAN3)))
  (DESCRIPTION=(ADDRESS=(PROTOCOL=tcp)(HOST=192.168.138.42)(PORT=1521)))
Services Summary...
Service "RABBITXDB.lab.com" has 2 instance(s).
  Instance "RABBIT1", status READY, has 1 handler(s) for this service...
  Instance "RABBIT2", status READY, has 1 handler(s) for this service...
Service "rabbit.lab.com" has 2 instance(s).
  Instance "RABBIT1", status READY, has 1 handler(s) for this service...
  Instance "RABBIT2", status READY, has 1 handler(s) for this service...
The command completed successfully

[oracle@rac2:/home/oracle]#lsnrctl status listener_scan1
LSNRCTL for Linux: Version 12.2.0.1.0 - Production on 08-MAR-2020 19:07:30
Copyright (c) 1991, 2016, Oracle.  All rights reserved.
Connecting to (DESCRIPTION=(ADDRESS=(PROTOCOL=IPC)(KEY=LISTENER_SCAN1)))
STATUS of the LISTENER
------------------------
Alias                     LISTENER_SCAN1
Version                   TNSLSNR for Linux: Version 12.2.0.1.0 - Production
Start Date                08-MAR-2020 16:16:04
Uptime                    0 days 2 hr. 51 min. 25 sec
Trace Level               off
Security                  ON: Local OS Authentication
SNMP                      OFF
Listener Parameter File   /oracle/app/12.2.0.1/grid/network/admin/listener.ora
Listener Log File         /oracle/app/grid/diag/tnslsnr/rac2/listener_scan1/alert/log.xml
Listening Endpoints Summary...
  (DESCRIPTION=(ADDRESS=(PROTOCOL=ipc)(KEY=LISTENER_SCAN1)))
  (DESCRIPTION=(ADDRESS=(PROTOCOL=tcp)(HOST=192.168.138.43)(PORT=1521)))
Services Summary...
Service "RABBITXDB.lab.com" has 2 instance(s).
  Instance "RABBIT1", status READY, has 1 handler(s) for this service...
  Instance "RABBIT2", status READY, has 1 handler(s) for this service...
Service "rabbit.lab.com" has 2 instance(s).
  Instance "RABBIT1", status READY, has 1 handler(s) for this service...
  Instance "RABBIT2", status READY, has 1 handler(s) for this service...
The command completed successfully
[oracle@rac2:/home/oracle]lsnrctl status listener_scan2
LSNRCTL for Linux: Version 12.2.0.1.0 - Production on 08-MAR-2020 19:07:33
Copyright (c) 1991, 2016, Oracle.  All rights reserved.
Connecting to (DESCRIPTION=(ADDRESS=(PROTOCOL=IPC)(KEY=LISTENER_SCAN2)))
TNS-12541: TNS:no listener
 TNS-12560: TNS:protocol adapter error
  TNS-00511: No listener
   Linux Error: 2: No such file or directory

[oracle@rac2:/home/oracle]#lsnrctl status listener_scan3
LSNRCTL for Linux: Version 12.2.0.1.0 - Production on 08-MAR-2020 19:07:36
Copyright (c) 1991, 2016, Oracle.  All rights reserved.
Connecting to (DESCRIPTION=(ADDRESS=(PROTOCOL=IPC)(KEY=LISTENER_SCAN3)))
TNS-12541: TNS:no listener
 TNS-12560: TNS:protocol adapter error
  TNS-00511: No listener
   Linux Error: 2: No such file or directory