Oracle 教程 Tablespace
1.Introduction to Tablespaces
Oracle stores data logically in tablespaces and physically in datafiles associated with the corresponding tablespace. Figure 3-1 illustrates this relationship.
Figure 3-1 Datafiles and Tablespaces
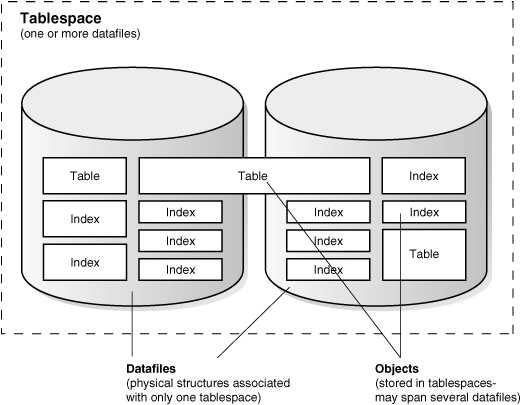
Figure 3-1 shows one tablespace that contains two datafiles. The datafiles are the physical structures associated with only one tablespace. Inside the datafiles are objects, like tables and indexes. Objects stored in tablespaces can span several datafiles.
Databases, tablespaces, and datafiles are closely related, but they have important differences:
- An Oracle database consists of one or more logical storage units called tablespaces, which collectively store all of the database’s data.
- Each tablespace in an Oracle database consists of one or more files called datafiles, which are physical structures that conform to the operating system in which Oracle is running.
- A database’s data is collectively stored in the datafiles that constitute each tablespace of the database. For example, the simplest Oracle database would have one tablespace and one datafile. Another database can have three tablespaces, each consisting of two datafiles (for a total of six datafiles).
1.1.Oracle-Managed Files
Oracle-managed files eliminate the need for you, the DBA, to directly manage the operating system files comprising an Oracle database. You specify operations in terms of database objects rather than filenames. Oracle internally uses standard file system interfaces to create and delete files as needed for the following database structures:
- Tablespaces
- Redo log files
- Control files
Through initialization parameters, you specify the file system directory to be used for a particular type of file. Oracle then ensures that a unique file, an Oracle-managed file, is created and deleted when no longer needed.
1.2.Allocate More Space for a Database
The size of a tablespace is the size of the datafiles that constitute the tablespace. The size of a database is the collective size of the tablespaces that constitute the database.
You can enlarge a database in three ways:
- Add a datafile to a tablespace
- Add a new tablespace
- Increase the size of a datafile
When you add another datafile to an existing tablespace, you increase the amount of disk space allocated for the corresponding tablespace. Figure 3-2 illustrates this kind of space increase.
Figure 3-2 Enlarging a Database by Adding a Datafile to a Tablespace
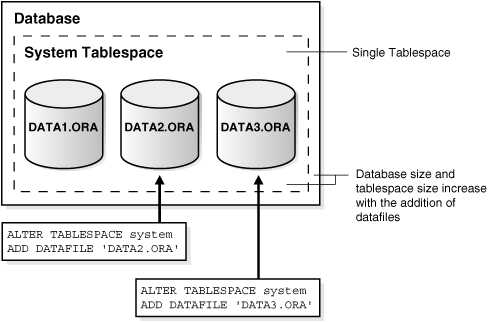
Figure 3-2 shows the SQL statement for adding a datafile to a tablespace.
Database size and tablespace size increase with the addition of datafiles.
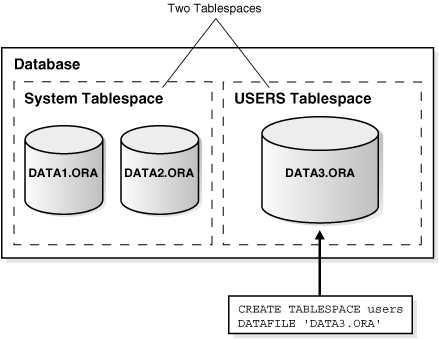
Alternatively, you can create a new tablespace (which contains at least one additional datafile) to increase the size of a database. Figure 3-3 illustrates this.
Figure 3-3 Enlarging a Database by Adding a New Tablespace
The third option for enlarging a database is to change a datafile’s size or let datafiles in existing tablespaces grow dynamically as more space is needed. You accomplish this by altering existing files or by adding files with dynamic extension properties. Figure 3-4 illustrates this.
Figure 3-4 Enlarging a Database by Dynamically Sizing Datafiles
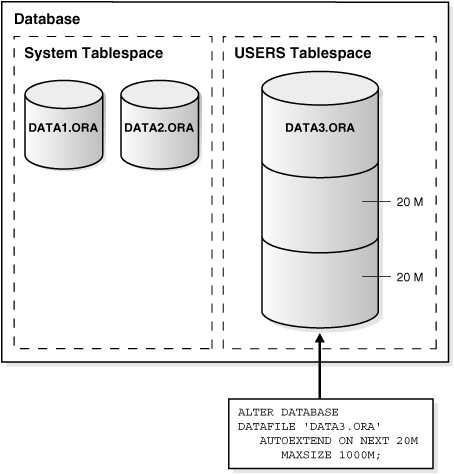
Figure 3-4 shows the SQL statement for dynamically sizing datafiles:
2.Guidelines for Managing Tablespaces
2.1.Use Multiple Tablespaces
Using multiple tablespaces allows you more flexibility in performing database operations.
When a database has multiple tablespaces, you can:
- Separate user data from data dictionary data to reduce I/O contention.
- Separate data of one application from the data of another to prevent multiple applications from being affected if a tablespace must be taken offline.
- Store the data files of different tablespaces on different disk drives to reduce I/O contention.
- Take individual tablespaces offline while others remain online, providing better overall availability.
- Optimizing tablespace use by reserving a tablespace for a particular type of database use, such as high update activity, read-only activity, or temporary segment storage.
- Back up individual tablespaces.
Some operating systems set a limit on the number of files that can be open simultaneously. Such limits can affect the number of tablespaces that can be simultaneously online. To avoid exceeding your operating system limit, plan your tablespaces efficiently. Create only enough tablespaces to fulfill your needs, and create these tablespaces with as few files as possible. If you must increase the size of a tablespace, then add one or two large data files, or create data files with autoextension enabled, rather than creating many small data files.
Review your data in light of these factors and decide how many tablespaces you need for your database design.
2.2.Assign Tablespace Quotas to Users
Grant to users who will be creating tables, clusters, materialized views, indexes, and other objects the privilege to create the object and a quota (space allowance or limit) in the tablespace intended to hold the object segment.
Note: For PL/SQL objects such as packages, procedures, and functions, users only need the privileges to create the objects. No explicit tablespace quota is required to create these PL/SQL objects.
alter user user_name quota unlimited on tablespace_name;  --对指定表空间不做限额
alter user user_name quota 10G on tablespace_name;        --指定用户在某表空间限制
3.Creating Tablespaces
3.1.About Creating Tablespaces
To create a new tablespace, use the SQL statement CREATE TABLESPACE or CREATE TEMPORARY TABLESPACE. You must have the CREATE TABLESPACE system privilege to create a tablespace.
Before you can create a tablespace, you must create a database to contain it. The primary tablespace in any database is the SYSTEM tablespace, which contains information basic to the functioning of the database server, such as the data dictionary and the system rollback segment. The SYSTEM tablespace is the first tablespace created at database creation. It is managed as any other tablespace, but requires a higher level of privilege and is restricted in some ways. For example, you cannot rename or drop the SYSTEM tablespace or take it offline.
The SYSAUX tablespace, which acts as an auxiliary tablespace to the SYSTEM tablespace, is also always created when you create a database. It contains the schemas used by various Oracle products and features, so that those products do not require their own tablespaces. As for the SYSTEM tablespace, management of the SYSAUX tablespace requires a higher level of security and you cannot rename or drop it. The management of the SYSAUX tablespace is discussed separately in “Managing the SYSAUX Tablespace”.
The steps for creating tablespaces vary by operating system, but the first step is always to use your operating system to create a directory structure in which your data files will be allocated. On most operating systems, you specify the size and fully specified file names of data files when you create a new tablespace or alter an existing tablespace by adding data files. Whether you are creating a new tablespace or modifying an existing one, the database automatically allocates and formats the data files as specified.
You can also use the CREATE UNDO TABLESPACE statement to create a special type of tablespace called an undo tablespace, which is specifically designed to contain undo records. These are records generated by the database that are used to roll back, or undo, changes to the database for recovery, read consistency, or as requested by a ROLLBACK statement. Creating and managing undo tablespaces is the subject of Managing Undo .
You can use the ALTER TABLESPACE or ALTER DATABASE statements to alter the tablespace. You must have the ALTER TABLESPACE or ALTER DATABASE system privilege, correspondingly.
CREATE TABLESPACE TS_EXAMPLE
    NOLOGGING
    DATAFILE  '/oradata/data/ts_example01.dbf'  SIZE 2048M
    AUTOEXTEND ON NEXT 100M MAXSIZE 20480M
    EXTENT MANAGEMENT LOCAL;
3.2.Locally Managed Tablespaces
A locally managed tablespace uses a bitmap stored in each data file to manage the extents.
3.2.1.About Locally Managed Tablespaces
Locally managed tablespaces track all extent information in the tablespace itself by using bitmaps.
Locally managed tablespaces provide the following benefits:
- Fast, concurrent space operations. Space allocations and deallocations modify locally managed resources (bitmaps stored in header files).
- Enhanced performance
- Readable standby databases are allowed, because locally managed temporary tablespaces do not generate any undo or redo.
- Space allocation is simplified, because when the AUTOALLOCATE clause is specified, the database automatically selects the appropriate extent size.
- User reliance on the data dictionary is reduced, because the necessary information is stored in file headers and bitmap blocks.
- Coalescing(合并) free extents is unnecessary for locally managed tablespaces.
All tablespaces, including the SYSTEM tablespace, can be locally managed.
The DBMS_SPACE_ADMIN package provides maintenance procedures for locally managed tablespaces.
LMT:Locally Managed Tablespace
DMT:Dictionary Managed Tablespace
对于Oracle 9i以后的表空间管理方式系统默认为LMT。
本地管理表空间,Oracle通过在每个数据文件内都维护一个位图以了解该数据文件内块的空闲或使用状态,位图内的每一位对应一个块或者一组块在分配区或者释放区,以供再次使用时Oracle 服务器更改位图数值以显示块的新状态。
每次一个区间被分配或者释放时,Oracle就会更新位图信息来显示新的空间使用状态,避免了在字典管理的空间分配期间需要的递归操作而导致的性能问题,而且简化空间分配,减少用户对数据字典的依赖,必要的信息被存储在头部的位图块中了。
本地化管理的表空间,使用位图(bitmap)的方式管理空间的使用情况,另一种管理的形式是使用数据字典进行管理,效率较低,现在不推荐使用。
UNIFORM实际上是段的概念,就是在表空间本地管理过程中对不同对象使用相同的段设置。
AUTOALLOCATE:区大小由系统自动分配。
Oracle提供了系统包转化DMT为LMT:
dbms_space_admin.tablespace_migrate_to_local('tablespacename','unit_size')
3.2.2.Creating a Locally Managed Tablespace
Create a locally managed tablespace by specifying LOCAL in the EXTENT MANAGEMENT clause of the CREATE TABLESPACE statement.
This is the default for new permanent tablespaces, but you must specify the EXTENT MANAGEMENT LOCAL clause to specify either the AUTOALLOCATE clause or the UNIFORM clause. You can have the database manage extents for you automatically with the AUTOALLOCATE clause (the default), or you can specify that the tablespace is managed with uniform extents of a specific size (UNIFORM).
If you expect the tablespace to contain objects of varying sizes requiring many extents with different extent sizes, then AUTOALLOCATE is the best choice. AUTOALLOCATE is also a good choice if it is not important for you to have a lot of control over space allocation and deallocation, because it simplifies tablespace management. Some space may be wasted with this setting, but the benefit of having Oracle Database manage your space most likely outweighs this drawback.
If you want exact control over unused space, and you can predict exactly the space to be allocated for an object or objects and the number and size of extents, then UNIFORM is a good choice. This setting ensures that you will never have unusable space in your tablespace.
When you do not explicitly specify the type of extent management, Oracle Database determines extent management as follows:
- If the CREATE TABLESPACE statement omits the DEFAULT storage clause, then the database creates a locally managed autoallocated tablespace.
- If the CREATE TABLESPACE statement includes a DEFAULT storage clause, then the database considers the following:
If you specified the MINIMUM EXTENT clause, the database evaluates whether the values of MINIMUM EXTENT, INITIAL, and NEXT are equal and the value of PCTINCREASE is 0. If so, the database creates a locally managed uniform tablespace with extent size = INITIAL. If the MINIMUM EXTENT, INITIAL, and NEXT parameters are not equal, or if PCTINCREASE is not 0, then the database ignores any extent storage parameters you may specify and creates a locally managed, autoallocated tablespace.
If you did not specify MINIMUM EXTENT clause, then the database evaluates only whether the storage values of INITIAL and NEXT are equal and PCTINCREASE is 0. If so, the tablespace is locally managed and uniform. Otherwise, the tablespace is locally managed and autoallocated.
For example, the following statement creates a locally managed tablespace named lmtbsb and specifies AUTOALLOCATE:
CREATE TABLESPACE lmtbsb DATAFILE '/u02/oracle/data/lmtbsb01.dbf' SIZE 50M
    EXTENT MANAGEMENT LOCAL AUTOALLOCATE;
AUTOALLOCATE causes the tablespace to be system managed with a minimum extent size of 64K.
The alternative to AUTOALLOCATE is UNIFORM. which specifies that the tablespace is managed with extents of uniform size. You can specify that size in the SIZE clause of UNIFORM. If you omit SIZE, then the default size is 1M.
The following example creates a tablespace with uniform 128K extents. (In a database with 2K blocks, each extent would be equivalent to 64 database blocks). Each 128K extent is represented by a bit in the extent bitmap for this file.
CREATE TABLESPACE lmtbsb DATAFILE '/u02/oracle/data/lmtbsb01.dbf' SIZE 50M
    EXTENT MANAGEMENT LOCAL UNIFORM SIZE 128K;
You cannot specify the DEFAULT storage clause, MINIMUM EXTENT, or TEMPORARY when you explicitly specify EXTENT MANAGEMENT LOCAL. To create a temporary locally managed tablespace, use the CREATE TEMPORARY TABLESPACE statement.
Note: When you allocate a data file for a locally managed tablespace, you should allow space for metadata used for space management (the extent bitmap or space header segment) which are part of user space. For example, if you specify the UNIFORM clause in the extent management clause but you omit(忽略) the SIZE parameter, then the default extent size is 1MB. In that case, the size specified for the data file must be larger (at least one block plus space for the bitmap) than 1MB.
Another Example:
CREATE TABLESPACE TS_EXAMPLE
DATAFILE
    '/oradata/PEACOCK/TS_EXAMPLE01.dbf' SIZE 8G AUTO EXTEND ON NEXT 100M,
    '/oradata/PEACOCK/TS_EXAMPLE02.dbf' SIZE 8G AUTO EXTEND ON NEXT 100M
EXTENT MANAGEMENT LOCAL;
3.2.3.Specifying Segment Space Management in Locally Managed Tablespaces
In a locally managed tablespace, there are two methods that Oracle Database can use to manage segment space: automatic and manual.
Manual segment space management uses linked lists called “freelists” to manage free space in the segment, while automatic segment space management uses bitmaps. Automatic segment space management is the more efficient method, and is the default for all new permanent, locally managed tablespaces.
Automatic segment space management delivers better space utilization than manual segment space management. It is also self-tuning, in that it scales with increasing number of users or instances. In an Oracle Real Application Clusters environment, automatic segment space management allows for a dynamic affinity of space to instances. In addition, for many standard workloads, application performance with automatic segment space management is better than the performance of a well-tuned application using manual segment space management.
Although automatic segment space management is the default for all new permanent, locally managed tablespaces, you can explicitly enable it with the SEGMENT SPACE MANAGEMENT AUTO clause.
For example, the following statement creates tablespace lmtbsb with automatic segment space management:
CREATE TABLESPACE lmtbsb DATAFILE '/u02/oracle/data/lmtbsb01.dbf' SIZE 50M
    EXTENT MANAGEMENT LOCAL
    SEGMENT SPACE MANAGEMENT AUTO;
SEGMENT SPACE MANAGEMENT AUTO 是缺省设置,不需要指定。
The SEGMENT SPACE MANAGEMENT MANUAL clause disables automatic segment space management.
The segment space management that you specify at tablespace creation time applies to all segments subsequently created in the tablespace. You cannot change the segment space management mode of a tablespace.
Note:
- If you set extent management to LOCAL UNIFORM, then you must ensure that each extent contains at least 5 database blocks.
- If you set extent management to LOCAL AUTOALLOCATE, and if the database block size is 16K or greater, then Oracle manages segment space by creating extents with a minimum size of 5 blocks rounded up to 64K.
- You cannot specify automatic segment space management for the SYSTEM tablespace.
3.3.Bigfile Tablespaces
Bigfile tablespaces can increase the storage capacity of a database and reduce the burden of managing many data files and temp files.
3.3.1.About Bigfile Tablespaces
A bigfile tablespace is a tablespace with a single, but potentially very large (up to 4G blocks) data file. Traditional smallfile tablespaces, in contrast, can contain multiple data files, but the files cannot be as large.
The benefits of bigfile tablespaces are the following:
- A bigfile tablespace with 8K blocks can contain a 32 terabyte data file. A bigfile tablespace with 32K blocks can contain a 128 terabyte data file. The maximum number of data files in an Oracle Database is limited (usually to 64K files). Therefore, bigfile tablespaces can significantly enhance the storage capacity of an Oracle Database.
- Bigfile tablespaces can reduce the number of data files needed for a database. An additional benefit is that the DB_FILES initialization parameter and MAXDATAFILES parameter of the CREATE DATABASE and CREATE CONTROLFILE statements can be adjusted to reduce the amount of SGA space required for data file information and the size of the control file.
- Bigfile tablespaces simplify database management by providing data file transparency. SQL syntax for the ALTER TABLESPACE statement lets you perform operations on tablespaces, rather than the underlying individual data files.
Bigfile tablespaces are supported only for locally managed tablespaces with automatic segment space management, with three exceptions: locally managed undo tablespaces, temporary tablespaces, and the SYSTEM tablespace.
Note:
- Bigfile tablespaces are intended to be used with Automatic Storage Management (Oracle ASM) or other logical volume managers that supports striping(分段, 分散读写, 条带) or RAID, and dynamically extensible logical volumes.
- Avoid creating bigfile tablespaces on a system that does not support striping because of negative implications for parallel query execution and RMAN backup parallelization.
- Using bigfile tablespaces on platforms that do not support large file sizes is not recommended and can limit tablespace capacity. See your operating system specific documentation for information about maximum supported file sizes.
条带(strip)是把连续的数据分割成相同大小的数据块,把每段数据分别写入到阵列中的不同磁盘上的方法。简单的说,条带是一种将多个磁盘驱动器合并为一个卷的方法。 许多情况下,这是通过硬件控制器来完成的。
3.3.2.Creating a Bigfile Tablespace
To create a bigfile tablespace, specify the BIGFILE keyword of the CREATE TABLESPACE statement (CREATE BIGFILE TABLESPACE …).
Oracle Database automatically creates a locally managed tablespace with automatic segment space management. You can, but need not, specify EXTENT MANAGEMENT LOCAL and SEGMENT SPACE MANAGEMENT AUTO in this statement. However, the database returns an error if you specify EXTENT MANAGEMENT DICTIONARY or SEGMENT SPACE MANAGEMENT MANUAL. The remaining syntax of the statement is the same as for the CREATE TABLESPACE statement, but you can only specify one data file. For example:
CREATE BIGFILE TABLESPACE bigtbs
    DATAFILE '/u02/oracle/data/bigtbs01.dbf' SIZE 50G;
You can specify SIZE in kilobytes (K), megabytes (M), gigabytes (G), or terabytes (T).
If the default tablespace type was set to BIGFILE at database creation, you need not specify the keyword BIGFILE in the CREATE TABLESPACE statement. A bigfile tablespace is created by default.
If the default tablespace type was set to BIGFILE at database creation, but you want to create a traditional (smallfile) tablespace, then specify a CREATE SMALLFILE TABLESPACE statement to override the default tablespace type for the tablespace that you are creating.
Another example:
CREATE BIGFILE TABLESPACE TS_EXAMPLE
DATAFILE '/oradata/PEACOCK/TS_EXAMPLE.dbf' SIZE 4G
autoextend on next 1G maxsize 2T;
3.3.3.Identifying a Bigfile Tablespace
You can query a set of data dictionary views for information about bigfile tablespaces.
The following views contain a BIGFILE column that identifies a tablespace as a bigfile tablespace:
- DBA_TABLESPACES
- USER_TABLESPACES
- V$TABLESPACE
Query these views for information about bigfile tablespaces.
You can also identify a bigfile tablespace by the relative file number of its single data file. That number is 1024 on most platforms, but 4096 on OS/390.
CREATE BIGFILE TABLESPACE bigtbs
    DATAFILE '/oradata/data/HAMSTER/bigtbs01.dbf' SIZE 1G;

SELECT tablespace_name, file_id, relative_fno FROM dba_data_files;

TABLESPACE_NAME          FILE_ID RELATIVE_FNO
------------------------------ ---------- ------------
TABLESPACE_NAME                   FILE_ID RELATIVE_FNO
------------------------------ ---------- ------------
SYSTEM                                  1            1
SYSAUX                                  3            3
UNDOTBS1                                4            4
USERS                                   7            7
BIGTBS                                  5         1024
3.4.Default Compression Attributes
When you create a tablespace, you can specify that all tables and indexes, or their partitions, created in a tablespace are compressed by default.
When you create a tablespace, you can specify the default compression of data for all tables and indexes created in the tablespace. The default compression level also applies to the partitions that comprise the tablespace. Compressing this data can reduce disk use.
When you create a tablespace, you can specify the type of table compression using the DEFAULT keyword, followed by the table compression clause including the compression type. You can also specify the type of index compression using the DEFAULT keyword, followed by index compression clause and the index compression type.
The following statement indicates that all tables and partitions created in the tablespace are to use advanced row compression, unless otherwise specified:
CREATE TABLESPACE ... DEFAULT ROW STORE COMPRESS ADVANCED ... ;
You can override the default tablespace compression specification when you create a table or partition in that tablespace.
The following statement indicates that all indexes created in the tablespace are to use high level advanced index compression, unless otherwise specified:
CREATE TABLESPACE ... DEFAULT INDEX COMPRESS ADVANCED HIGH ... ;
You can override the default tablespace compression specification when you create an index in that tablespace.
3.5.Encrypted Tablespaces
You can encrypt any permanent tablespace to protect sensitive data.
3.5.1.About Encrypted Tablespaces
Encrypted tablespaces primarily protect your data from unauthorized access by means other than through the database. For example, when encrypted tablespaces are written to backup media for travel from one Oracle database to another or for travel to an off-site facility for storage, they remain encrypted.
Also, encrypted tablespaces protect data from users who try to circumvent the security features of the database and access database files directly through the operating system file system. Tablespace encryption is completely transparent to your applications, so no application modification is necessary.
Tablespace encryption does not address all security issues. It does not, for example, provide access control from within the database. Any user who is granted privileges on objects stored in an encrypted tablespace can access those objects without providing any kind of additional password or key.
When you encrypt a tablespace, all tablespace blocks are encrypted. All segment types are supported for encryption, including tables, clusters, indexes, LOBs (BASICFILE and SECUREFILE), table and index partitions, and so on.
Note: There is no need to use LOB encryption on SECUREFILE LOBs stored in an encrypted tablespace.
To maximize security, data from an encrypted tablespace is automatically encrypted when written to the undo tablespace, to the redo logs, and to any temporary tablespace. However, starting with Oracle Database 12c Release 2 (12.2.0.1), you can optionally encrypt undo tablespaces and temporary tablespaces.
For partitioned tables and indexes that have different partitions in different tablespaces, it is permitted to use both encrypted and non-encrypted tablespaces in the same table or index.
Tablespace encryption uses the Transparent Data Encryption feature of Oracle Database, which requires that you create a keystore to store the master encryption key for the database. The keystore must be open before you can create the encrypted tablespace and before you can store or retrieve encrypted data. When you open the keystore, it is available to all session, and it remains open until you explicitly close it or until the database is shut down.
Transparent Data Encryption supports industry-standard encryption algorithms, including the following types of encryption algorithms Advanced Encryption Standard (AES) and Triple Data Encryption Standard (3DES) algorithms:
- Advanced Encryption Standard (AES)
- ARIA
- GHOST
- SEED
- Triple Data Encryption Standard (3DES)
The encryption key length is implied by the algorithm name. For example, the AES128 algorithm uses 128-bit keys. You specify the algorithm to use when you create the tablespace, and different tablespaces can use different algorithms. Although longer key lengths theoretically provide greater security, there is a trade-off in CPU overhead. If you do not specify the algorithm in your CREATE TABLESPACE statement, then AES128 is the default. There is no disk space overhead for encrypting a tablespace.
After an encrypted table is created, you can use an ALTER TABLESPACE statement to decrypt it or change its key. You can also use an ALTER TABLESPACE statement to encrypt a tablespace that is not encrypted.
After an encrypted table is created, you can use an ALTER TABLESPACE statement to decrypt it or change its key. You can also use an ALTER TABLESPACE statement to encrypt a tablespace that is not encrypted.
Restrictions
The following are restrictions for encrypted tablespaces:
- Encrypted tablespaces are subject to restrictions when they are transported to another database. See “General Limitations on Transporting Data”.
- When recovering a database with encrypted tablespaces (for example after a SHUTDOWN ABORT or a catastrophic error that brings down the database instance), you must open the keystore after database mount and before database open, so that the recovery process can decrypt data blocks and redo.
3.5.2.Creating Encrypted Tablespaces
You can create encrypted tablespaces to protect your data from unauthorized access.
To encrypt a tablespace, you must open the database with the COMPATIBLE initialization parameter set to 11.1.0 or higher. Any user who can create a tablespace can create an encrypted tablespace.
Examples
To create an encrypted tablespace:
- Run a CREATE TABLESPACE statement with an ENCRYPTION clause.
The following statement creates an encrypted tablespace with the default encryption algorithm:
CREATE TABLESPACE securespace
DATAFILE '/u01/app/oracle/oradata/orcl/secure01.dbf' SIZE 100M
ENCRYPTION ENCRYPT;
The following statement creates the same tablespace with the AES256 algorithm:
CREATE TABLESPACE securespace
DATAFILE '/u01/app/oracle/oradata/orcl/secure01.dbf' SIZE 100M
ENCRYPTION USING 'AES256' ENCRYPT;
You can query the DBA_TABLESPACES and USER_TABLESPACES data dictionary views for information about encrypted tablespaces.
The DBA_TABLESPACES and USER_TABLESPACES data dictionary views include a column named ENCRYPTED. This column contains YES for encrypted tablespaces.
The view V$ENCRYPTED_TABLESPACES lists all currently encrypted tablespaces. The following query displays the name and encryption algorithm of encrypted tablespaces:
SELECT t.name, e.encryptionalg algorithm
FROM  vtablespace t, vencrypted_tablespaces e
WHERE t.ts# = e.ts#;

NAME                           ALGORITHM
------------------------------ ---------
SECURESPACE                    AES256
3.6.Temporary Tablespaces
Temporary tablespaces can improve the concurrency of multiple sort operations that do not fit in memory. These tablespaces also improve the efficiency of space management operations during sorts.
3.6.1.About Temporary Tablespaces
A temporary tablespace contains transient data that persists only for the duration of the session. Temporary tablespaces can improve the concurrency of multiple sort operations that do not fit in memory and can improve the efficiency of space management operations during sorts.
Temporary tablespaces are used to store the following:
- Intermediate sort results
- Temporary tables and temporary indexes
- Temporary LOBs
- Temporary B-trees
Within a temporary tablespace, all sort operations for a particular instance share a single sort segment, and sort segments exist for every instance that performs sort operations that require temporary space. A sort segment is created by the first statement after startup that uses the temporary tablespace for sorting, and is released only at shutdown.
By default, a single temporary tablespace named TEMP is created for each new Oracle Database installation. You can create additional temporary tablespaces with the CREATE TABLESPACE statement. You can assign a temporary tablespace to each database user with the CREATE USER or ALTER USER statement. A single temporary tablespace can be shared by multiple users.
You cannot explicitly create objects in a temporary tablespace.
Note: The exception to the preceding statement is a temporary table. When you create a temporary table, its rows are stored in your default temporary tablespace, unless you create the table in a new temporary tablespace.
Starting with Oracle Database 12c Release 2 (12.2), local temporary tablespaces are available. A local temporary tablespace stores separate, non-shared temp files for every database instance. A local temporary tablespace is used only for spilling temporary results of SQL statements, such as queries that involve sorts, hash aggregations(聚集), and joins. These results are only accessible within an instance. In contrast, a shared temporary tablespace resides on a shared disk and is available to all instances. To create a local temporary tablespace, use a CREATE LOCAL TEMPORARY TABLESPACE statement. Shared temporary tablespaces were available in prior releases of Oracle Database and were called “temporary tablespaces.” In this Oracle Database Administrator’s Guide, the term “temporary tablespace” refers to a shared temporary tablespace unless specified otherwise.
Default Temporary Tablespace
Users who are not explicitly assigned a temporary tablespace use the database default temporary tablespace, which for new installations is TEMP. You can change the default temporary tablespace for the database with the following command:
ALTER DATABASE DEFAULT TEMPORARY TABLESPACE tablespace_name;
To determine the current default temporary tablespace for the database, run the following query:
SELECT PROPERTY_NAME, PROPERTY_VALUE FROM DATABASE_PROPERTIES WHERE
   PROPERTY_NAME='DEFAULT_TEMP_TABLESPACE';

PROPERTY_NAME              PROPERTY_VALUE
-------------------------- ------------------------------
DEFAULT_TEMP_TABLESPACE    TEMP
Space Allocation in a Temporary Tablespace
You can view the allocation and deallocation of space in a temporary tablespace sort segment using the V$SORT_SEGMENT view. The V#TEMPSEG_USAGE view identifies the current sort users in those segments.
When a sort operation that uses temporary space completes, allocated extents in the sort segment are not deallocated; they are just marked as free and available for reuse. The DBA_TEMP_FREE_SPACE view displays the total allocated and free space in each temporary tablespace. You can manually shrink a locally managed temporary tablespace that has a large amount of unused space.
3.6.2.Creating a Locally Managed Temporary Tablespace
Because space management is much simpler and more efficient in locally managed tablespaces, they are ideally suited for temporary tablespaces.
Locally managed temporary tablespaces use temp files, which do not modify data outside of the temporary tablespace or generate any redo for temporary tablespace data. Because of this, they enable you to perform on-disk sorting operations in a read-only or standby database.
You also use different views for viewing information about temp files than you would for data files. The V$TEMPFILE and DBA_TEMP_FILES views are analogous to the V#DATAFILE and DBA_DATA_FILES views.
To create a locally managed temporary tablespace, you use the CREATE TEMPORARY TABLESPACE statement, which requires that you have the CREATE TABLESPACE system privilege.
The following statement creates a temporary tablespace in which each extent is 16M. Each 16M extent (which is the equivalent of 8000 blocks when the standard block size is 2K) is represented by a bit in the bitmap for the file.
CREATE TEMPORARY TABLESPACE lmtemp TEMPFILE '/u02/oracle/data/lmtemp01.dbf'
     SIZE 20M REUSE
     EXTENT MANAGEMENT LOCAL UNIFORM SIZE 16M;
The extent management clause is optional for temporary tablespaces because all temporary tablespaces are created with locally managed extents of a uniform size. If an extent size is specified in the EXTENT SIZE clause, then it is used. If it is not specified, then, Oracle Database uses the tablespace size and file sizes to determine the default extent size.
Note: On some operating systems, the database does not allocate space for the temp file until the temp file blocks are actually accessed. This delay in space allocation results in faster creation and resizing of temp files, but it requires that sufficient disk space is available when the temp files are later used. See your operating system documentation to determine whether the database allocates temp file space in this way on your system.
3.6.3.Creating a Bigfile Temporary Tablespace
Just as for regular tablespaces, you can create single-file (bigfile) temporary tablespaces.
To create a bigfile temporary tablespace:
- Run the CREATE BIGFILE TEMPORARY TABLESPACE statement to create a single-temp file tablespace.
3.6.4.Viewing Space Usage for Temporary Tablespaces
The DBA_TEMP_FREE_SPACE dictionary view contains information about space usage for each temporary tablespace.
The information includes the space allocated and the free space. You can query this view for these statistics using the following statement:
SELECT * from DBA_TEMP_FREE_SPACE;

TABLESPACE_NAME                     TABLESPACE_SIZE ALLOCATED_SPACE FREE_SPACE
----------------------------------- --------------- --------------- ----------
TEMP                                250609664       250609664       249561088
3.7.Temporary Tablespace Groups
A temporary tablespace group is a tablespace group that is assigned as the default temporary tablespace for the database.
3.7.1.Multiple Temporary Tablespaces: Using Tablespace Groups
A tablespace group enables a user to consume temporary space from multiple tablespaces. Using a tablespace group, rather than a single temporary tablespace, can alleviate problems caused where one tablespace is inadequate to hold the results of a sort, particularly on a table that has many partitions. A tablespace group enables parallel execution servers in a single parallel operation to use multiple temporary tablespaces.
A tablespace group has the following characteristics:
- It contains at least one tablespace. There is no explicit limit on the maximum number of tablespaces that are contained in a group.
- It shares the namespace of tablespaces, so its name cannot be the same as any tablespace.
- You can specify a tablespace group name wherever a tablespace name would appear when you assign a default temporary tablespace for the database or a temporary tablespace for a user.
You do not explicitly create a tablespace group. Rather, it is created implicitly when you assign the first temporary tablespace to the group. The group is deleted when the last temporary tablespace it contains is removed from it.
The view DBA_TABLESPACE_GROUPS lists tablespace groups and their member tablespaces.
3.7.2.Creating a Tablespace Group
You create a tablespace group implicitly when you include the TABLESPACE GROUP clause in the CREATE TEMPORARY TABLESPACE or ALTER TABLESPACE statement and the specified tablespace group does not currently exist.
For example, if neither group1 nor group2 exists, then the following statements create those groups, each of which has only the specified tablespace as a member:
CREATE TEMPORARY TABLESPACE lmtemp2 TEMPFILE '/u02/oracle/data/lmtemp201.dbf'
     SIZE 50M
     TABLESPACE GROUP group1;

ALTER TABLESPACE lmtemp TABLESPACE GROUP group2;
3.7.3.Changing Members of a Tablespace Group
You can add a tablespace to an existing tablespace group by specifying the existing group name in the TABLESPACE GROUP clause of the CREATE TEMPORARY TABLESPACE or ALTER TABLESPACE statement.
For example, the following statement adds a tablespace to an existing group. It creates and adds tablespace lmtemp3 to group1, so that group1 contains tablespaces lmtemp2 and lmtemp3.
CREATE TEMPORARY TABLESPACE lmtemp3 TEMPFILE '/u02/oracle/data/lmtemp301.dbf'
     SIZE 25M
     TABLESPACE GROUP group1;
The following statement also adds a tablespace to an existing group, but in this case because tablespace lmtemp2 already belongs to group1, it is in effect moved from group1 to group2:
ALTER TABLESPACE lmtemp2 TABLESPACE GROUP group2;
Now group2 contains both lmtemp and lmtemp2, while group1 consists of only tmtemp3.
You can remove a tablespace from a group as shown in the following statement:
ALTER TABLESPACE lmtemp3 TABLESPACE GROUP '';
Tablespace lmtemp3 no longer belongs to any group. Further, since there are no longer any members of group1, this results in the implicit deletion of group1.
3.7.4.Assigning a Tablespace Group as the Default Temporary Tablespace
Use the ALTER DATABASE…DEFAULT TEMPORARY TABLESPACE statement to assign a tablespace group as the default temporary tablespace for the database.
For example:
ALTER DATABASE DEFAULT TEMPORARY TABLESPACE group2;
Any user who has not explicitly been assigned a temporary tablespace will now use tablespaces lmtemp and lmtemp2.
If a tablespace group is specified as the default temporary tablespace, you cannot drop any of its member tablespaces. You must first remove the tablespace from the tablespace group. Likewise, you cannot drop a single temporary tablespace as long as it is the default temporary tablespace.
4.Consider Storing Tablespaces in the In-Memory Column Store
You can enable a tablespace for the In-Memory Column Store during tablespace creation or by altering a tablespace. When this enable a tablespace for the In-Memory Column Store, all tables in the tablespace are enabled for the In-Memory Column Store by default.
Note: This feature is available starting with Oracle Database 12c Release 1 (12.1.0.2).
The In-Memory Column Store is an optional portion of the system global area (SGA) that stores copies of tables, table partitions, and other database objects that is optimized for rapid scans. In the In-Memory Column Store, table data is stored by column rather than row in the SGA.
5.Specifying Nonstandard Block Sizes for Tablespaces
You can create tablespaces with block sizes different from the standard database block size, which is specified by the DB_BLOCK_SIZE initialization parameter. This feature lets you transport tablespaces with unlike block sizes between databases.
To create a tablespace with a block size different from the database standard block size:
- Use the BLOCKSIZE clause of the CREATE TABLESPACE statement.
In order for the BLOCKSIZE clause to succeed, you must have already set the DB_CACHE_SIZE and at least one DB_nK_CACHE_SIZE initialization parameter. Further, and the integer you specify in the BLOCKSIZE clause must correspond with the setting of one DB_nK_CACHE_SIZE parameter setting. Although redundant, specifying a BLOCKSIZE equal to the standard block size, as specified by the DB_BLOCK_SIZE initialization parameter, is allowed.
The following statement creates tablespace lmtbsb, but specifies a block size that differs from the standard database block size (as specified by the DB_BLOCK_SIZE initialization parameter):
CREATE TABLESPACE lmtbsb DATAFILE '/u02/oracle/data/lmtbsb01.dbf' SIZE 50M
    EXTENT MANAGEMENT LOCAL UNIFORM SIZE 128K
    BLOCKSIZE 8K;
6.Controlling the Writing of Redo Records
For some database operations, you can control whether the database generates redo records.
Without redo, no media recovery is possible. However, suppressing redo generation can improve performance, and may be appropriate for easily recoverable operations. An example of such an operation is a CREATE TABLE…AS SELECT statement, which can be repeated in case of database or instance failure.
To suppress redo when these operations are performed for objects within the tablespace:
- Specify the NOLOGGING clause in the CREATE TABLESPACE statement.
If you do not include this clause, or if you specify LOGGING instead, then the database generates redo when changes are made to objects in the tablespace. Redo is never generated for temporary segments or in temporary tablespaces, regardless of the logging attribute.
The logging attribute specified at the tablespace level is the default attribute for objects created within the tablespace. You can override this default logging attribute by specifying LOGGING or NOLOGGING at the schema object level–for example, in a CREATE TABLE statement.
If you have a standby database, NOLOGGING mode causes problems with the availability and accuracy of the standby database. To overcome this problem, you can specify FORCE LOGGING mode. When you include the FORCE LOGGING clause in the CREATE TABLESPACE statement, you force the generation of redo records for all operations that make changes to objects in a tablespace. This overrides any specification made at the object level.
If you transport a tablespace that is in FORCE LOGGING mode to another database, the new tablespace will not maintain the FORCE LOGGING mode.
7.Online and Offline Tablespaces
You can take an online tablespace offline so that it is temporarily unavailable for general use. The rest of the database remains open and available for users to access data. Conversely, you can bring an offline tablespace online to make the schema objects within the tablespace available to database users. The database must be open to alter the availability of a tablespace.
To alter the availability of a tablespace, use the ALTER TABLESPACE statement. You must have the ALTER TABLESPACE or MANAGE TABLESPACE system privilege.
7.1.Taking Tablespaces Offline
Taking a tablespace offline makes it unavailable for normal access.
You may want to take a tablespace offline for any of the following reasons:
- To make a portion of the database unavailable while allowing normal access to the remainder of the database
- To perform an offline tablespace backup (even though a tablespace can be backed up while online and in use)
- To make an application and its group of tables temporarily unavailable while updating or maintaining the application
- To rename or relocate tablespace data files
To take a tablespace offline:
- Run an ALTER TABLESPACE statement with the OFFLINE clause.
When a tablespace is taken offline, the database takes all the associated files offline.
You cannot take the following tablespaces offline:
- SYSTEM
- The undo tablespace
- Temporary tablespaces
Before taking a tablespace offline, consider altering the tablespace allocation of any users who have been assigned the tablespace as a default tablespace. Doing so is advisable because those users will not be able to access objects in the tablespace while it is offline.
You can specify any of the following parameters as part of the ALTER TABLESPACE…OFFLINE statement:
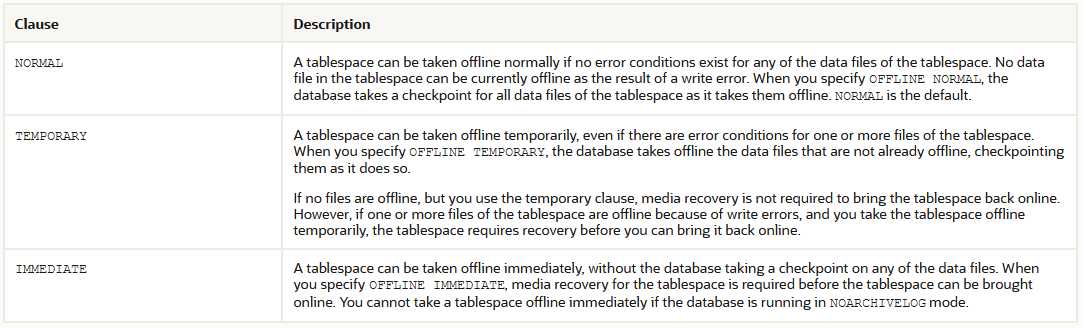
Note: If you must take a tablespace offline, use the NORMAL clause (the default) if possible. This setting guarantees that the tablespace will not require recovery to come back online, even if after incomplete recovery you reset the redo log sequence using an ALTER DATABASE OPEN RESETLOGS statement.
Specify TEMPORARY only when you cannot take the tablespace offline normally. In this case, only the files taken offline because of errors need to be recovered before the tablespace can be brought online. Specify IMMEDIATE only after trying both the normal and temporary settings.
The following example takes the users tablespace offline normally:
ALTER TABLESPACE users OFFLINE NORMAL;
7.2.Bringing Tablespaces Online
You can bring any tablespace in an Oracle Database online whenever the database is open. A tablespace is normally online so that the data contained within it is available to database users.
To bring a tablespace online:
- Run an ALTER TABLESPACE statement with the ONLINE clause.
If a tablespace to be brought online was not taken offline “cleanly” (that is, using the NORMAL clause of the ALTER TABLESPACE OFFLINE statement), you must first perform media recovery on the tablespace before bringing it online. Otherwise, the database returns an error and the tablespace remains offline.
For example, the following statement brings the users tablespace online:
ALTER TABLESPACE users ONLINE;
8.Read-Only Tablespaces
A tablespace can be put into read-only mode. This prevents any data stored in it from being updated.
8.1.About Read-Only Tablespaces
Making a tablespace read-only prevents write operations on the data files in the tablespace.
The primary purpose of read-only tablespaces is to eliminate the need to perform backup and recovery of large, static portions of a database. Read-only tablespaces also provide a way to protecting historical data so that users cannot modify it. Making a tablespace read-only prevents updates on all tables in the tablespace, regardless of a user’s update privilege level.
Note: Making a tablespace read-only cannot in itself be used to satisfy archiving or data publishing requirements, because the tablespace can only be brought online in the database in which it was created. However, you can meet such requirements by using the transportable tablespace feature, as described in “Transporting Tablespaces Between Databases”.
You can drop items, such as tables or indexes, from a read-only tablespace, but you cannot create or alter objects in a read-only tablespace. You can execute statements that update the file description in the data dictionary, such as ALTER TABLE…ADD or ALTER TABLE…MODIFY, but you will not be able to use the new description until the tablespace is made read/write. Note that you cannot add a column of data type BLOB when you alter a table definition.
Read-only tablespaces can be transported to other databases. And, since read-only tablespaces can never be updated, they can reside on CD-ROM or WORM (Write Once-Read Many) devices.
8.2.Making a Tablespace Read-Only
You can make a tablespace read-only using the ALTER TABLESPACE statement with the READ ONLY clause.
All tablespaces are initially created as read/write. You must have the ALTER TABLESPACE or MANAGE TABLESPACE system privilege.
Before you can make a tablespace read-only, the following conditions must be met.
- The tablespace must be online. This is necessary to ensure that there is no undo information that must be applied to the tablespace.
- The tablespace cannot be the active undo tablespace or SYSTEM tablespace.
- The tablespace must not currently be involved in an online backup, because the end of a backup updates the header file of all data files in the tablespace.
- The tablespace cannot be a temporary tablespace.
To change a tablespace to read-only:
- Use the READ ONLY clause in the ALTER TABLESPACE statement.
For example the following statement makes the flights tablespace read-only:
ALTER TABLESPACE flights READ ONLY;
For better performance while accessing data in a read-only tablespace, you can issue a query that accesses all of the blocks of the tables in the tablespace just before making it read-only. A simple query, such as SELECT COUNT (*), executed against each table ensures that the data blocks in the tablespace can be subsequently accessed most efficiently. This eliminates the need for the database to check the status of the transactions that most recently modified the blocks.
You can issue the ALTER TABLESPACE…READ ONLY statement while the database is processing transactions. After the statement is issued, the tablespace is put into a transitional read-only mode, and the ALTER command waits for existing transactions to complete by committing or by rolling back. No further DML operations are allowed to the tablespace, and if a DML statement attempts further changes, then an error is returned.
The ALTER TABLESPACE…READ ONLY statement waits for the following transactions to either commit or roll back before returning: transactions that have pending or uncommitted changes to the tablespace and that were started before you issued the statement. If a transaction started before the statement remains active, but rolls back to a savepoint, rolling back its changes to the tablespace, then the statement no longer waits for this active transaction.
If you find it is taking a long time for the ALTER TABLESPACE statement to complete, then you can identify the transactions that are preventing the read-only state from taking effect. You can then notify the owners of those transactions and decide whether to terminate the transactions, if necessary.
The following example identifies the transaction entry for the ALTER TABLESPACE…READ ONLY statement and displays its session address (saddr):
SELECT SQL_TEXT, SADDR
    FROM VSQLAREA,VSESSION
    WHERE VSQLAREA.ADDRESS = VSESSION.SQL_ADDRESS
        AND SQL_TEXT LIKE 'alter tablespace%';

SQL_TEXT                                 SADDR
---------------------------------------- --------
alter tablespace tbs1 read only          80034AF0
The start SCN of each active transaction is stored in the VTRANSACTION view. Displaying this view sorted by ascending start SCN lists the transactions in execution order. From the preceding example, you already know the session address of the transaction entry for the read-only statement, and you can now locate it in the VTRANSACTION view. All transactions with smaller start SCN, which indicates an earlier execution, can potentially hold up the quiesce and subsequent read-only state of the tablespace.
SELECT SES_ADDR, START_SCNB
    FROM V$TRANSACTION
    ORDER BY START_SCNB;

SES_ADDR START_SCNB
-------- ----------
800352A0       3621   --> waiting on this txn
80035A50       3623   --> waiting on this txn
80034AF0       3628   --> this is the ALTER TABLESPACE statement
80037910       3629   --> don't care about this txn
You can now find the owners of the blocking transactions.
SELECT T.SES_ADDR, S.USERNAME, S.MACHINE
   FROM VSESSION S, VTRANSACTION T
   WHERE T.SES_ADDR = S.SADDR
   ORDER BY T.SES_ADDR

SES_ADDR USERNAME             MACHINE
-------- -------------------- --------------------
800352A0 DAVIDB               DAVIDBLAP             --> Contact this user
80035A50 MIKEL                LAB61                 --> Contact this user
80034AF0 DBA01                STEVEFLAP
80037910 NICKD                NICKDLAP
After making the tablespace read-only, it is advisable to back it up immediately. As long as the tablespace remains read-only, no further backups of the tablespace are necessary, because no changes can be made to it.
8.3.Making a Read-Only Tablespace Writable
Making a read-only tablespace writable allows write operations on the data files in the tablespace.
You must have the ALTER TABLESPACE or MANAGE TABLESPACE system privilege.
To change a tablespace to allow write operations:
- Use the READ WRITE keywords in the ALTER TABLESPACE statement
A prerequisite to making the tablespace read/write is that all of the data files in the tablespace, as well as the tablespace itself, must be online. Use the DATAFILE…ONLINE clause of the ALTER DATABASE statement to bring a data file online. The V$DATAFILE view lists the current status of data files.
For example, the following statement makes the flights tablespace writable:
ALTER TABLESPACE flights READ WRITE;
Making a read-only tablespace writable updates the control file entry for the data files, so that you can use the read-only version of the data files as a starting point for recovery.
8.4.Creating a Read-Only Tablespace on a WORM Device
You can create a read-only tablespace on a CD-ROM or WORM (Write Once-Read Many) device.
Follow these steps to create a read-only tablespace on a CD-ROM or WORM device.
- Create a writable tablespace on another device. Create the objects that belong in the tablespace and insert your data.
- Alter the tablespace to make it read-only.
- Copy the data files of the tablespace onto the WORM device. Use operating system commands to copy the files.
- Take the tablespace offline.
- Rename the data files to coincide with the names of the data files you copied onto your WORM device. Use ALTER TABLESPACE with the RENAME DATAFILE clause. Renaming the data files changes their names in the control file.
- Bring the tablespace back online.
8.5.Delaying the Opening of Data Files in Read-Only Tablespaces
You can delay the opening of data files for read-only tablespaces until there is an attempt to access them.
When substantial portions of a very large database are stored in read-only tablespaces that are located on slow-access devices or hierarchical storage, you should consider setting the READ_ONLY_OPEN_DELAYED initialization parameter to TRUE. This speeds certain operations, primarily opening the database, by causing data files in read-only tablespaces to be accessed for the first time only when an attempt is made to read data stored within them.
Setting READ_ONLY_OPEN_DELAYED=TRUE has the following side-effects:
- A missing or bad read-only file is not detected at open time. It is only discovered when there is an attempt to access it.
- ALTER SYSTEM CHECK DATAFILES does not check read-only files.
- ALTER TABLESPACE…ONLINE and ALTER DATABASE DATAFILE…ONLINE do not check read-only files. They are checked only upon the first access.
- V$RECOVER_FILE, V#BACKUP, and V#DATAFILE_HEADER do not access read-only files. Read-only files are indicated in the results list with the error “DELAYED OPEN”, with zeroes for the values of other columns.
- V$DATAFILE does not access read-only files. Read-only files have a size of “0” listed.
- V$RECOVERY_LOG does not access read-only files. Logs they could need for recovery are not added to the list.
- ALTER DATABASE NOARCHIVELOG does not access read-only files. It proceeds even if there is a read-only file that requires recovery.
Note:
- RECOVER DATABASE and ALTER DATABASE OPEN RESETLOGS continue to access all read-only data files regardless of the parameter value. To avoid accessing read-only files for these operations, take those files offline.
- If a backup control file is used, the read-only status of some files may be inaccurate. This can cause some of these operations to return unexpected results. Care should be taken in this situation.
9.Altering and Maintaining Tablespaces
You can alter and maintain tablespaces by performing such tasks as adding data files and temp files to them.
9.1.Resizing the Size of a Tablespace
You can increase the size of a tablespace by either increasing the size of a data file in the tablespace or adding one.
Additionally, you can enable automatic file extension (AUTOEXTEND) to data files and bigfile tablespaces.
ALTER TABLESPACE users
    ADD DATAFILE '/u02/oracle/rbdb1/users03.dbf' SIZE 10M
      AUTOEXTEND ON
      NEXT 512K
      MAXSIZE 250M;
In the following example, assume that the data file /u02/oracle/rbdb1/stuff01.dbf has extended up to 250M. However, because its tablespace now stores smaller objects, the data file can be reduced in size.
The following statement decreases the size of data file /u02/oracle/rbdb1/stuff01.dbf:
ALTER DATABASE DATAFILE '/u02/oracle/rbdb1/stuff01.dbf'
   RESIZE 100M;
9.2.Altering a Locally Managed Tablespace
You can add a data file to a locally managed tablespace, alter its availability, make it read-only or read/write, rename it, or enable/disable autoextension.
You cannot alter a locally managed tablespace to a locally managed temporary tablespace, nor can you change its method of segment space management. Coalescing free extents is unnecessary for locally managed tablespaces. However, you can use the ALTER TABLESPACE statement on locally managed tablespaces for some operations, including the following:
- Adding a data file. For example:
ALTER TABLESPACE lmtbsb
   ADD DATAFILE '/u02/oracle/data/lmtbsb02.dbf' SIZE 1M;
- Altering tablespace availability (ONLINE/OFFLINE).
- Making a tablespace read-only or read/write.
- Renaming a data file, or enabling or disabling the autoextension of the size of a data file in the tablespace.
9.3.Altering a Bigfile Tablespace
You can resize or autoextend a bigfile tablespace.
Two clauses of the ALTER TABLESPACE statement support data file transparency when you are using bigfile tablespaces:
- RESIZE: The RESIZE clause lets you resize the single data file in a bigfile tablespace to an absolute size, without referring to the data file. For example:
ALTER TABLESPACE bigtbs RESIZE 80G;
- AUTOEXTEND (used outside of the ADD DATAFILE clause):
With a bigfile tablespace, you can use the AUTOEXTEND clause outside of the ADD DATAFILE clause. For example:
ALTER TABLESPACE bigtbs AUTOEXTEND ON NEXT 20G;
An error is raised if you specify an ADD DATAFILE clause for a bigfile tablespace.
9.4.Altering a Locally Managed Temporary Tablespace
You can alter a locally managed temporary tablespace to add a temp file, take a temp file offline, or bring a temp file online.
Note: You cannot use the ALTER TABLESPACE statement, with the TEMPORARY keyword, to change a locally managed permanent tablespace into a locally managed temporary tablespace. You must use the CREATE TEMPORARY TABLESPACE statement to create a locally managed temporary tablespace.
You can use ALTER TABLESPACE to add a temp file, take a temp file offline, or bring a temp file online, as illustrated in the following examples:
ALTER TABLESPACE lmtemp
   ADD TEMPFILE '/u02/oracle/data/lmtemp02.dbf' SIZE 18M REUSE;

ALTER TABLESPACE lmtemp TEMPFILE OFFLINE;
ALTER TABLESPACE lmtemp TEMPFILE ONLINE;
Note: You cannot take a temporary tablespace offline. Instead, you take its temp file offline. The view V$TEMPFILE displays online status for a temp file.
The ALTER DATABASE statement can be used to alter temp files.
The following statements take offline and bring online temp files. They behave identically to the last two ALTER TABLESPACE statements in the previous example.
ALTER DATABASE TEMPFILE '/u02/oracle/data/lmtemp02.dbf' OFFLINE;
ALTER DATABASE TEMPFILE '/u02/oracle/data/lmtemp02.dbf' ONLINE;
The following statement resizes a temp file:
ALTER DATABASE TEMPFILE '/u02/oracle/data/lmtemp02.dbf' RESIZE 18M;
The following statement drops a temp file and deletes its operating system file:
ALTER DATABASE TEMPFILE '/u02/oracle/data/lmtemp02.dbf' DROP
    INCLUDING DATAFILES;
The tablespace to which this temp file belonged remains. A message is written to the alert log for the temp file that was deleted. If an operating system error prevents the deletion of the file, the statement still succeeds, but a message describing the error is written to the alert log.
It is also possible to use the ALTER DATABASE statement to enable or disable the automatic extension of an existing temp file, and to rename a temp file. See Oracle Database SQL Language Reference for the required syntax.
Note: To rename a temp file, you take the temp file offline, use operating system commands to rename or relocate the temp file, and then use the ALTER DATABASE RENAME FILE command to update the database control files.
9.5.Shrinking a Locally Managed Temporary Tablespace
You can shrink locally managed temporary tablespaces and release unused space.
Large sort operations performed by the database may result in a temporary tablespace growing and occupying a considerable amount of disk space. After the sort operation completes, the extra space is not released; it is just marked as free and available for reuse. Therefore, a single large sort operation might result in a large amount of allocated temporary space that remains unused after the sort operation is complete. For this reason, the database enables you to shrink locally managed temporary tablespaces and release unused space.
To shrink a temporary tablespace:
- Use the SHRINK SPACE clause of the ALTER TABLESPACE statement.
To shrink a specific temp file of a temporary tablespace:
- Use the SHRINK TEMPFILE clause of the ALTER TABLESPACE statement .
Shrinking frees as much space as possible while maintaining the other attributes of the tablespace or temp file. The optional KEEP clause defines a minimum size for the tablespace or temp file.
Shrinking is an online operation, which means that user sessions can continue to allocate sort extents if needed, and already-running queries are not affected.
The following example shrinks the locally managed temporary tablespace lmtmp1 while ensuring a minimum size of 20M.
ALTER TABLESPACE lmtemp1 SHRINK SPACE KEEP 20M;
The following example shrinks the temp file lmtemp02.dbf of the locally managed temporary tablespace lmtmp2. Because the KEEP clause is omitted, the database attempts to shrink the temp file to the minimum possible size.
ALTER TABLESPACE lmtemp2 SHRINK TEMPFILE '/u02/oracle/data/lmtemp02.dbf';
10.Renaming Tablespaces
Using the RENAME TO clause of the ALTER TABLESPACE, you can rename a permanent or temporary tablespace.
For example, the following statement renames the users tablespace:
ALTER TABLESPACE users RENAME TO usersts;
When you rename a tablespace the database updates all references to the tablespace name in the data dictionary, control file, and (online) data file headers. The database does not change the tablespace ID so if this tablespace were, for example, the default tablespace for a user, then the renamed tablespace would show as the default tablespace for the user in the DBA_USERS view.
The following affect the operation of this statement:
- If the tablespace being renamed is the SYSTEM tablespace or the SYSAUX tablespace, then it will not be renamed and an error is raised.
- If any data file in the tablespace is offline, or if the tablespace is offline, then the tablespace is not renamed and an error is raised.
- If the tablespace is read only, then data file headers are not updated. This should not be regarded as corruption; instead, it causes a message to be written to the alert log indicating that data file headers have not been renamed. The data dictionary and control file are updated.
- If the tablespace is the default temporary tablespace, then the corresponding entry in the database properties table is updated and the DATABASE_PROPERTIES view shows the new name.
- If the tablespace is an undo tablespace and if the following conditions are met, then the tablespace name is changed to the new tablespace name in the server parameter file (SPFILE).
The server parameter file was used to start up the database.
The tablespace name is specified as the UNDO_TABLESPACE for any instance. - If a traditional initialization parameter file (PFILE) is being used then a message is written to the alert log stating that the initialization parameter file must be manually changed.
11.Dropping Tablespaces
You can drop a tablespace and its contents (the segments contained in the tablespace) from the database if the tablespace and its contents are no longer required.
You must have the DROP TABLESPACE system privilege to drop a tablespace.
Note: Once a tablespace has been dropped, the data in the tablespace is not recoverable. Therefore, ensure that all data contained in a tablespace to be dropped will not be required in the future. Also, immediately before and after dropping a tablespace from a database, back up the database completely. This is strongly recommended so that you can recover the database if you mistakenly drop a tablespace, or if the database experiences a problem in the future after the tablespace has been dropped.
When you drop a tablespace, the file pointers in the control file of the associated database are removed. You can optionally direct Oracle Database to delete the operating system files (data files) that constituted the dropped tablespace. If you do not direct the database to delete the data files at the same time that it deletes the tablespace, you must later use the appropriate commands of your operating system to delete them.
You cannot drop a tablespace that contains any active segments. For example, if a table in the tablespace is currently being used or the tablespace contains undo data needed to roll back uncommitted transactions, you cannot drop the tablespace. The tablespace can be online or offline, but it is best to take the tablespace offline before dropping it.
To drop a tablespace:
- Use the DROP TABLESPACE statement.
The following statement drops the users tablespace, including the segments in the tablespace:
DROP TABLESPACE users INCLUDING CONTENTS;
If the tablespace is empty (does not contain any tables, views, or other structures), you do not need to specify the INCLUDING CONTENTS clause. Use the CASCADE CONSTRAINTS clause to drop all referential integrity constraints from tables outside the tablespace that refer to primary and unique keys of tables inside the tablespace.
To delete the data files associated with a tablespace at the same time that the tablespace is dropped, use the INCLUDING CONTENTS AND DATAFILES clause. The following statement drops the users tablespace and its associated data files:
DROP TABLESPACE users INCLUDING CONTENTS AND DATAFILES;
A message is written to the alert log for each data file that is deleted. If an operating system error prevents the deletion of a file, the DROP TABLESPACE statement still succeeds, but a message describing the error is written to the alert log.
12.SYSTEM Tablespace
Every Oracle database contains a tablespace named SYSTEM, which Oracle creates automatically when the database is created. The SYSTEM tablespace is always online when the database is open.
To take advantage of the benefits of locally managed tablespaces, you can create a locally managed SYSTEM tablespace, or you can migrate an existing dictionary managed SYSTEM tablespace to a locally managed format.
In a database with a locally managed SYSTEM tablespace, dictionary managed tablespaces cannot be created. It is possible to plug in a dictionary managed tablespace using the transportable feature, but it cannot be made writable.
Note: If a tablespace is locally managed, then it cannot be reverted back to being dictionary managed.
12.1.The Data Dictionary
The SYSTEM tablespace always contains the data dictionary tables for the entire database. The data dictionary tables are stored in datafile 1.
12.2. PL/SQL Program Units Description
All data stored on behalf of stored PL/SQL program units (that is, procedures, functions, packages, and triggers) resides in the SYSTEM tablespace. If the database contains many of these program units, then the database administrator must provide the space the units need in the SYSTEM tablespace.
12.3.Migrating the SYSTEM Tablespace to a Locally Managed Tablespace
Use the DBMS_SPACE_ADMIN.TABLESPACE_MIGRATE_TO_LOCAL procedure to migrate the SYSTEM tablespace from dictionary-managed to locally managed.
Before performing the migration the following conditions must be met:
- The database has a default temporary tablespace that is not SYSTEM.
- There are no rollback segments in the dictionary-managed tablespace.
- There is at least one online rollback segment in a locally managed tablespace, or if using automatic undo management, an undo tablespace is online.
- All tablespaces other than the tablespace containing the undo space (that is, the tablespace containing the rollback segment or the undo tablespace) are in read-only mode.
- The SYSAUX tablespace is offline.
- The system is in restricted mode.
- There is a cold backup of the database.
All of these conditions, except for the cold backup, are enforced by the TABLESPACE_MIGRATE_TO_LOCAL procedure.
The following statement performs the migration:
SQL> EXECUTE DBMS_SPACE_ADMIN.TABLESPACE_MIGRATE_TO_LOCAL('SYSTEM');
Note: After the SYSTEM tablespace is migrated to locally managed, any dictionary-managed tablespaces in the database cannot be made read/write. If you want to use the dictionary-managed tablespaces in read/write mode, then Oracle recommends that you first migrate these tablespaces to locally managed before migrating the SYSTEM tablespace.
13.SYSAUX Tablespace
The SYSAUX tablespace was installed as an auxiliary tablespace to the SYSTEM tablespace when you created your database. Some database components that formerly created and used separate tablespaces now occupy the SYSAUX tablespace.
If the SYSAUX tablespace becomes unavailable, core database functionality will remain operational. The database features that use the SYSAUX tablespace could fail, or function with limited capability.
13.1.Monitoring Occupants of the SYSAUX Tablespace
You can monitor the occupants of the SYSAUX tablespace.
The list of registered occupants of the SYSAUX tablespace are discussed in “About the SYSAUX Tablespace”. These components can use the SYSAUX tablespace, and their installation provides the means of establishing their occupancy of the SYSAUX tablespace.
To monitor the occupants of the SYSAUX tablespace:
- Query the V$SYSAUX_OCCUPANTS view.
This view lists the following information about the occupants of the SYSAUX tablespace:
- Name of the occupant
- Occupant description
- Schema name
- Move procedure
- Current space usage
View information is maintained by the occupants.
13.2.Moving Occupants Out Of or Into the SYSAUX Tablespace
The VSYSAUX_OCCUPANTS view provides a move procedure for each occupant of the SYSAUX tablespace.
You will have an option at component install time to specify that you do not want the component to reside in SYSAUX. Also, if you later decide that the component should be relocated to a designated tablespace, you can use the move procedure for that component, as specified in the VSYSAUX_OCCUPANTS view, to perform the move.
The move procedure also lets you move a component from another tablespace into the SYSAUX tablespace.
13.3.Controlling the Size of the SYSAUX Tablespace
The SYSAUX tablespace is occupied by several database components, and its total size is governed by the space consumed by those components. The space consumed by the components, in turn, depends on which features or functionality are being used and on the nature of the database workload.
The largest portion of the SYSAUX tablespace is occupied by the Automatic Workload Repository (AWR). The space consumed by the AWR is determined by several factors, including the number of active sessions in the system at any given time, the snapshot interval, and the historical data retention period. A typical system with an average of 10 concurrent active sessions may require approximately 200 to 300 MB of space for its AWR data.
The following table provides guidelines on sizing the SYSAUX tablespace based on the system configuration and expected load.

You can control the size of the AWR by changing the snapshot interval and historical data retention period. For more information on managing the AWR snapshot interval and retention period, see Oracle Database Performance Tuning Guide.
Another major occupant of the SYSAUX tablespace is the embedded Oracle Enterprise Manager Cloud Control repository. This repository is used by Cloud Control to store its metadata. The size of this repository depends on database activity and on configuration-related information stored in the repository.
Other database components in the SYSAUX tablespace will grow in size only if their associated features (for example, Oracle Text and Oracle Streams) are in use. If the features are not used, then these components do not have any significant effect on the size of the SYSAUX tablespace.
14.Undo Tablespaces
Undo tablespaces are special tablespaces used solely for storing undo information. You cannot create any other segment types (for example, tables or indexes) in undo tablespaces. Each database contains zero or more undo tablespaces. In automatic undo management mode, each Oracle instance is assigned one (and only one) undo tablespace. Undo data is managed within an undo tablespace using undo segments that are automatically created and maintained by Oracle.
When the first DML operation is run within a transaction, the transaction is bound (assigned) to an undo segment (and therefore to a transaction table) in the current undo tablespace. In rare circumstances, if the instance does not have a designated undo tablespace, the transaction binds to the system undo segment.
Caution: Do not run any user transactions before creating the first undo tablespace and taking it online.
Each undo tablespace is composed of a set of undo files and is locally managed. Like other types of tablespaces, undo blocks are grouped in extents and the status of each extent is represented in the bitmap. At any point in time, an extent is either allocated to (and used by) a transaction table, or it is free.
You can create a bigfile undo tablespace.
14.1.Creation of Undo Tablespaces
A database administrator creates undo tablespaces individually, using the CREATE UNDO TABLESPACE statement. It can also be created when the database is created, using the CREATE DATABASE statement. A set of files is assigned to each newly created undo tablespace. Like regular tablespaces, attributes of undo tablespaces can be modified with the ALTER TABLESPACE statement and dropped with the DROP TABLESPACE statement.
Note: An undo tablespace cannot be dropped if it is being used by any instance or contains any undo information needed to recover transactions.
14.2.Assignment of Undo Tablespaces
You assign an undo tablespace to an instance in one of two ways:
- At instance startup. You can specify the undo tablespace in the initialization file or let the system choose an available undo tablespace.
- While the instance is running. Use ALTER SYSTEM SET UNDO_TABLESPACE to replace the active undo tablespace with another undo tablespace. This method is rarely used.
You can add more space to an undo tablespace by adding more datafiles to the undo tablespace with the ALTER TABLESPACE statement.
You can have more than one undo tablespace and switch between them. Use the Database Resource Manager to establish user quotas for undo tablespaces. You can specify the retention period for undo information.
15.Transport of Tablespaces Between Databases
A transportable tablespace lets you move a subset of an Oracle database from one Oracle database to another, even across different platforms. You can clone a tablespace and plug it into another database, copying the tablespace between databases, or you can unplug a tablespace from one Oracle database and plug it into another Oracle database, moving the tablespace between databases.
Moving data by transporting tablespaces can be orders of magnitude faster than either export/import or unload/load of the same data, because transporting a tablespace involves only copying datafiles and integrating the tablespace metadata. When you transport tablespaces you can also move index data, so you do not have to rebuild the indexes after importing or loading the table data.
You can transport tablespaces across platforms. (Many, but not all, platforms are supported for cross-platform tablespace transport.) This can be used for the following:
- Provide an easier and more efficient means for content providers to publish structured data and distribute it to customers running Oracle on a different platform
- Simplify the distribution of data from a data warehouse environment to data marts which are often running on smaller platforms
- Enable the sharing of read only tablespaces across a heterogeneous cluster
- Allow a database to be migrated from one platform to another
15.1.Tablespace Repository
A tablespace repository is a collection of tablespace sets. Tablespace repositories are built on file group repositories, but tablespace repositories only contain the files required to move or copy tablespaces between databases. Different tablespace sets may be stored in a tablespace repository, and different versions of a particular tablespace set also may be stored. A version of a tablespace set in a tablespace repository consists of the following files:
- The Data Pump export dump file for the tablespace set
- The Data Pump log file for the export
- The datafiles that comprise the tablespace set
15.2.How to Move or Copy a Tablespace to Another Database
To move or copy a set of tablespaces, you must make the tablespaces read only, copy the datafiles of these tablespaces, and use export/import to move the database information (metadata) stored in the data dictionary. Both the datafiles and the metadata export file must be copied to the target database. The transport of these files can be done using any facility for copying flat files, such as the operating system copying facility, ftp, or publishing on CDs
After copying the datafiles and importing the metadata, you can optionally put the tablespaces in read/write mode.
The first time a tablespace’s datafiles are opened under Oracle Database with the COMPATIBLE initialization parameter set to 10 or higher, each file identifies the platform to which it belongs. These files have identical on disk formats for file header blocks, which are used for file identification and verification. Read only and offline files get the compatibility advanced after they are made read/write or are brought online. This implies that tablespaces that are read only prior to Oracle Database 10g must be made read/write at least once before they can use the cross platform transportable feature.
Note: In a database with a locally managed SYSTEM tablespace, dictionary tablespaces cannot be created. It is possible to plug in a dictionary managed tablespace using the transportable feature, but it cannot be made writable.
16.Correcting Problems with Locally Managed Tablespaces
Oracle Database includes aids for correcting problems with locally managed tablespaces.
16.1.Diagnosing and Repairing Locally Managed Tablespace Problems
Oracle Database includes the DBMS_SPACE_ADMIN package, which is a collection of aids for diagnosing and repairing problems in locally managed tablespaces.
DBMS_SPACE_ADMIN Package Procedures
The following table lists the DBMS_SPACE_ADMIN package procedures. See Oracle Database PL/SQL Packages and Types Reference for details on each procedure.
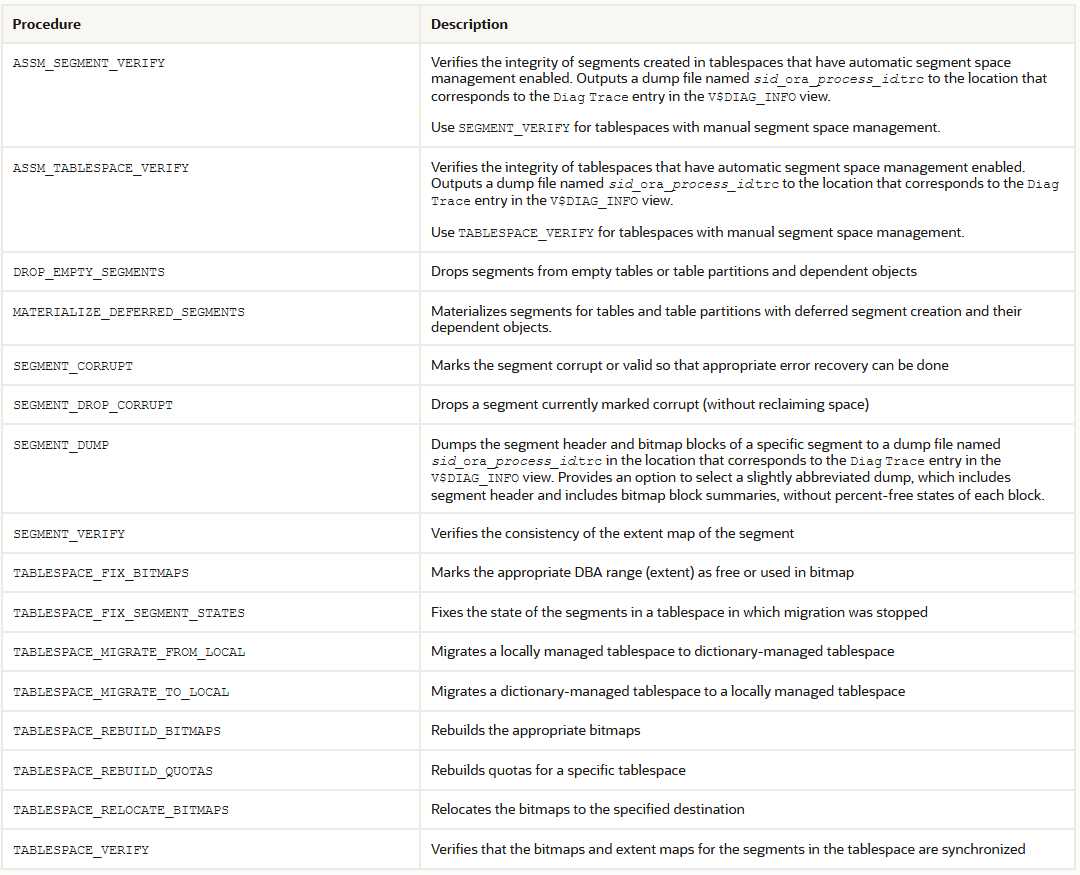
The following scenarios describe typical situations in which you can use the DBMS_SPACE_ADMIN package to diagnose and resolve problems.
Note: Some of these procedures can result in lost and unrecoverable data if not used properly. You should work with Oracle Support Services if you have doubts about these procedures.
16.2.Scenario 1: Fixing Bitmap When Allocated Blocks are Marked Free (No Overlap)
The TABLESPACE_VERIFY procedure discovers that a segment has allocated blocks that are marked free in the bitmap, but no overlap between segments is reported.
In this scenario, perform the following tasks:
- Call the SEGMENT_DUMP procedure to dump the ranges that the administrator allocated to the segment.
- For each range, call the TABLESPACE_FIX_BITMAPS procedure with the TABLESPACE_EXTENT_MAKE_USED option to mark the space as used.
- Call TABLESPACE_REBUILD_QUOTAS to rebuild quotas.
16.3.Scenario 2: Dropping a Corrupted Segment
You cannot drop a segment because the bitmap has segment blocks marked “free”. The system has automatically marked the segment corrupted.
In this scenario, perform the following tasks:
- Call the SEGMENT_VERIFY procedure with the SEGMENT_VERIFY_EXTENTS_GLOBAL option. If no overlaps are reported, then proceed with steps 2 through 5.
- Call the SEGMENT_DUMP procedure to dump the DBA ranges allocated to the segment.
- For each range, call TABLESPACE_FIX_BITMAPS with the TABLESPACE_EXTENT_MAKE_FREE option to mark the space as free.
- Call SEGMENT_DROP_CORRUPT to drop the SEG$ entry.
- Call TABLESPACE_REBUILD_QUOTAS to rebuild quotas.
16.4.Scenario 3: Fixing Bitmap Where Overlap is Reported
The TABLESPACE_VERIFY procedure reports some overlapping. Some of the real data must be sacrificed based on previous internal errors.
After choosing the object to be sacrificed, in this case say, table t1, perform the following tasks:
- Make a list of all objects that t1 overlaps(重叠).
- Drop table t1. If necessary, follow up by calling the SEGMENT_DROP_CORRUPT procedure.
- Call the SEGMENT_VERIFY procedure on all objects that t1 overlapped. If necessary, call the TABLESPACE_FIX_BITMAPS procedure to mark appropriate bitmap blocks as used.
- Rerun the TABLESPACE_VERIFY procedure to verify that the problem is resolved.
16.5.Scenario 4: Correcting Media Corruption of Bitmap Blocks
A set of bitmap blocks has media corruption.
In this scenario, perform the following tasks:
- Call the TABLESPACE_REBUILD_BITMAPS procedure, either on all bitmap blocks, or on a single block if only one is corrupt.
- Call the TABLESPACE_REBUILD_QUOTAS procedure to rebuild quotas.
- Call the TABLESPACE_VERIFY procedure to verify that the bitmaps are consistent.
16.6.Scenario 5: Migrating from a Dictionary-Managed to a Locally Managed Tablespace
Use the TABLESPACE_MIGRATE_TO_LOCAL procedure to migrate a dictionary-managed tablespace to a locally managed tablespace.
This operation is done online, but space management operations are blocked until the migration has been completed. Therefore, you can read or modify data while the migration is in progress, but if you are loading a large amount of data that requires the allocation of additional extents, then the operation may be blocked.
Assume that the database block size is 2K and the existing extent sizes in tablespace tbs_1 are 10, 50, and 10,000 blocks (used, used, and free). The MINIMUM EXTENT value is 20K (10 blocks). Allow the system to choose the bitmap allocation unit. The value of 10 blocks is chosen, because it is the highest common denominator and does not exceed MINIMUM EXTENT.
The statement to convert tbs_1 to a locally managed tablespace is as follows:
EXEC DBMS_SPACE_ADMIN.TABLESPACE_MIGRATE_TO_LOCAL ('tbs_1');
If you choose to specify an allocation unit size, it must be a factor of the unit size calculated by the system.
17.Viewing Information About Tablespaces
Oracle Database includes data dictionary views that you can query for information about tablespaces.
SQL> desc v$tablespace;
 Name                                      Null?    Type
 ----------------------------------------- -------- ----------------------------
 TS#                                                NUMBER
 NAME                                               VARCHAR2(30)
 INCLUDED_IN_DATABASE_BACKUP                        VARCHAR2(3)
 BIGFILE                                            VARCHAR2(3)
 FLASHBACK_ON                                       VARCHAR2(3)
 ENCRYPT_IN_BACKUP                                  VARCHAR2(3)
 CON_ID                                             NUMBER
17.1.Tablespace Data Dictionary Views
The following data dictionary and dynamic performance views provide useful information about the tablespaces of a database.
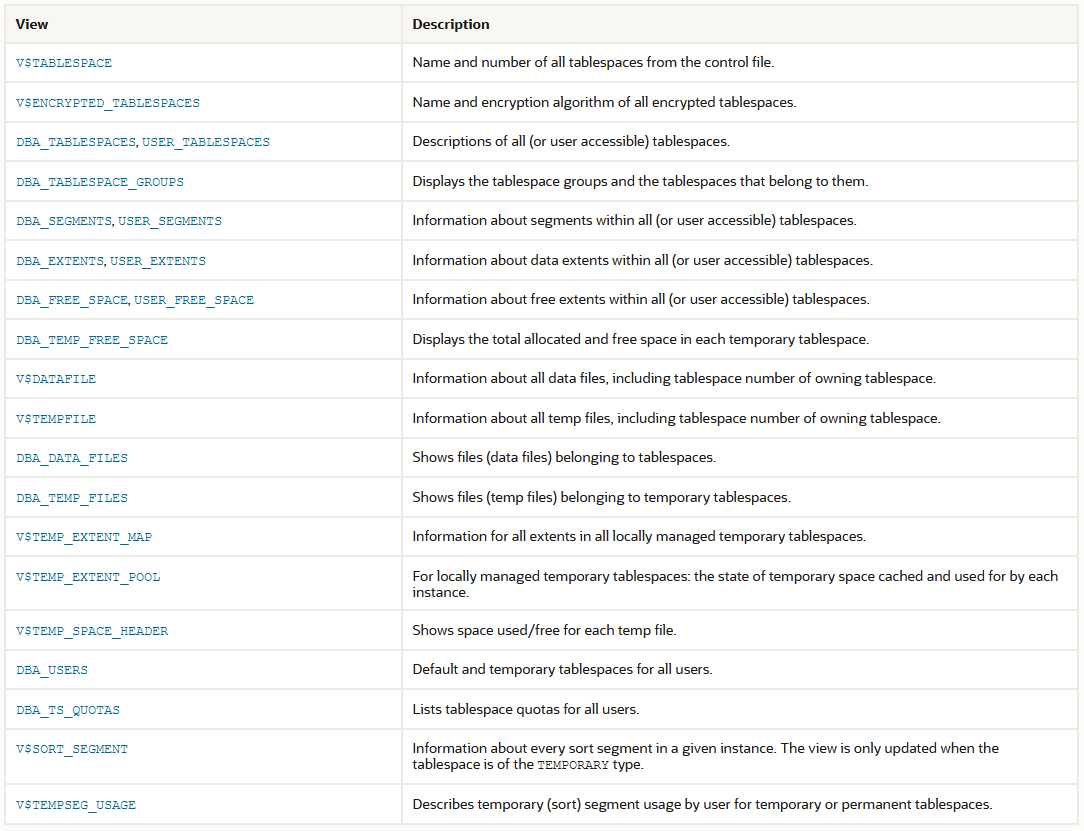
17.2.Example 1: Listing Tablespaces and Default Storage Parameters
ou can query the DBA_TABLESPACES view to list the names and default storage parameters.
To list the names and default storage parameters of all tablespaces in a database, use the following query on the DBA_TABLESPACES view:
SELECT TABLESPACE_NAME "TABLESPACE",
   INITIAL_EXTENT "INITIAL_EXT",
   NEXT_EXTENT "NEXT_EXT",
   MIN_EXTENTS "MIN_EXT",
   MAX_EXTENTS "MAX_EXT",
   PCT_INCREASE
   FROM DBA_TABLESPACES;

TABLESPACE  INITIAL_EXT  NEXT_EXT  MIN_EXT   MAX_EXT    PCT_INCREASE
----------  -----------  --------  -------   -------    ------------
RBS             1048576   1048576        2        40               0
SYSTEM           106496    106496        1        99               1
TEMP             106496    106496        1        99               0
TESTTBS           57344     16384        2        10               1
USERS             57344     57344        1        99               1
17.3.Example 2: Listing the Data Files and Associated Tablespaces of a Database
You can query the DBA_DATA_FILES view to list the names, sizes, and associated tablespaces of a database.
To list the names, sizes, and associated tablespaces of a database, enter the following query on the DBA_DATA_FILES view:
SELECT  FILE_NAME, BLOCKS, TABLESPACE_NAME
   FROM DBA_DATA_FILES;

FILE_NAME                                      BLOCKS  TABLESPACE_NAME
------------                               ----------  -------------------
/U02/ORACLE/IDDB3/DBF/RBS01.DBF                  1536  RBS
/U02/ORACLE/IDDB3/DBF/SYSTEM01.DBF               6586  SYSTEM
/U02/ORACLE/IDDB3/DBF/TEMP01.DBF                 6400  TEMP
/U02/ORACLE/IDDB3/DBF/TESTTBS01.DBF              6400  TESTTBS
/U02/ORACLE/IDDB3/DBF/USERS01.DBF                 384  USERS
Check files of a tablespace and the size:
set linesize 350
col tablespace_name format a25
col file_name format a50
SELECT tablespace_name, file_name, Round(bytes/1024/1024,2) MB, Round(maxbytes/1024/1024, 2) max_mb
FROM dba_data_files
WHERE tablespace_name = 'SYSTEM'
ORDER BY file_name;
17.4.Example 3: Displaying Statistics for Free Space (Extents) of Each Tablespace
You can query the DBA_FREE_SPACE view to display statistics about free extents and coalescing activity for each tablespace in the database.
To produce statistics about free extents and coalescing activity for each tablespace in the database, enter the following query:
SELECT TABLESPACE_NAME "TABLESPACE", FILE_ID,
   COUNT(*)    "PIECES",
   MAX(blocks) "MAXIMUM",
   MIN(blocks) "MINIMUM",
   AVG(blocks) "AVERAGE",
   SUM(blocks) "TOTAL"
   FROM DBA_FREE_SPACE
GROUP BY TABLESPACE_NAME, FILE_ID;

TABLESPACE    FILE_ID  PIECES   MAXIMUM    MINIMUM  AVERAGE    TOTAL
----------    -------  ------   -------    -------  -------   ------
RBS                 2       1       955        955      955      955
SYSTEM              1       1       119        119      119      119
TEMP                4       1      6399       6399     6399     6399
TESTTBS             5       5      6364          3     1278     6390
USERS               3       1       363        363      363      363
PIECES shows the number of free space extents in the tablespace file, MAXIMUM and MINIMUM show the largest and smallest contiguous area of space in database blocks, AVERAGE shows the average size in blocks of a free space extent, and TOTAL shows the amount of free space in each tablespace file in blocks. This query is useful when you are going to create a new object or you know that a segment is about to extend, and you want to ensure that there is enough space in the containing tablespace.
17.5.Tablespace Usage
Data and Temp tablespace
SELECT df.tablespace_name "Tablespace",
       df.bytes / (1024 * 1024) "Size(MB)",
       Round(SUM(fs.bytes) / (1024 *1024),2) "Free(MB)",
       Nvl(Round((SUM(fs.bytes) *100 / df.bytes),2),1) "%Free",
       Round(((df.bytes - SUM(fs.bytes)) * 100 / df.bytes), 2) "%Used"
  FROM dba_free_space fs,
       (SELECT tablespace_name, SUM(bytes) bytes
          FROM dba_data_files
        GROUP BY tablespace_name) df
 WHERE fs.tablespace_name (+) = df.tablespace_name
 GROUP BY df.tablespace_name, df.bytes
UNION ALL
SELECT df.tablespace_name "Tablespace",
       fs.bytes / (1024 * 1024) "Size(MB)",
       Round(SUM (df.bytes_free) / (1024 * 1024),2) "Free(MB)",
       Nvl(Round(((SUM(fs.bytes) - df.bytes_free) * 100 / fs.bytes), 2), 1) "%Free",
       Round(((SUM(fs.bytes) - df.bytes_free) * 100 / fs.bytes), 2) "%Used"
  FROM dba_temp_files fs,
       (SELECT tablespace_name, bytes_free, bytes_used
          FROM v$temp_space_header
        GROUP BY tablespace_name, bytes_free, bytes_used) df
 WHERE fs.tablespace_name (+) = df.tablespace_name
 GROUP BY df.tablespace_name, fs.bytes, df.bytes_free, df.bytes_used
 ORDER BY 4 DESC;

Tablespace                       Size(MB)   Free(MB)      %Free      %Used
------------------------------ ---------- ---------- ---------- ----------
TEMP                                  131          0        100        100
BIGTBS                               1024     956.06      93.37       6.63
UNDOTBS1                               70      57.75       82.5       17.5
USERS                                   5          4         80         20
SYSAUX                                730      71.63       9.81      90.19
SYSTEM                                820        6.5        .79      99.21
TEMP tablespace usage:
SELECT df.tablespace_name "Tablespace",
       fs.bytes / (1024 * 1024) "Size(MB)",
       Round(SUM (df.bytes_free) / (1024 * 1024),2) "Free(MB)",
       Nvl(Round(((SUM(fs.bytes) - df.bytes_free) * 100 / fs.bytes), 2), 1) "%Free",
       Round(((SUM(fs.bytes) - df.bytes_free) * 100 / fs.bytes), 2) "%Used"
  FROM dba_temp_files fs,
       (SELECT tablespace_name, bytes_free, bytes_used
          FROM v$temp_space_header
        GROUP BY tablespace_name, bytes_free, bytes_used) df
 WHERE fs.tablespace_name (+) = df.tablespace_name
 GROUP BY df.tablespace_name, fs.bytes, df.bytes_free, df.bytes_used
 ORDER BY 4 DESC;

Tablespace                       Size(MB)   Free(MB)      %Free      %Used
------------------------------ ---------- ---------- ---------- ----------
TEMP                                  131          0        100        100
Tablespace usage (without temp tablespace):
SELECT df.tablespace_name "Tablespace",
       df.bytes / (1024 * 1024) "Size(MB)",
       Round(SUM(fs.bytes) / (1024 *1024),2) "Free(MB)",
       Nvl(Round((SUM(fs.bytes) *100 / df.bytes),2),1) "%Free",
       Round(((df.bytes - SUM(fs.bytes)) * 100 / df.bytes), 2) "%Used"
  FROM dba_free_space fs,
       (SELECT tablespace_name, SUM(bytes) bytes
          FROM dba_data_files
        GROUP BY tablespace_name) df
 WHERE fs.tablespace_name (+) = df.tablespace_name
 GROUP BY df.tablespace_name, df.bytes;

Tablespace                       Size(MB)   Free(MB)      %Free      %Used
------------------------------ ---------- ---------- ---------- ----------
UNDOTBS1                               70      57.75       82.5       17.5
USERS                                   5          4         80         20
SYSTEM                                820        6.5        .79      99.21
SYSAUX                                730      71.63       9.81      90.19
BIGTBS                               1024     956.06      93.37       6.63