Oracle Grid Infrastructure for a Standalone Server
1.Overview
Oracle Grid Infrastructure for a standalone server, also known as Oracle Restart, provides system support for a single-instance Oracle Database. This support includes volume management, file system, and automatic restart capabilities. If you plan to use Oracle Automatic Storage Management (Oracle ASM), then you must install Oracle Restart before installing your database. Oracle Grid Infrastructure for a standalone server includes Oracle Restart and Oracle Automatic Storage Management. Oracle combined the two infrastructure products into a single set of binaries that is installed into an Oracle Restart home.
Oracle Automatic Storage Management is a volume manager and a file system for Oracle database files that supports single-instance Oracle Database and Oracle Real Application Clusters (Oracle RAC) configurations. Oracle Automatic Storage Management also supports a general purpose file system for your application needs, including Oracle Database binaries. Oracle Automatic Storage Management is Oracle’s recommended storage management solution that provides an alternative to conventional volume managers, file systems, and raw devices.
- Oracle Restart is used in single-instance (nonclustered) environments only.
Oracle Restart improves the availability of your Oracle database by providing the following:
- When there is a hardware or a software failure, Oracle Restart automatically starts all Oracle components, including the Oracle database instance, Oracle Net Listener, database services, and Oracle ASM.
-
Oracle Restart starts components in the proper order when the database host is restarted.
-
Oracle Restart runs periodic checks to monitor the status of Oracle components. If a check operation fails for a component, then the component is shut down and restarted.
2.Configuring
2.1 Checking Hardware and Memory Configuration
Run the following commands to check your current system information:
- To determine the size of the configured swap space, enter the following command:
# grep SwapTotal /proc/meminfo
If necessary, see your operating system documentation for information about configuring additional swap space.
- To determine the available RAM and swap space, enter the following command:
# free
- To determine the amount of free disk space on the system, enter one of the following commands:
# df -h
- To determine the amount of space available in the /tmp directory, enter one of the following commands:
# df -h /tmp
- To determine the physical RAM size, enter the following command:
# grep MemTotal /proc/meminfo
If the size of the physical RAM installed in the system is less than the required size, then install more memory before you continue.
2.2.Memory Minimum Requirements
Ensure that your system meets the following memory requirements for installing Oracle Grid Infrastructure for a standalone server:
At least 4 GB of RAM for Oracle Grid Infrastructure for a standalone server including installations where you plan to install Oracle Database.
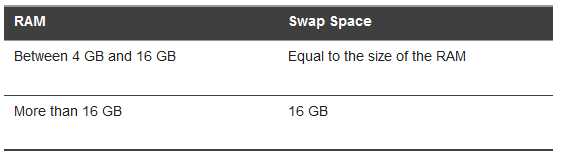
The following table describes the relationship between installed RAM and the configured swap space recommendation:
Note:
On Linux, the HugePages feature allocates non-swappable memory for large page tables using memory-mapped files. If you enable HugePages, then you should deduct the memory allocated to HugePages from the available RAM before calculating swap space.
2.3.Storage Minimum Requirements
Ensure that your system meets the following minimum disk space requirements for installing Oracle Grid Infrastructure on a standalone server:
- For Linux x86-64: At least 6.9 GB of disk space
- At least 1 GB of space in the /tmp directory.
If there is less than 1 GB of free space in the /tmp directory, then complete one of the following steps:- Delete unnecessary files from the /tmp directory to meet the disk space requirement.
-
Set the TMP and TMPDIR environment variables to specify a temporary directory when setting the oracle user’s environment.
- Extend the file system that contains the /tmp directory.
2.4.Environment Requirements
Complete the following tasks to set the Oracle Restart software owner user’s environment:
- During installation, you must perform tasks as root or as other users on remote terminals. You must run Oracle Universal Installer from the oracle or grid account. However, before you start Oracle Universal Installer, you must configure the environment of the oracle or grid user. To configure the environment, you must:Set the default file mode creation mask (umask) to 022 in the shell startup file.
- Ensure that you set the path to the Oracle base directory. Oracle recommends that you create the Oracle Restart home and the Oracle Database home under the same Oracle base directory. For example:
# ORACLE_BASE=/u01/app/oracle;
# export ORACLE_BASE
- Set the Oracle Restart software owner user default file mode creation mask (umask) to 022 in the shell startup file. Setting the mask to 022 ensures that the user performing the software installation creates files with 644 permissions.
- Set ulimit settings for file descriptors and processes for the Oracle Restart installation software owner.
- Set the DISPLAY environment variable in preparation for installation.
3.ASM
转载:博客园Oracle ASM
作者整理自云和恩墨的线上讲座,原文:https://wenku.baidu.com/view/752e450fdc36a32d7375a417866fb84ae45cc391.html
3.1.ASM概述
提到Oracle ASM,相信大家都有熟悉又陌生的感觉,熟悉在于目前11g ARC数据库基本都使用ASM,陌生在于平时只是基本的使用,对ASM了解并不全面。例如数据库实例是如何与ASM交互与分工的、ASM存在哪些特性、数据库各种文件是怎样存放于ASM存储中、它的元数据是怎么存放的。
Oracle 10g之前,存储设备的使用情况:UNIX/Linux操作系统上安装逻辑卷管理器(LVM),通过LVM将多个磁盘做成卷组,在卷组上划分逻辑卷(logical volume),然后在逻辑卷上创建文件系统,RAC环境下需要第三方共享集群软件。Oracle 10g之后引入的专用文件系统ASM,为数据库文件的管理提供了很好的支持。DBA能够完全在Oracle框架内执行许多任务,利用ASM来将一组磁盘转换成一个可伸缩的和高性能的文件系统/卷管理器。ASM磁盘组提供了直接作为原始设备来访问这个空间,并提供文件系统的便利性和灵活性。
ASM对DBA有许多好处,使用ASM可以避免:
- I/O性能优化
- 数据文件移动和重新组织
- 文件名管理
- 逻辑卷管理
- 文件系统管理
- 集群文件系统管理
- 裸设备管理
使用ASM可以显著减少:
- 逻辑单元号(LUN)管理,逻辑单元数量较少,大小较大
- 数据库管理员对系统管理员的依赖性
- 手动执行任务时可能发生的错误
3.2.RAC环境下的ASM结构
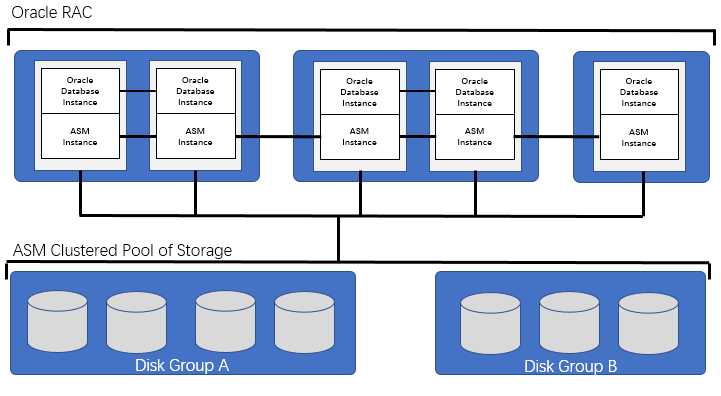
ASM的出现是为RDBMS管理文件存储,ASM中适合存放的文件类型包括:数据文件(data file)、控制文件(control file)、重做日志文件(redo log file)、归档日志文件(archive log file)、闪回日志文件(flashback log file)、参数文件(spfile)、RMAN备份以及block tracking file、datapump文件。
ASM不会代替RDBMS去实施I/O读写,很多人对这一点存在误解,认为RDBMS发送I/O请求给ASM,ASM去执行I/O,这样的想法是错误的。ASM只负责将存储空间地址返回给RDBMS,真正的I/O还是会由RDBMS进程去完成,和不用ASM的裸设备一样,因此ASM不是I/O的中间层,也就不存在因为ASM而出现I/O瓶颈。
3.3.ASM实例
ASM实例的主要任务之一就是管理ASM metadata元数据。ASM instance在10.2中使用与RDBMS一样的二进制软件,到11.2中分开独立实例,它类似于ORACLE RDBMS INSTANCE,有其SGA和大多数后台进程。
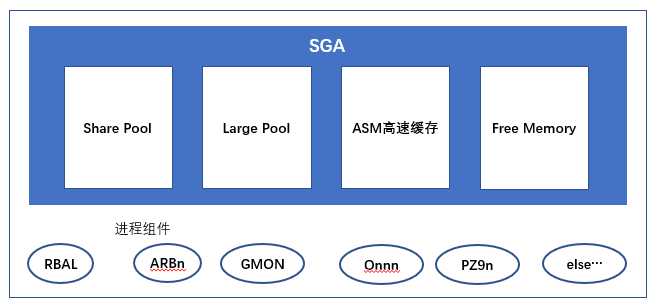
(1)ASM Instance中的内存结构主要包括4个部分:
- Share Pool:用于元数据信息
- Large Pool:用于并行操作ASM
SQL> show parameter large_pool_size
NAME                            TYPE         VALUE
------------------------------- -----------  ------------

       large_pool_size                 big integer  12M
- ASM高速缓存:用于重新平衡操作期间读取和写入块
- Free Memory:可用的未分配内存
(2)ASM实例的主要进程:
- RBAL:在搜索过程中打开所有设备文件并协调重新平衡活动
- ARBn:一个或多个从属过程,用于执行重新平衡活动
- GMON:负责管理磁盘活动,例如删除或脱机以及提高ASM磁盘兼容性
- MARK:根据需要将ASM分配单元标记为过时
(3)ASM实例还有以下进程:
- ARCn:归档进程
- CKPT:检查点进程
- DBWn:数据库写进程
- DIAG:诊断进程
- Jnnn:作业队列进程
- LGWR:日志写进程,ASM实例的SGA不包含log buffer,该实例也不使用联机重做日志文件,ASM实例的LGWR进程将事件记录信息复制到ASM磁盘组。
- PMON:进程监视进程
- SMON:系统监视进程
- PSP0:进程衍生进程
- QMNn:队列监视进程
- RECO:恢复器进程
- VKTM:虚拟计时器进程
(4)对于ASM实例,这些进程执行的任务与数据库实例中的不同。例如,ASM实例的SGA不包含日志缓冲区,该实例也不使用联机重做日志,ASM实例中的LGWR进程将事件记录信息复制到ASM磁盘。
如果ASM是以集群方式建立的,则将在ASM实例中运行与集群管理相关的附加进程。其中一些进程如下:
- LMON:全局入队服务监视器进程
- LMDn:全局入队服务守护进程
- LMSn:全局高速缓存服务进程
- LCKn:锁定进程
3.4.初始化参数
ASM由参数文件控制,通常设置的参数包括:
- instance_type:对于asm实例来说,要设置成asm,对于数据库,则设置成RDBMS
- ASM_POWER_LIMITE:默认为1,表示ASM磁盘组在进行rebalance时的并行度,值从1到11,1最慢,该参数可动态修改alter system set asm_power_limit=5;
- ASM_DISKSTRING:是一个与操作系统有关的值,ASM使用它来限制搜索时考虑的磁盘集。默认为空字符串,表示ASM查找系统中所有ASM拥有读写权限的所有设备;
- ASM_DISKGROUP:表示启动实例时,自动Mount那些磁盘组,可以写多个磁盘组
- MEMORY_TARGET:默认自动启动内存管理,即使未明确设置MEMORY_TARGET参数也是如此,该参数建议不小于1536M。
通常,这几个参数的值如下:
asm_diskgroups                        string
asm_diskstring                        string
asm_power_limit                       integer      1
asm_preferred_read_failure_groups     string
memory_target                         big integer  0
3.5.数据库实例与ASM实例的交互
例如,一个数据文件的创建,数据库实例与ASM实例是怎么交互分工来完成的?
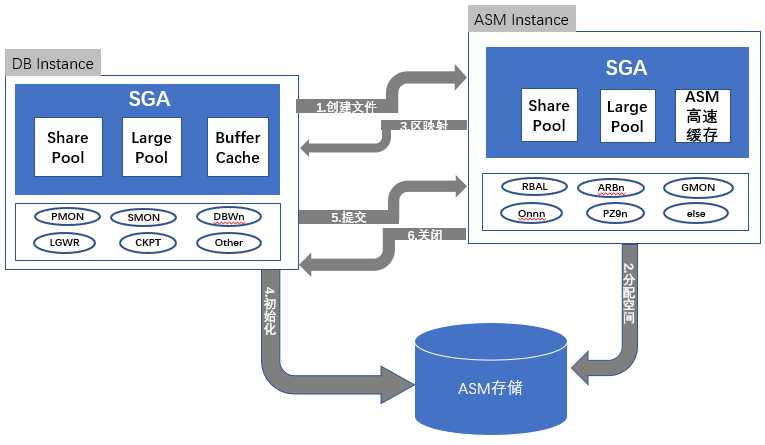
文件创建过程如下:
- 用户在RDBMS发出create file命令,RDBMS会发起一个与ASM实例的连接,RDBMS端这个连接是ASMB后台进程,而ASM端则是个前台进程,接着,创建文件的指令通过这个链接提交给ASM实例;
- ASM根据创建文件的指令,从磁盘中分配AU,ASM会根据指定的模板(template)或diskgroup默认的template来决定文件的冗余、条带策略;
- AU分配完成后,ASM就把文件的Extent map发送给RDBMS;
- RDBMS发起I/O操作,初始化(格式化)这个ASM文件;
- 初始化完成后,RDBMS向ASM发送commit请求,ASM把相应的allocation table、file directory、alias directory异步写回磁盘;
- 提交确认会隐式关闭该文件。将来发生I/O时,数据库实例需要重新打开该文件。
注意:用户在读写数据时,第4步不同,其它均相同
经常有人问,数据库实例使用ASM作为存储,只需要在文件名中加上磁盘组名即可,而在数据库中没有ASM相关的静态配置,那么是怎么找到ASM磁盘组的?
其实ASM实例挂载磁盘组后,ASM会把disk group、asm instance name、oracle home path等信息注册到CSS,当数据库实例打开或创建名字以“+”开头的文件时,它会通过CSS来查看disk group和mount该DG的ASM实例的信息,再通过CSS中这些信息构造connect string连接ASM实例的。
ASM概念图如下:
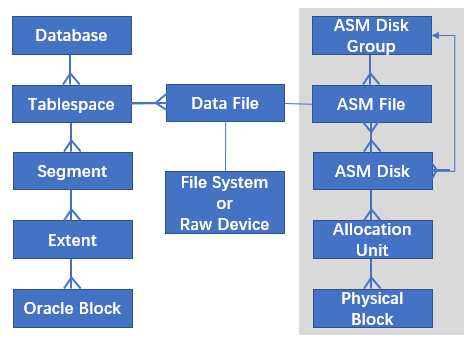
图4.数据库逻辑结构与ASM物理结构的关系
3.6.磁盘组、磁盘、AU、ASM文件、EXTENT MAP
3.6.1.ASM磁盘组(ASM diskgroup)
一个Disk Group由多个ASM Disk组成,该Diskgroup空间使用信息的元数据均完整的包含在这个磁盘组中,通过v$asm_diskgroup视图查看磁盘组信息。
 SQL> select * from v$asm_diskgroup;

GROUP_NUMBER    NAME        SECTOR_SIZE  BLOCK_SIZE  ALLOCATION_UNIT_SIZE   STATE        TYPE      TOTAL_MB    FREE_MB     COLD_USED_MB  USABLE_FILE_MB  VOTING_FILES
------------    ---------   -----------  ----------  --------------------   ----------   ------    ----------  ----------  ------------  --------------  ------------
           1    ARC         1024         4096        1048576                CONNECTED    EXTERN    204800       178612     26188         178612           N
           2    DATA        1024         4096        1048576                CONNECTED    EXTERN    2048000      1523261    524739        1523261          N
           3    OCRVOTE     1024         4096        1048576                MOUNTED      EXTERN    6144         5716       428           5716             Y
我们可以看到一共有3个DG,名字分别为ARC、DATA、OCRVOTE,磁盘组的Block Size大小为4096b(4kb),AU大小为1Mb,STATE状态有CONNECTED,说明数据库实例正在连接使用该DG;状态为MOUNTED,说明DG已经挂载,随时可以使用。TYPE类型显示为外部冗余,总容量和空闲容量在这也有显示。
磁盘组冗余有三种选择:
- External Redundancy:没有Fialure Group,不提供任何镜像;
- Normal Redundancy:至少要求2个Failure Group,默认支持双向镜像;
- High Redundancy:要求3个Failure Group,默认支持三向镜像。
3.6.2.ASM磁盘(ASM disk)
对于ASM而言LUN Disk可以是裸设备也可以直接是块设备,可以通过v$asm_diskgroup来查看磁盘信息:
SQL> select * from v$asm_disk;

GROUP_NUMBER  DISK_NUMBER  MOUNT_STATUS  MODE_STATUS  LIBRARY    OS_MB      TOTAL_MB  FREE_MB  NAME           FAILGROUP      PATH                VOTING_FILE  SECTOR_SIZE   FAILGROUP_TYPE
------------  -----------  ------------  -----------  -------    --------   --------  -------  -------------- ------------   ------------------  -----------  -----------   --------------
           3  0            CACHED        ONLINE       System     6144       6144      5716     OCRVOTE_0000   OCRVOTE_0000   /dev/rdisk/disk18   Y            1024          REGULAR
           1  0            CACHED        ONLINE       System     204800     204800    186864   ARC_0000       ARC_0000       /dev/rdisk/disk19   N            1024          REGULAR
           2  0            CACHED        ONLINE       System     1024000    1024000   761637   DATA_0000      DATA_0000      /dev/rdisk/disk20   N            1024          REGULAR
           2  1            CACHED        ONLINE       System     1024000    1024000   761624   DATA_0001      DATA_0001      /dev/rdisk/disk21   N            1024          REGULAR
我们可以看到ASM Disk,其中/dev/rdisk/disk19属于diskgroup1,/dev/rdisk/disk20和/dev/rdisk/disk21属于diskgroup2,/dev/rdisk/disk18属于diskgroup3。通过ASM磁盘信息,我们也可以看到磁盘的使用情况。
创建ASM磁盘的方法主要有:ASMLIB和UDEV。通常不建议使用ASMLIB创建ASM磁盘,缺点有:
- 对于多路径设备,需要配置ORACLEASM_SCANORDER及ORACLEASM_SCANEXCLUDE;
- 因为ASM Instance使用ASMLIB提供的ASM disk,所以增加了额外的层面;
- 不是每个版本的Linux Kernel都支持ASMLIB;
- 使用ASMLIB意味着要花费更多的时间去创建和维护。
3.6.3.AU
AU(allocation unit)是Disk Group的分配单元,一个ASM磁盘上的可用空间总是整数倍个AU。在每一个ASM Disk的头部均有一个表,该表的一个记录代表ASM Disk的一个AU。
在创建磁盘组时可以配置AU大小,AU默认大小为1MB,AU足够小,能够缓存数据库,但足够大,能够提供高效的访问。AU的大小可设置为:1,2,4,8,16,32或64MB。
3.6.4.ASM文件
ASM文件由一组分配单元(AU)组成,这些文件只属于某个磁盘组,不可跨越磁盘组,每个ASM文件都具有唯一的系统生成的名称,ASM文件的文件名以“+”号开头,如“+data/orcl/datafile/system.256.689832921”。如果在创建ASM文件时指定了文件的名称,如“+data/orcl/tbs01.dbf”,则该名称为ASM文件的别名,ASM会将该别名与实际创建的文件名称相关联。
ASM中可以存放数据文件、日志文件、控制文件、归档日志文件等。
3.6.5.区映射(EXTENT MAP)
区映射是ASM的Extent指针(pointer)给出了ASM Disk Number和AU号,这就描述了该Extent的物理位置
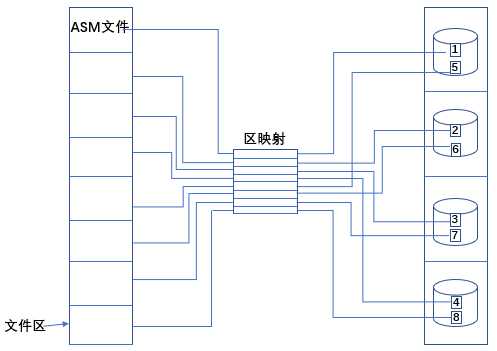
文件区与分配单元(AU)之间的关系如下所示。区包含:
- 1个AU用于前20000个区(0-19999)
- 4 AUs用于接下来的20000个区(20000-39999)
- 16 Aus用于40000以上的区
将可变大小的区与大型分配单元结合使用,可满足非常大的ASM存储文件的需要。
X$KFFXP是ASM自动存储管理特性的重要内部视图,该视图反应了File Extent Map映射关系。
3.7.ASM故障组
ASM怎么实现冗余,failure group采用同一份数据的多份拷贝,保证不会出现单点错误,冗余拷贝单位为Extent。多份冗余拷贝不会存在同一个failure group 的磁盘中,换句话说,一个failure group中只有一份拷贝的数据,不会有第二份。
failure group又是什么概念呢?个人理解,failure group是diskgroup的一个子集,在创建diskgroup的时候,我们可以指定磁盘组的failure group的数量,如果不指定,则diskgroup中的每个磁盘都是一个failure group。对于冗余级别为external的diskgroup, 只保留一份数据,因此只需要有1个diskgroup即可,对于冗余级别为normal的diskgroup, 需要保留一份数据及其镜像,因此至少需要有2个diskgroup,对于冗余级别为high的diskgroup, 需要保留一份数据及两份镜像,因此至少需要有3个diskgroup。
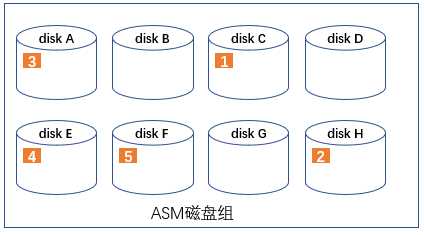
以下示例,一个normal redundancy的diskgroup中存在8个disk,并使用2个failure group,可以看到每个failure group存一份数据。

ASM Normal Redundancy Extents分布图示
当disk H发生故障时,这个失败要求在失败磁盘上的所有的Extent均被修复,Extent3和Extent5会从现存的磁盘中复制到failure group 2中可用的区域。在此例子中,Extent 5被从disk A中复制到disk F,Extent 3从disk拷贝到disk G,最后将失败的磁盘从diskgroup中drop出去。
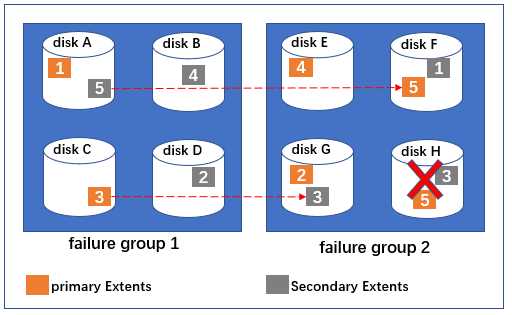
失效时的磁盘分配
3.8.ASM磁盘数据rebalance
ASM怎么平衡组内磁盘的数据?Rebanlance将在diskgroup范围内将数据在disk上移动,以保证文件均匀分布在diskgroup上的各个磁盘中。一旦diskgroup发生了存储配置变化,如增加或删除磁盘,resize会自动出发一次rebanlance。power参数将决定有多少个slave进程参与数据移动。
以下示例Rebanlance。磁盘组diskgroup中有2个磁盘disk A和disk B,这时,我们再增加一个磁盘disk C,这时disk C并没有数据。在Rebanlance后,三个磁盘数据达到平衡。
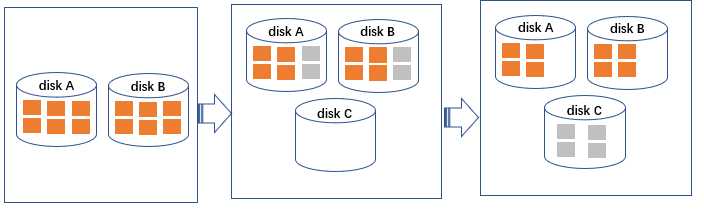
ASM磁盘数据rebanlance
3.9.ASM条带化
在ASM中,条带化主要有2个用途:
- 在磁盘组的所有磁盘中执行I/O负载平衡;
- 改善I/O等待时间
ASM条带化一共有2种类型,粗粒度条带化和细粒度条带化。
3.9.1.粗粒度条带化
主要用于平衡I/O
粗粒度条带化条带大小固定为AU大小,条带宽度固定为1。因此,粗粒度条带化在分配文件时,ASM会在所有磁盘中分布分配单元,有时无法非常平均,但随着时间的流逝,会变得几乎相等。下图显示了一个具有5个分配单元的文件,这些AU在条带化之后,分布在一个冗余级别为external的磁盘组中,该磁盘组一共有8个磁盘。
3.9.2.细粒度条带化
主要用于改善等待时间
细粒度条带化极少使用,默认都是粗粒度。细粒度条带化条带大小为128KB(默认),AU大小为1MB(默认),条带宽度为8。细粒度条带化将数据区拆分为128KB的块,然后许多磁盘分布每个区的负载,从而改善特定文件类型的等待时间,默认情况下,细粒度条带化用于控制文件和联机重做日志文件。
例子:具有8个磁盘构成的磁盘组,采用外部冗余的模式,AU大小为1MB,细粒度条带化条带大小为128KB,AU大小为1MB。第一个1MB区在8个AU中以128KB条带形式写入。因此,1MB数据分布在8个磁盘中,而不是1个磁盘中。

第一个1MB区在8个AU中以128KB条带形式写入
当第二个1MB区数据进来后,继续分配在每个磁盘AU的第2个128KB块中,这种模式一直继续,直到第1组AU写满,然后再分配下一组AU。

第二个1MB区继续在8个AU中以128KB条带形式写入
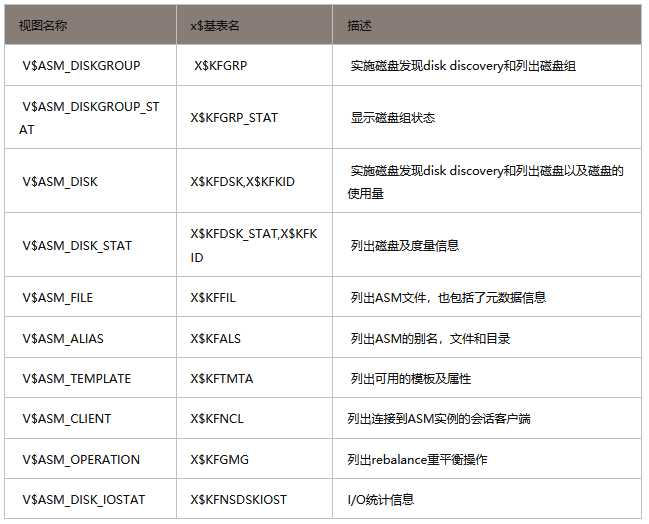
3.10.ASM常用视图
4.Oracle ACFS
4.1.Overview
Oracle Automatic Storage Management Cluster File System (Oracle ACFS) is a multi-platform, scalable file system, and storage management technology that extends Oracle Automatic Storage Management (Oracle ASM) functionality to support customer files maintained outside of Oracle Database. Oracle ACFS supports many database and application files, including executables, database trace files, database alert logs, application reports, BFILEs, and configuration files. Other supported files are video, audio, text, images, engineering drawings, and other general-purpose application file data.
Notes:
- Oracle ASM is the preferred storage manager for all database files. It has been specifically designed and optimized to provide the best performance for database file types. For a list of file types supported by Oracle ASM, see Table 7-1, “File types supported by Oracle ASM”.
- Oracle ACFS is the preferred file manager for non-database files. It is optimized for general purpose files.
- Oracle ACFS does not support any file type that can be directly stored in Oracle ASM, except where explicitly noted in the documentation.
- Not supported means Oracle Support Services does not take calls and development does not fix bugs associated with storing unsupported file types in Oracle ACFS.
- Starting with Oracle Automatic Storage Management 11g Release 2 (11.2.0.3), Oracle ACFS supports RMAN backups (BACKUPSET file type), archive logs (ARCHIVELOG file type), and Data Pump dumpsets (DUMPSET file type). Note that Oracle ACFS snapshots are not supported with these files.
- Oracle ACFS does not support files for the Oracle Grid Infrastructure home.
- Oracle ACFS does not support Oracle Cluster Registry (OCR) and voting files.
- Oracle ACFS functionality requires that the disk group compatibility attributes for ASM and ADVM be set to 11.2 or greater. For information about disk group compatibility, refer to “Disk Group Compatibility”.
An Oracle ACFS file system is a layer on Oracle ASM and is configured with Oracle ASM storage, as shown in Figure 5-1. Oracle ACFS leverages Oracle ASM functionality that enables:
- Oracle ACFS dynamic file system resizing
- Maximized performance through direct access to Oracle ASM disk group storage
- Balanced distribution of Oracle ACFS across Oracle ASM disk group storage for increased I/O parallelism
- Data reliability through Oracle ASM mirroring protection mechanisms
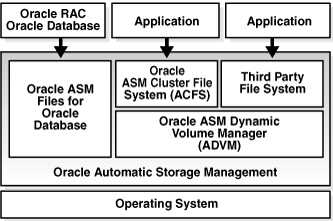
Oracle ACFS establishes and maintains communication with the Oracle ASM instance to participate in Oracle ASM state transitions including Oracle ASM instance and disk group status updates and disk group rebalancing. Oracle Automatic Storage Management with Oracle ACFS and Oracle ASM Dynamic Volume Manager (Oracle ADVM) delivers support for all customer data and presents a common set of Oracle storage management tools and services across multiple vendor platforms and operating system environments on both Oracle Restart (single-node) and cluster configurations. For an overview of Oracle ADVM, see “Overview of Oracle ASM Dynamic Volume Manager”.
Oracle ACFS is tightly coupled with Oracle Clusterware technology, participating directly in Clusterware cluster membership state transitions and in Oracle Clusterware resource-based high availability (HA) management. In addition, Oracle installation, configuration, verification, and management tools have been updated to support Oracle ACFS.
Oracle ACFS can be accessed and managed using native operating system file system tools and standard application programming interfaces (APIs). Oracle ACFS can be configured and managed using Oracle Enterprise Management tools. Oracle ACFS can be accessed using industry standard Network Attached Storage (NAS) File Access Protocols: Network File System (NFS) and Common Internet File System (CIFS).
In addition to sharing file data, Oracle ACFS provides additional storage management services including support for the Oracle Grid Infrastructure clusterwide mount registry, dynamic on-line file system resizing, and multiple space-efficient snapshots for each file system. For information about the mount registry, see “About the Oracle ACFS Mount Registry”.
Oracle ACFS contributes to the overall Oracle storage management by providing:
- A general-purpose single-node (standalone) and cluster file system solution that is integrated with Oracle ASM, Oracle Clusterware, and Oracle Enterprise Management technologies
- A common set of file system features across multiple vendor platforms and operating systems, offering an alternative to native operating system or third-party file system solutions
- Single-node and clusterwide shared Oracle Database homes and application data
- Uniform, coherent shared file access and clusterwide naming of all customer application files maintained outside of the database
Oracle ACFS accommodates large storage capacities and large numbers of cluster nodes. It efficiently manages large numbers of file systems, files, and supports both small and large sized files with exabyte-capable file and file system capacities. Oracle ACFS provides optimized fast directory lookup for large directories with millions of files.
Oracle ACFS file systems are generally mounted on all Oracle Cluster Synchronization Services (CSS) cluster members. In the event of a member failure, another cluster member quickly recovers any outstanding metadata transactions on behalf of the failed member. Following recovery, access by other active cluster members and any remote client systems can resume.
ACFS是一个支持多个平台,可扩展的,基于ASM的集群文件系统,可以用来存储数据库和各种应用的文件,包括数据库的trace文件,alert日志文件和配置文件等等,也可以用来存储视频,音频,文本,图片等文件!
在这之前,集群文件系统使用过Redhat的gfs,还有开源的ocfs2。gfs的配置太繁琐复杂,因为是基于RHCS套件,所以很多功能对于单纯的集群文件系统显得有些多余;ocfs2目前已经停止开发了,不过ocfs2配置很简单;ACFS在11g r2中推出,基于grid infrastructure,配置容易,架构在ASM上,稳定性有保证。
4.2.简介
Oracle ACFS (ASM Cluster File System) 是一个符合 POSIX、X/OPEN 和 Windows 行业标准的集群文件系统,支持多种操作系统和服务器平台,包括 Oracle 数据库云平台和 Oracle 数据库机等 Oracle 集成系统以及传统服务器环境。它包括许多高级特性,例如文件系统快照、复制、压缩、标签、安全性、加密、审计以及高可用性 NFS 和 SMB 服务。
Oracle ACFS 一直都集成了 Oracle 自动存储管理来扩展其功能,因此既支持通用文件,也支持数据库文件,为此甚至一度被称作 Oracle 云文件系统。Oracle ACFS 旨在直接访问 Oracle ASM 磁盘组存储,用较短的 IO 路径提供优秀性能。Oracle ACFS 基于盘区的底层架构可提供快速文件访问、高吞吐量和快速响应时间。
Oracle ACFS 利用 Oracle Clusterware 功能,可直接参与集群成员状态转换并可获得基于资源的高可用性。Oracle ACFS、ADVM、Oracle ASM 和 Oracle Clusterware 结合在一起构成了 Oracle Grid Infrastructure (GI)。Oracle GI 是在集群环境中管理数据库、卷和文件系统的紧密集成的基础,简化了存储和集群管理,大大降低了复杂性和成本。
Oracle ACFS 大大简化了所有用途类型的文件系统的存储管理和供应自动化。使用操作系统自带的命令、acfsutil 跨平台命令和 Oracle Grid Control 对 Oracle ACFS 进行管理。Oracle ACFS 的独特价值在于其各种高级功能,包括加密、安全性、审计、压缩、快照、复制、标签和高可用性 NFS 以及以编程方式访问 IO 统计信息的插件。Linux、Solaris、AIX 和 Windows 等操作系统平台均支持 Oracle ACFS。
Oracle ASM Dynamic Volume Manager (ADVM) 提供了一个通用卷管理服务和一个标准设备驱动程序接口,便于系统管理员跨不同平台管理卷。Oracle ACFS 可以使用 Oracle ADVM 创建和管理可利用 Oracle ASM 特性的所有功能的文件系统。无需停机即可轻松调整 Oracle ADVM 卷的大小以适应文件系统的存储需求。
4.3.相关组件
ADVM: ASM Dynamic Volume Manager,ASM动态卷管理器, 主要负责将ASM空间输出到OS的,也就是实现Volume的。
Volumes: 也就是逻辑卷,是从ASM磁盘组分出来的一部分存储空间,与我们常说的普通逻辑卷类似;
ACFS: ASM Cluster File System,顾名思义,就是基于ASM建立的簇文件系统,其建立于来自ASM的 Volume上,其除了与普通文件系统类似,还可以在多个节点间共享。
把ASM磁盘组分一部分或者一个磁盘组,做成了volume 逻辑卷,然后ACFS是它的文件系统。
4.4.创建ACFS
ACFS就是ASM Cluster File System,即自动存储集群文件系统.它可以让我们在ASM(Automated Storage Management)自动存储管理之上建立逻辑卷,文件系统.通过ACFS我们可以实现像GPFS之类的共享文件系统.从而不必依赖其他集群软件来实现,完全由Oracle自己的Grid Infrastructure来实现。

如图所示:
首先我们可以在DATA下划分逻辑卷.比如名字叫datavolume.它对应到操作系统的设备文件就是/dev/asm/datavolume-276.然后可以用操作系统的mount命令将这个卷挂载到文件系统上.挂载到文件系统后,就可以在下面创建文件了。
1.划分ASM卷
[oracle@rac1 ~]asmcmd volcreate -G data ogg -s 3G
[oracle@rac1 ~] asmcmd volinfo -G data ogg
Diskgroup Name: DATA

         Volume Name: OGG
         Volume Device: /dev/asm/ogg-276
         State: ENABLED
         Size (MB): 3072
         Resize Unit (MB): 32
         Redundancy: UNPROT
         Stripe Columns: 4
         Stripe Width (K): 128
         Usage:
         Mountpath:
2.将ASM卷格式化成ACFS
[oracle@rac1 ~]$ /sbin/mkfs -t acfs /dev/asm/ogg-276
mkfs.acfs: version                   = 11.2.0.3.0
mkfs.acfs: on-disk version           = 39.0
mkfs.acfs: volume                    = /dev/asm/ogg-276
mkfs.acfs: volume size               = 3221225472
mkfs.acfs: Format complete.
3.把设备文件,挂载点注册到GI的ACFS服务中
这一步的作用是以后重启操作系统,启动完GI后,会自动挂载文件系统
[root@rac1 oracle]# acfsutil registry -a -f /dev/asm/ogg-276 /cloudfs
acfsutil registry: mount point /cloudfs successfully added to Oracle Registry
[root@rac1 ~]# acfsutil registry
Mount Object:
  Device: /dev/asm/ogg-276
  Mount Point: /cloudfs
  Disk Group: DATA
  Volume: OGG
  Options: none
  Nodes: all

[root@rac1 ~]# acfsutil info fs /cloudfs/
/cloudfs/
    ACFS Version: 11.2.0.3.0
    flags:        MountPoint,Available
    mount time:   Sun Aug  5 22:42:48 2012
    volumes:      1
    total size:   3221225472
    total free:   3145486336
    primary volume: /dev/asm/ogg-276
        label:
        flags:                 Primary,Available,ADVM
        on-disk version:       39.0
        allocation unit:       4096
        major, minor:          252, 141313
        size:                  3221225472
        free:                  3145486336
        ADVM diskgroup         DATA
        ADVM resize increment: 33554432
        ADVM redundancy:       unprotected
        ADVM stripe columns:   4
        ADVM stripe width:     131072
    number of snapshots:  0
    snapshot space usage: 0
    replication status: DISABLED
4.重启ACFS服务,重启后自动挂载
[oracle@rac1 ~]crs_stop ora.registry.acfs
Attempting to stop `ora.registry.acfs` on member `rac1`
Attempting to stop `ora.registry.acfs` on member `rac2`
Stop of `ora.registry.acfs` on member `rac1` succeeded.
Stop of `ora.registry.acfs` on member `rac2` succeeded.
[oracle@rac1 ~] crs_start ora.registry.acfs
Attempting to start `ora.registry.acfs` on member `rac2`
Attempting to start `ora.registry.acfs` on member `rac1`
Start of `ora.registry.acfs` on member `rac2` succeeded.
Start of `ora.registry.acfs` on member `rac1` succeeded.
[oracle@rac1 ~]$ df -h
Filesystem            Size  Used Avail Use% Mounted on
/dev/sda3              16G   11G  4.2G  72% /
/dev/sda1              99M   12M   83M  13% /boot
tmpfs                 1.5G  200M  1.3G  14% /dev/shm
/dev/asm/ogg-276      3.0G   73M  3.0G   3% /cloudfs
至此我们完成了我们以前在操作系统上做逻辑卷的操作.接下来再演示一下删除的操作.删除操作正好相反.
1.umount两边的文件系统
[root@rac1 ~]# umount /cloudfs/ [root@rac2 ~]# umount /cloudfs/
2.删除ASM卷
[oracle@rac1 ~]$ asmcmd voldelete -G data ogg
3.取消ACFS注册
[root@rac1 ~]# acfsutil registry -d /cloudfs/
acfsutil registry: successfully removed ACFS mount point /cloudfs from Oracle Registry
当然这些也可以通过图形界面ASMCA来实现。
5.Oracle Restart 说明
转载:http://blog.csdn.net/tianlesoftware/article/details/8435670
5.1.OHASD 说明
Oracle 11gR2 中对CRSD资源进行了重新分类: Local Resources 和 Cluster Resources。
[grid@rac2 ~]$ crsctl stat res -t
--------------------------------------------------------------------------------
NAME           TARGET  STATE       SERVER                  STATE_DETAILS
--------------------------------------------------------------------------------
Local Resources
--------------------------------------------------------------------------------

ora.DATA.dg
               ONLINE  ONLINE      rac1
               ONLINE  ONLINE      rac2
ora.FRA.dg
               ONLINE  ONLINE      rac1
               ONLINE  ONLINE      rac2
ora.LISTENER.lsnr
               ONLINE  ONLINE      rac1
               ONLINE  ONLINE      rac2
ora.OCRVOTING.dg
               ONLINE  ONLINE      rac1
               ONLINE  ONLINE      rac2
ora.asm
               ONLINE  ONLINE      rac1                    Started
               ONLINE  ONLINE      rac2                    Started
ora.gsd
               OFFLINE OFFLINE      rac1
               OFFLINE OFFLINE      rac2
ora.net1.network
               ONLINE  ONLINE      rac1
               ONLINE  ONLINE      rac2
ora.ons
               ONLINE  ONLINE      rac1
               ONLINE  ONLINE      rac2
--------------------------------------------------------------------------------
Cluster Resources
--------------------------------------------------------------------------------
ora.LISTENER_SCAN1.lsnr
     1        ONLINE  ONLINE      rac1
ora.cvu
     1        ONLINE  ONLINE      rac1
ora.oc4j
     1        ONLINE  ONLINE      rac1
ora.rac1.vip
     1        ONLINE  ONLINE      rac1
ora.rac2.vip
     1        ONLINE  ONLINE      rac2
ora.scan1.vip
     1        ONLINE  ONLINE      rac1
ora.sdd.db
     1        ONLINE  ONLINE      rac1                     Open
     2        ONLINE  ONLINE      rac2                     Open
Local Resources 属于应用层,
Cluster Resources 属于集群层。
Oracle Restart 就是对Cluster Resource的一个管理。
在Oracle 10g RAC 安装时,在运行root.sh时,会在/etc/inittab文件的最后加入ora.crs,ora.cssd,ora.evmd 三个进程。 这样以后每次系统启动时,Clusterware 也会自动启动,其中EVMD和CRSD 两个进程如果出现异常,则系统会自动重启这两个进程,如果是CSSD 进程异常,系统会立即重启。
而在Oracle 11gR2中,只会将ohasd 写入/etc/inittab 文件。
官网对OHASD 的说明:
Oracle High Availability Services Daemon(OHASD) :This process anchors the lower part of the Oracle Clusterwarestack, which consists of processes that facilitate cluster operations.
可以使用如下命令查看OHASD管理的资源:
[grid@rac2 ~]crsctl stat res -init -t

[grid@rac2 ~] ps -ef|grep ohasd
root     1057     1  0 Dec21 ?        00:00:00 /bin/sh /etc/init.d/init.ohasdrun
root     2274     1  0 Dec21 ?        00:22:53/u01/app/grid/11.2.0/bin/ohasd.bin reboot
5.2.About Oracle Restart
Oracle Restartimproves the availability of your Oracle database. When you install OracleRestart, various Oracle components can be automatically restarted after ahardware or software failure or whenever your database host computer restarts.
Oracle Restart 能提高数据库的可用性,当安装了Oracle Restart 之后,在系统出现硬件或者软件问题,或者主机重启之后,OracleRestart 管理的组件都能自动的进行启动。
OracleRestart 会周期性的检查和监控这些组件的状态,如果发现某个组件fail,那么就会shutdown并restart 该组件。
Oracle Restart 只能用于not-cluster的环境。 对于Oracle RAC 环境,Oracle Clusterware 会提供automatically restart的功能。
对于非集群环境,只需要安装OracleGrid Infrastructure,在安装的时候选择“仅安装网格基础结构软件”,然后运行如下脚本来安装Oracle Restart:
$GRID_HOME/crs/install/roothas.pl
如果是先安装了Oracle Restart,然后使用dbca创建了实例,那么DBCA会自动的把Oracle 添加到OracleRestart的配置里。 当DBCA启动数据库时,数据库会和其他组件(如disk group)之间建立依赖关系,然后Oracle Restart 开始管理数据库。
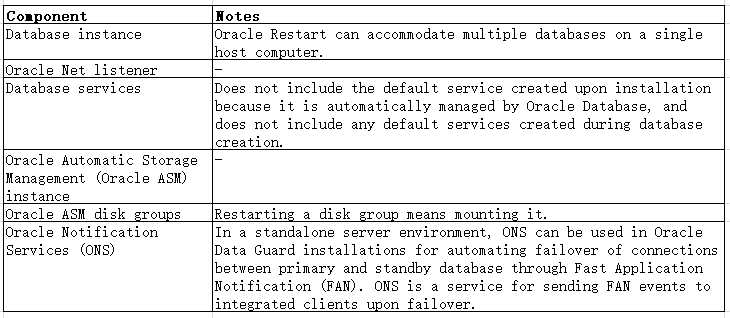
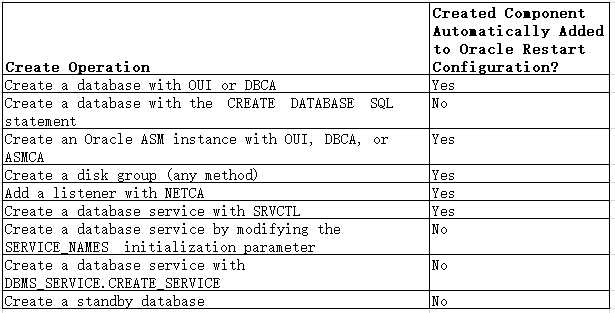
当安装了Oracle Restart 后,一些Create操作会自动的创建Oracle 的Compents并将其自动的添加到Oracle Restart configuration中。 这类操作如下表所示:
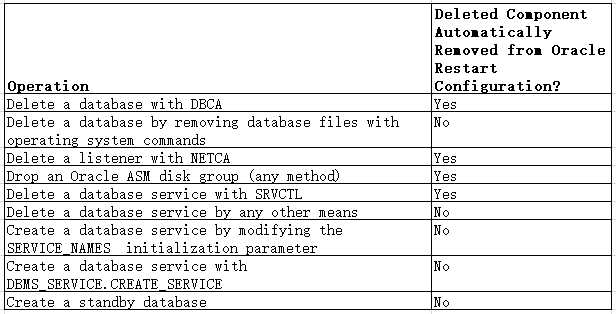
同样,一些delete/drop/remove操作也会自动的从Oracle Restart Configuration中进行更新,具体如下表:
Oracle Restart 由OHASD 进程来管理。 这个就是第一节介绍OHASD的原因。 对于standalone server,使用OHASD 来管理Oracle Restart ,并且不需要CRSD进程的支持。 可以使用OHASD管理的组件如下:
- CSSD: This is used for Group Services as it was inprevious releases (when it was installed using “localconfig add“)
- ASM Instance :if Automatic Storage Management is used.
- ASM Disk Groups: if Automatic Storage Management is used.
- Listeners
- Database Instances
- Database Services
OHASD 是一个后台的守护进程,其可用来启动和监控OracleRestart 进程。 该进程由/etc/init.d/ohasd 脚本来初始化,并有root用户来执行ohasd.bin 来启动。
使用Oracle Restart 有如下好处:
- Automatic resource startup atboot time without using shell scripts or the Oracle supplied dbstart and dbshut scripts.
- Resources are started in thecorrect sequence based on dependencies in the OLR(Oracle Local Resource).
- Resources are also monitored by ohasd foravailability and may be restarted in place if they fail.
- Role managed services for DataGuard.
- Consistency of command lineinterfaced tools using crsctl and srvctl as is done withclusters.
5.3.CRSCTL命令
CRSCTL 命令可选参数:
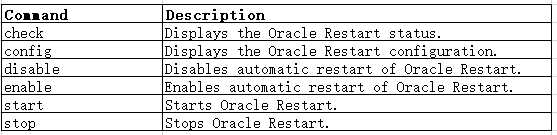
以下操作需要已root用户执行
手工停止Oracle Restart:
crsctl stop has [-f]
启动HAS
[root@rac1 bin]# ./crsctl start has

CRS-4123: Oracle High Availability Serviceshas been started.
启动HAS,实际上后面会把Oracle Restart 管理的资源都会启动。这个可以使用crs_stat 命令来进程验证,不过Oracle 11g的进程启动过程比较慢,需要耐心等待。
禁用HAS
(Restart)在server 重启后的自动启动
[root@rac1 bin]# ./crsctl disable has

CRS-4621: Oracle High Availability Servicesautostart is disabled.
查看HAS
(Restart)的状态
[root@rac1 bin]# ./crsctl config has

CRS-4621: Oracle High Availability Servicesautostart is disabled.
启用HAS
(Restart)在server 重启后的自启动
[root@rac1 bin]# ./crsctl enable has

CRS-4622: Oracle High Availability Servicesautostart is enabled.
查看Restart 当前状态
[root@rac1 bin]# ./crsctl check has

CRS-4638: Oracle High Availability Servicesis online
查看Oracle Restart 中由OHASD管理的resource 状态
[root@rac1 bin]# ./crsctl stat res -t
5.4.SRVCTL命令
可以手工的使用SRVCTL 命令来管理Oracle Restart。从Oracle Restart 配置里添加或者删除一些组件。当我们手工的添加一个组件到到Oracle Restart,并使用SRVCTL启用该组件,那么Oracle Restart 就开始管理该组件,并根据需要决定是否对该组件进行重启。
SRVCTL命令主要有如下选项:
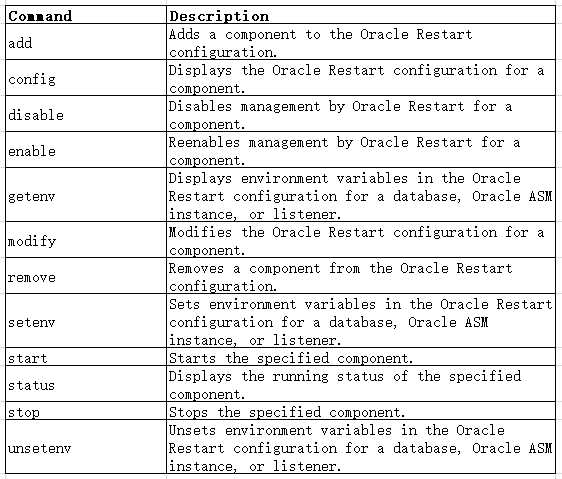
–This example adds thedatabase with the DB_UNIQUE_NAME dbcrm:
srvctl add database -d dbcrm -o/u01/app/oracle/product/11.2.0/dbhome_1
–This example adds thesame database and also establishes a dependency between the database and thedisk groups DATA and RECOVERY.
srvctl add database -d dbcrm -o/u01/app/oracle/product/11.2.0/dbhome_1 -a "DATA,RECOVERY"
–The following commandadds a listener (named LISTENER) running out of the database Oracle homeand listening on TCP port 1522:
srvctl add listener -p TCP:1522 -o /u01/app/oracle/product/11.2.0/dbhome_1
srvctl命令中的config 选项,其是用来限制相关Resource 信息的:
[grid@rac1 ~]$ srvctl config asm -a
ASM home: /u01/app/grid/11.2.0
ASM listener: LISTENER
ASM is enabled.
srvctl 命令是非常常用的。有些操作会自动的把相关的resource 添加到Restart里进行监控,但有些操作不会添加到Restart里,需要手工添加。
6.References
2.Automatic Storage Management (ASM)
3.Using the Oracle ASM Cluster File System (Oracle ACFS) on Linux
Part 1
Part 2
Part3