1.Reference Documents
Refer to the official published document shown below for detailed information on Oracle Advanced Security, where it describes in detail how to configure and use the Secure Sockets Layer (SSL) and Transport Layer Security (TLS) protocols.
For Oracle 12c database: https://docs.oracle.com/en/database/oracle/oracle-database/12.2/dbseg/configuring-secure-sockets-layer-authentication.html#GUID-6AD89576-526F-4D6B-A539-ADF4B840819F
2.Difference between SSL and TLS
Transport Layer Security (TLS) is an incremental version of Secure Sockets Layer (SSL) version 3.0.
Although SSL was primarily developed by Netscape Communications Corporation, the Internet Engineering Task Force (IETF) took over development of it, and renamed it Transport Layer Security (TLS).
Note: To simplify discussion, this chapter uses the term SSL where either SSL or TLS may be appropriate because SSL is the most widely recognized term. However, where distinctions occur between how you use or configure these protocols, this chapter specifies what is appropriate for either SSL or TLS.
TLS 1.2 and above is the recommended protocol.
3.Prerequisites
- The Oracle database server version should be Oracle Database Enterprise Edition 12c Release.
-
On the application machine, Oracle Database 12c 32bit ODAC and 12c Client are required.
-
The Oracle public key infrastructure (PKI), which provides Oracle Wallet and Oracle Wallet Manager (OWM), is required. The OraclePKI command is used to create keys to generate certificates. The OraclePKI command can be found in $ORACLE_HOME/bin folder.
4.Using TLS for a multi tenant environment applications
Transport Layer Security (TLS) can be used in a multi tenant environment applications. If you want to use Transport Layer Security (TLS) in a multi-tenant environment application, then you must ensure that the database is able to use its own wallet with its own certificates for TLS authentication.
TLS works with the core Oracle Database features such as encryption and data access controls. By using Oracle Database SSL functionality to secure communications between clients and servers, you can:
- use TLS to encrypt the connection between clients and servers.
-
authenticate any client or server, to any Oracle database server that is configured to communicate over TLS.
5.Enabling TLS 1.2 for Clients and Oracle Database Connection
You must configure TLS 1.2 on the Oracle database server, and then the clients side.
- Configure TLS 1.2 on the Oracle Database Server. Configure the Oracle wallet and use TCP/IP with SSL on the server. See Step 1, Step 3, and Step 4
-
Configure TLS 1.2 on the clients side. When you configure SSL on the client, configure the server DNS and use TCP/IP with SSL on the client. See Step 2 and Step 5
-
Log in to the Database Instance. After you have completed the configuration, you are ready to log in to the database.
Step 1: Configure Oracle Wallet for Server (Database) Side
- Open a command prompt window as a normal user.
- Create a directory on the server machine to store the server wallet at
. Run the make directory command below at “C:/Oracle” folder.
>mkdir wallets
>cd wallets
>mkdir db
>cd db
Based on the sample above, the value for
- Create a wallet for the Oracle server. Create an empty wallet with auto login enabled:
> orapki wallet create -wallet "<SERVER_WALLET>" -pwd <password> -auto_login
Example:
orapki wallet create -wallet "C:\Oracle\wallets\db" -pwd <password> -auto_login
- Add a self-signed certificate in the wallet (a new pair of private/public keys is created):
> orapki wallet add -wallet "<SERVER_WALLET>" -pwd <password> -dn "CN=<server_machine_name>" -keysize 2048 -self_signed -validity <No. of Days>
Example:
orapki wallet add -wallet "C:\Oracle\wallets\db" -pwd <password> -dn "CN=server1" -keysize 2048 -self_signed -validity 365
- Check the contents of the wallet. Notice the self-signed certificate is both a user and trusted certificate.
> orapki wallet display -wallet "<SERVER_WALLET>" -pwd <password>
- Export the certificate so it can be loaded into the client wallet later.
> orapki wallet export -wallet "<SERVER_WALLET>" -pwd <password> -dn "CN=<server_machine_name>" -cert <SERVER_WALLET>\<server-certificate-name>.crt
Example:
orapki wallet export -wallet "C:\Oracle\Wallets\db" -pwd <password> -dn "CN=server1" -cert C:\Oracle\wallets\db\server-cert-db.crt
- Check whether the certificate has exported to the above directory.
Step 2: Configure Oracle Wallet for Client (Application) Side
You must create a client wallet on all SPMS client machines. Follow the steps below to create a client wallet and repeat the steps on each of the database client machines.
- Open a command prompt window as a normal user.
-
Create a directory on the client machine to store the client wallet. Call it
. Create it under the “C:\Oracle” folder.
>mkdir wallets
>cd wallets
>mkdir user
>cd user
Based on the sample above, the value for
- Create a wallet for the Oracle client. Create an empty wallet with auto login enabled:
> orapki wallet create -wallet "<CLIENT_WALLET>" -pwd <password> -auto_login.
Add a self-signed certificate in the wallet (a new pair of private/public keys is created):
> orapki wallet add -wallet "<CLIENT_WALLET> " -pwd <password> -dn "CN=<client_machine_name>" -keysize 2048 -self_signed -validity <No. of Days>
Note:
Ensure each client certificate has a unique name. Ue the client machine name as the certificate name.
- Check the contents of the wallet. Note that the self-signed certificate is both a user and trusted certificate.
> orapki wallet display -wallet "<CLIENT_WALLET>" -pwd <password>
- Export the certificate, so it can be loaded into the server wallet later.
> orapki wallet export -wallet "<CLIENT_WALLET>" -pwd <password> -dn "CN=<client_machine_name>" -cert <CLIENT_WALLET>\<client-certificate-name>.crt
Note:
Ensure each client certificate has a unique name, use the client machine name as the certificate name.
- Check whether the certificate is exported to the above directory.
Step 3: Perform Clients-Server Exchange Certificate Process
These instructions are for the exchange server and client public keys. These steps must be repeated on each of the database client machines.
- Copy server-certificate-name.crt from the server machine to the client machine CLIENT_WALLET folder.
-
Copy client-certificate-name.crt from the client machine to the server machine SERVER_WALLET folder.
-
Load the server certificate into the client wallet.
orapki wallet add -wallet "<CLIENT_WALLET>" -pwd <password> -trusted_cert -cert <CLIENT_WALLET>/<server-certificate-name>.crt
- Check the contents of the client wallet. Note that the server certificate is now included in the list of trusted certificates.
orapki wallet display -wallet "<CLIENT_WALLET>" -pwd <password>
- Load the client certificate into the server wallet.
orapki wallet add -wallet "<SERVER_WALLET>" -pwd <password> -trusted_cert -cert <SERVER_WALLET>/<client-certificate-name>.crt
- Check the contents of the server wallet. Note that the client certificate is now included in the list of trusted certificates.
Step 4: Configure the Oracle Database to Listen For TCPS Connection
Configure the listener.ora and sqlnet.ora files on the database server using the following steps.
To configure the listener.ora file:
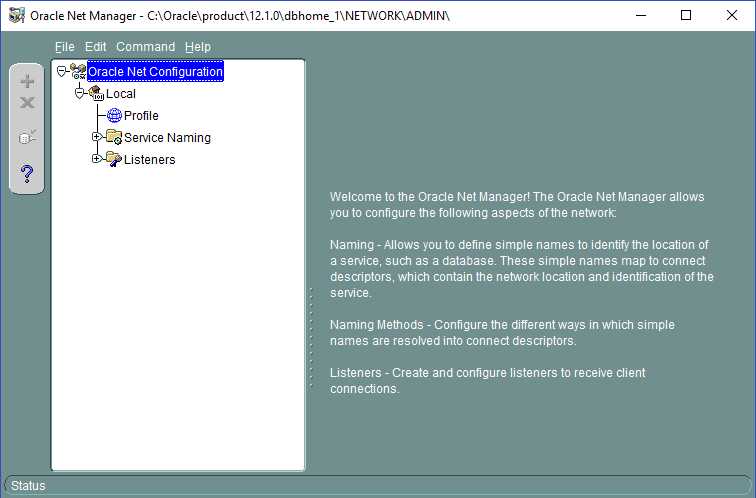
- Launch the Net Manager Tool.
Figure 1-1 Net Manager
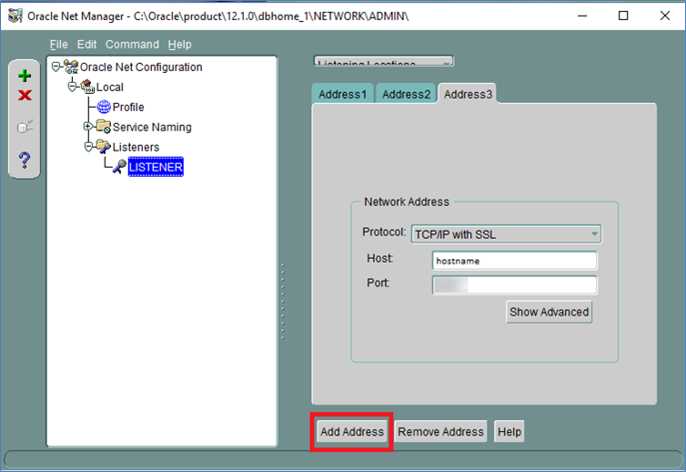
- Expand the Listeners container under Local, and select the Listener.
-
Click Add Address and select TCP/IP with SSL as the protocol.
-
Enter the hostname and port as shown in the screen below.
Figure 1-2 Listener, Address Tab
- Click File, and then click Save Network Configuration to save the setting. Below is an example of the listener.ora file
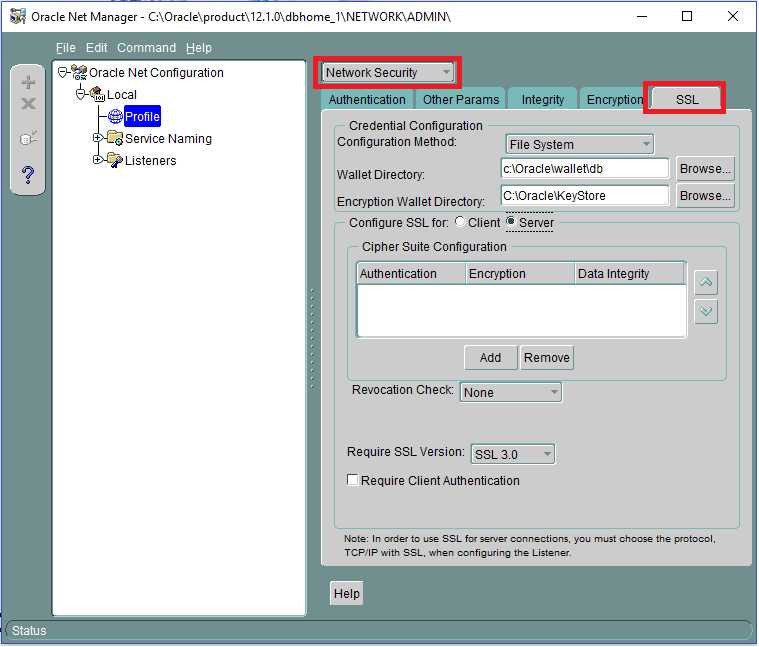
To configure the sqlnet.ora file using Oracle Net Manager:
- Click Profile,and then select Network Security from the drop-down list.
-
Select the SSL tab, and then select the Server option.
-
Enter the values as shown below:
Configuration Method: File System
Wallet Directory: SERVER_WALLET
Configure SSL for: Server
Revocation Check: None
Require Client Authentication: FALSE
Figure 1-3 Network Security in Net Manager
- Click File, and then click Save Network Configuration to save. At this point, exit the Oracle Net Manager tool and ensure all changes are saved.
-
Since the Oracle Net Manager does not allow for certain values to be changed, open
ORACLE_HOME/network/admin/sqlnet.ora and make sure the following properties are set to
SSL_VERSION = 1.2
SSL_CIPHER_SUITES= (SSL_RSA_WITH_AES_128_GCM_SHA256)
- In ORACLE_HOME/dbs/init.ora make sure the following property is set to
_use_fips_mode=FALSE
- Restart the Database Service and listener so that all the above changes takes effect. From Windows Services Administrative Tools, Services, restart the corresponding Database Service. The Listener can be restarted from Windows services or as shown below:
Open the command prompt and follow the below steps using Run as Administrator:
> lsnrctl stop
> lsnrctl start
After completing the steps, re-open the Net Manager. Below is a sample of the sqlnet.ora and listener.ora file:
<ORACLE_HOME>/network/admin/sqlnet.ora
...
SQLNET.AUTHENTICATION_SERVICES=(BEQ,TCPS,NTS)
SSL_CLIENT_AUTHENTICATION = FALSE
SSL_VERSION = 1.2
WALLET_LOCATION =
   (SOURCE =
     (METHOD = FILE)
     (METHOD_DATA = (DIRECTORY = C:/Oracle/wallets/db))
   )
SSL_CIPHER_SUITES= (SSL_RSA_WITH_AES_128_GCM_SHA256)
...
<ORACLE_HOME>/network/admin/listener.ora
...
SSL_CLIENT_AUTHENTICATION = FALSE
WALLET_LOCATION =
   (SOURCE =
     (METHOD = FILE)
     (METHOD_DATA = (DIRECTORY = C:/Oracle/wallets/db))
   )
...
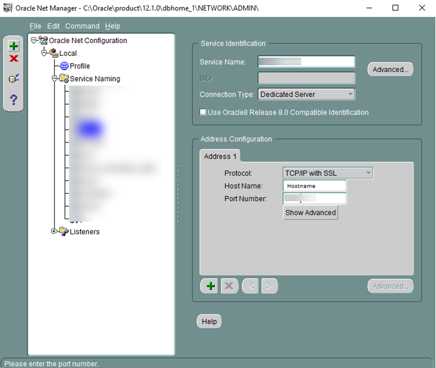
To configure the tnsnames.ora file:
1. Click on Service Naming in Net Manager.
- Click on Edit, select Create to create a new service. Complete the Net Service Name Wizard as described below:
Net Service Name: Service Name
Select: “TCP/IP with SSL (Secure Internet Protocol)”
Host Name: Host Name
Port Number: Port Number
(Oracle8i or later) Service Name: Service Name
Connection Type: Default database Test the connection on page 5 of the wizard.
Figure 1-4 Net Manager Service Name
Here is the sample tnsnames.ora file:
...
fidelio_tcps =
   (DESCRIPTION =
     (ADDRESS_LIST =
     (ADDRESS = (PROTOCOL = TCPS)(HOST = example.com)(PORT = <Port No>)))
     (CONNECT_DATA = (SERVICE_NAME = <Service_Name>))
   )
...
- Click File, and then clickSave Network Configuration to save.
-
Click File, and then clickExit. All server configurations have been completed.
Step 5: Configure the Oracle Client to Connect with TCPS Connection
Perform the following configuration on the machine running the application.
- Follow the steps in Step 4 for configuring the client sqlnet.ora file. This file is located in the ORACLE_HOME/network/admin folder. File contents are similar to the example below.
...
SQLNET.AUTHENTICATION_SERVICES=(BEQ,TCPS,NTS)
SSL_CLIENT_AUTHENTICATION = FALSE
SSL_VERSION = 1.2
WALLET_LOCATION =
   (SOURCE =
     (METHOD = FILE)
     (METHOD_DATA = (DIRECTORY = C:/Oracle/wallets/user))
   )

SSL_CIPHER_SUITES= (SSL_RSA_WITH_AES_128_GCM_SHA256)
...
- Follow the steps in Step 4 for configuring the tnsnames.ora file on the client/application. This file is located in the ORACLE_HOME/network/admin folder. Below are the sample file contents:
FIDELIO=
(DESCRIPTION =
  (ADDRESS_LIST =
    (ADDRESS = (PROTOCOL = TCPS)(HOST = example.com)(PORT = <Port No>))
  )
  (CONNECT_DATA =
    (SERVER = DEDICATED)
    (SERVICE_NAME = <Service Name>)
  )
)
- Connect to the Database using SQLPlus client with SSL.
-
Launch the SQLPlus session from the command line, by typing the username and password as username/password@ssl_connectstring.
Note:
To enable the IIS Server connection to the database, the wallet folder of the IIS server must give permission to IIS_IUSR to access the wallet. For further details, refer to the Oracle Database Security Guide, section “Configuring Secure Sockets Layer Authentication” located at: https://docs.oracle.com/database/121/DBSEG/asossl.htm#DBSEG9665.
6.How Secure Sockets Layer Works with Other Authentication Methods
Secure Sockets Layer can be used with other authentication methods that Oracle Database supports.
Figure 18-1 illustrates a configuration in which Secure Sockets Layer is used in combination with another authentication method.
Figure 18-1 Secure Sockets Layer in Relation to Other Authentication Methods
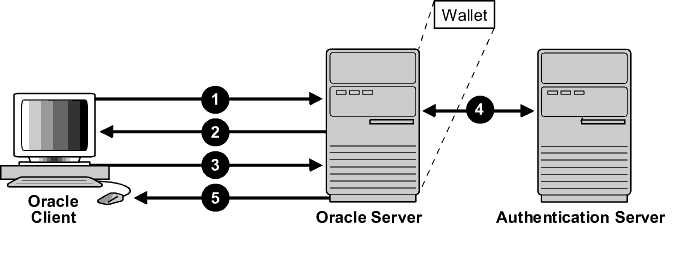
In this example, Secure Sockets Layer is used to establish the initial handshake (server authentication), and an alternative authentication method is used to authenticate the client. The process is as follows:
- The client seeks to connect to the Oracle database server.
-
Secure Sockets Layer performs a handshake during which the server authenticates itself to the client and both the client and server establish which cipher suite to use.
-
Once the Secure Sockets Layer handshake is successfully completed, the user seeks access to the database.
-
The Oracle database server authenticates the user with the authentication server using a non-SSL authentication method such as Kerberos or RADIUS.
-
Upon validation by the authentication server, the Oracle database server grants access and authorization to the user, and then the user can access the database securely by using SSL.
How Secure Sockets Layer Works in an Oracle Environment: The SSL Handshake
When a network connection over Secure Sockets Layer is initiated, the client and server perform an SSL handshake before performing the authentication.
The handshake process is as follows:
- The client and server establish which cipher suites to use. This includes which encryption algorithms are used for data transfers.
-
The server sends its certificate to the client, and the client verifies that the server’s certificate was signed by a trusted CA. This step verifies the identity of the server.
-
Similarly, if client authentication is required, the client sends its own certificate to the server, and the server verifies that the client’s certificate was signed by a trusted CA.
-
The client and server exchange key information using public key cryptography. Based on this information, each generates a session key. All subsequent communications between the client and the server is encrypted and decrypted by using this session key and the negotiated cipher suite.
The authentication process is as follows:
-
On a client, the user initiates an Oracle Net connection to the server by using SSL.
-
SSL performs the handshake between the client and the server.
-
If the handshake is successful, then the server verifies that the user has the appropriate authorization to access the database.