1.Hardware
1.1.Notes
- Power NASPi Gemini via USB-C or DC jack of X882 shield, DO NOT power via USB-C of Raspberry Pi 4, or you can’t use the AUTO ON & Safe shutdown function
- Because the shielding of the metal case will cause the loss of 2.4G wifi signal, only recommend to use Ethernet or 5G WiFi.
- Support Max 16mm thickness 2.5″ SATA HDD/SSD installation.
- Support Max 7mm thickness heatsinks on Raspberry Pi 4 as we use 11mm height spacers for the fan with bracket installation on Pi4.
- Insert the SD card into Raspberry Pi 4 first before NASPi Gemini installation start.
- The Raspberry Pi 4 board, 2.5″ SATA SSDs/HDDs, power adapter are all not included in the packing list.
WIKI: wiki.geekworm.com/NASPi_Gemini
Installation Video: youtu.be/7FzZeoTBQiI (Software Guide of script installation, please fast forward video to 5 minutes 10 seconds.)
1.2.Overview
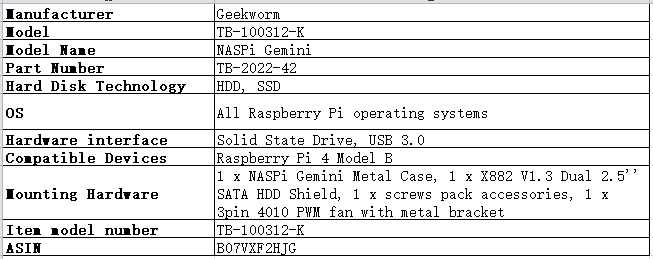
Geekworm NASPi Gemini is an ultra-compact dual 2.5 inch SATA HDD/SSD NAS storage kit with safe shutdown, auto power on and RAID function that specially designed for Raspberry Pi 4 Model B computer, it allows two pcs 2.5″ HDD/SSD to working at the same time with your Raspberry Pi 4. Also support use with one single 2.5″ SATA HDD/SSD. The SuperSpeed USB 3.0 port delivers a blistering data transfer rate of up to 5Gbps, letting you transfer a large amount of data in seconds.
NASPi Gemini is composed of three parts: X882 dual 2.5″ SATA HDD shield, NASPi Gemini metal case and heat dissipation system(3Pin 4010 PWM fan with metal bracket). To get better heat dissipation of NASPi Gemini, it also support install Max 7mm thickness heatsink above Pi4, as we use the M2.5*11+6mm spacers to fix the PWM fan with bracket.There is space for extra heatsink installation on Pi4.
1.3.Features
- Ultra-compact NAS storage solution for Raspberry Pi 4 with Dual 2.5″ SATA HDD/SSD
- For use with Raspberry Pi 4 Model B only
- Supports Dual Max 16mm thickness 2.5 SATA HDDs/SSDs working at the same time
- Support Auto Power On function by jumper setting (Automatically turn on when there is a power supply)
- Support Software & Hardware safe shutdown function(Integrated on X882 shield, do not need extra expansion board)
- Support connecting 3pin PWM fan for cooling
- Support Three RAID Modes by jumper setting
- UASP supported only, do not support TRIM
- Allows booting OS from your HDD/SSD for faster app opens, web serving and file copying
- Compatible with all Raspberry Pi operating systems (If the OS (such as Home Assistant) does not allow the installation of external scripts, then the software safe shutdown and automatic adjust fan speed functions are not supported;)
1.4.Note about SSD
- Do not recommend using Samsung hard drives, please use hard drives of other brands.
- As with all SSDs, new SSD/HDD must be formatted before use.
- Older SSD drives with less efficient flash media may not perform as well as newer drives.
- A microSD card is required for forceing the Raspbian OS to use the HDD/SSD for its “root” partition.
1.5.How to Power NASPi Gemini
- Via USB Type-C port of X882, 5.1Vdc +/-5% , ≥4A(Geekworm Type-C 5V 4A 20W power supply(ASIN: B09J856PND)is recommended.)
- Via DC5521 Jack of X882, 5.1Vdc +/-5% , ≥4A (DC5525 Jack is compatible with DC5521, also support 5V PSU with DC5525 Jack)
1.6.Note about PSU
Please use high quality power adapter, or the dual HDD/SSD may cannot be recognized. Since NASPi Gemini can install two pcs 2.5 inch hard drives, it needs a high-quality power supply to provide enough current.

1.7.Raspbery Pi
Raspberry Pi 4 Model B Board:
- Broadcom BCM2711, Quad core Cortex-A72 (ARM v8) 64-bit SoC @ 1.5GHz
- 2GB or 4GB LPDDR4-3200 SDRAM (depending on model)
- 2.4 GHz and 5.0 GHz IEEE 802.11ac wireless, Bluetooth-compatible 5.0, BLE
- Gigabit Ethernet
- 2 USB 3.0 ports; 2 USB 2.0 ports.
- Raspberry Pi standard 40 pin GPIO header (fully backwards compatible with previous boards)
- 2 × Micro HDMI-compatible ports (up to 4kp60 supported)
- 2-lane MIPI DSI display port
- 2-lane MIPI CSI camera port
- 4-pole stereo audio and composite video port
- H.265 (4kp60 decode), H264 (1080p60 decode, 1080p30 encode)
- OpenGL ES 3.0 graphics
- Micro card slot for loading operating system and data storage
- 5V DC via USB-C connector (minimum 3A*)
- 5V DC via GPIO header (minimum 3A*)
- Power over Ethernet (PoE) enabled (requires separate PoE HAT)
- Operating temperature: 0 – 50 degrees C ambient
Specifications:
- The ABS case support to install cooling fan on the cover.
- 4pcs heat sink provide good heat dissipation for your Pi 4B.
- 32GB/64GB , Class 10 Card , with high speed.
- 1.5m Micro HDMI-compatible cable , use to connect the Raspberry Pi to LCD.
- 5V 3A ON/OFF switch power adapter, convenient to control the power, please leave a message for power adapter(EU/US/AU/UK) you want in the order.

1.8.SD Card

2.Install Raspberry Pi OS
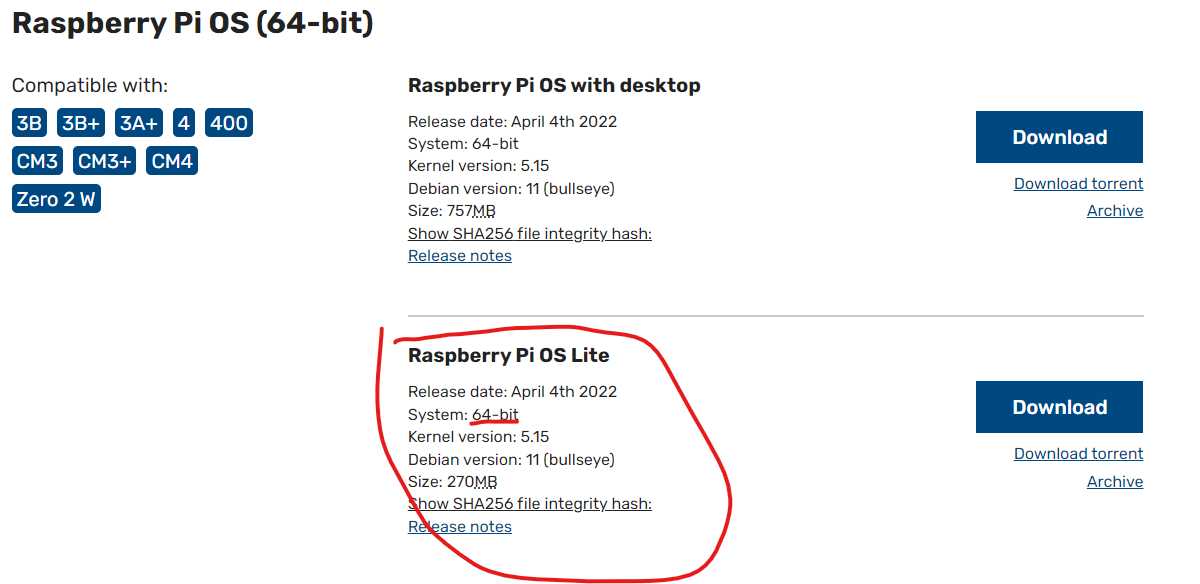
2.1.Download Raspberry Pi OS Lite
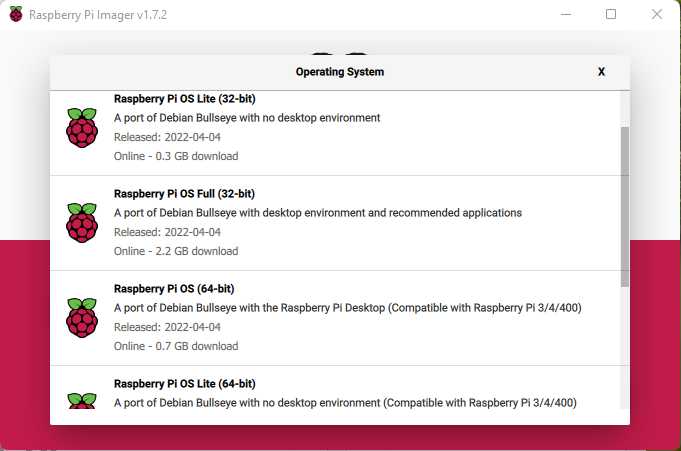
2.2.Download Raspberry Pi Imager

2.3.Used 7Zip to decompress image file

2.4.Write Image to SD card
3.Configure Raspberry Pi OS
3.1.Login
You can log in using the default username: “pi” and the default password: “raspberry”.
change root password:
sudo passwd root
3.2.Disable auto login
sudo raspi-config
(enter) Boot Options ->
(enter) Desktop / CLI ->
(enter) B1 Console Text console, requiring user to login ->
(enter) B3 Desktop Desktop GUI, requiring user to login ->
choose both B1 and B2 to ensure that the command-line won’t be auto logged in and that you will also have a GUI prompt available.
3.3.Configuring your WiFi network
Set up the /etc/wpa_supplicant/wpa_supplicant.conf file
country=CA
ctrl_interface=DIR=/var/run/wpa_supplicant GROUP=netdev
update_config=1
network={
    ssid="your-networks-SSID"
    psk="your-networks-password"
}
Set up the /etc/dhcpcd.conf file
interface wlan0
static ip_address=192.168.1.200
static routers=192.168.1.1
static domain_name_servers=8.8.8.8
Reboot
rfkill list
sudo rfkill unblock all
sudo reboot
Alternatively, raspi-config can be used in the terminal.
You can check your network connection by running the following command:
ifconfig wlan0
If the output looks something like this (with an inet addr) you are connected:
wlan0   Link encap:Ethernet HWaddr 74:da:38:2b:1c:3d

inet addr:192.168.1.216

 Bcast:192.168.1.255 Mask:255.255.255.0
        inet6 addr: fe80::8727:5526:a190:b339/64 Scope:Link
        UP BROADCAST RUNNING MULTICAST MTU:1500 Metric:1
        RX packets:6917 errors:0 dropped:229 overruns:0 frame:0
        TX packets:2931 errors:0 dropped:1 overruns:0 carrier:0
        collisions:0 txqueuelen:1000
        RX bytes:10001000 (9.5 MiB) TX bytes:295067 (288.1 KiB)
3.4.Enable SSH
sudo systemctl enable ssh
sudo systemctl start ssh
3.5.config profile
vi .profile
xport PS1='[\u@\h:`pwd`]€'
3.6.Change Hostname
sudo vi /etc/hosts
Change the old Raspberry Pi hostname to your new one and save
sudo vi /etc/hostname
Change the hostname there and save.
Reboot your Raspberry Pi for the changes to take effect.
3.7.Update Pi
apt-get --allow-releaseinfo-change update
apt-get upgrade
3.8.Install PWM fan control script
sudo apt-get install -y git pigpio
sudo apt-get install -y python3-pigpio python3-smbus
git clone https://github.com/geekworm-com/x-c1.git
cd x-c1
sudo chmod +x *.sh
sudo bash install.sh
echo "alias xoff='sudo /usr/local/bin/x-c1-softsd.sh'" >> ~/.bashrc
vi /etc/rc.local
sudo reboot
Test safe shutdown script
xoff
Please run xoff to shutdown or press the on-board button switch to shutdown.
DON’t run the shutdown Linux command otherwise the power of x-c1 will not be shutdown.
press button switch 1-2 seconds to reboot
press button switch 3 seconds to safe shutdown
press button switch 7-8 seconds to force shutdown
4.set up OpenMediaVault on Raspberry Pi 4
https://openmediavault.readthedocs.io/en/latest/index.html
4.1.Installing OpenMediaVault
wget -O - https://github.com/OpenMediaVault-Plugin-Developers/installScript/raw/master/install | sudo bash
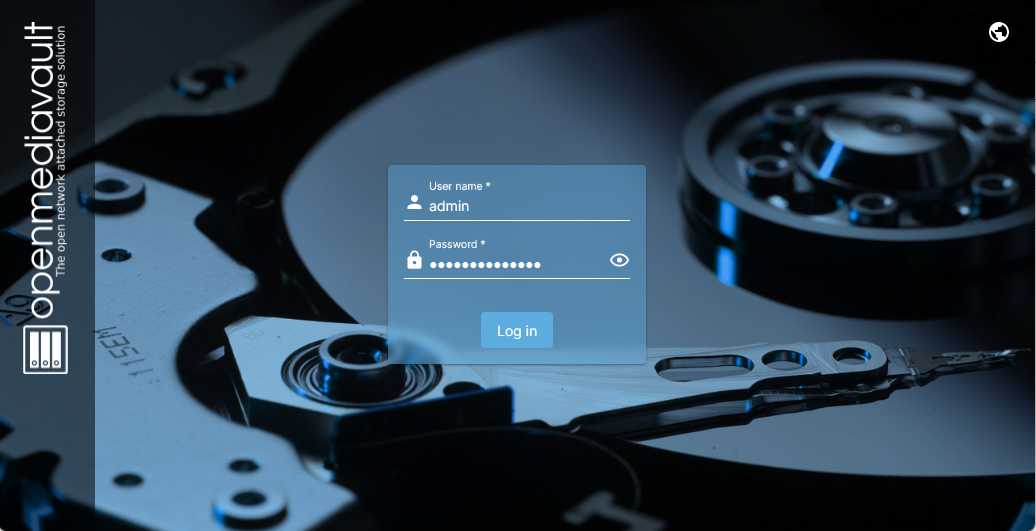
After installation completed, logged into the web management UI in your browser with your raspberry pi IP address(default credentials admin/openmediavault):
OMV completely occupies the network setup with its own settings and destroy the default Raspbian networking with dhcpcd. OMV modifies /etc/network/interfaces and claims to use systemd-networkd for network setups.
Run
sudo omv-firstaid
and select the following from the menu list so you can let OMV to automatically setup the DHCP.
Select 1 Configure network interface
Select as network interface eth0 Do you want to configure IPv4 for this interface? Yes
Do you want to use DHCPv4 for this interface? Yes
Do you want to configure IPv6 for this interface? No
Do you want to enable WOL for this interface? No
The process is going to take a few minutes, you will see the message:
Configuring network interface. Please wait…
…wait patiently till you see the message:
The network interface configuration was successfully changed.
If the above fails with an error with message Failed to connect to socket: No such file or directory or related to /var/lib/openmediavault/engined.sock then your main OMV engine is not running.
In this case, run
sudo omv-engined -d -f
Then re-run sudo omv-firstaid on your other terminal and go through the options described above.
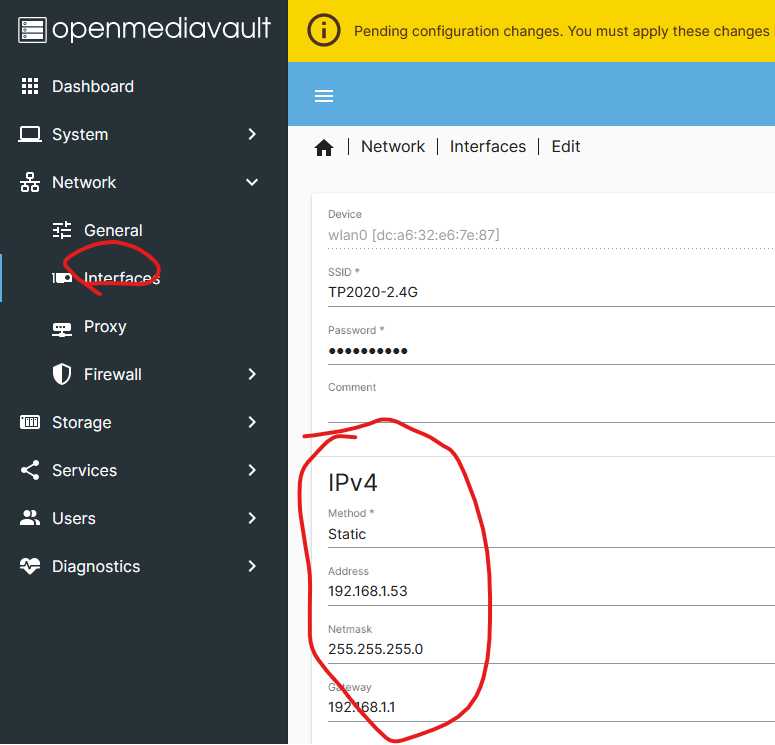
Logged into the web management UI, config network settings.
Goto System – Network – Interfaces and add/remove your network adapter.
or run this command
ifconfig <network_interface> xxx.xxx.xxx.xxx netmask xxx.xxx.xxx.xxx
5.Issues
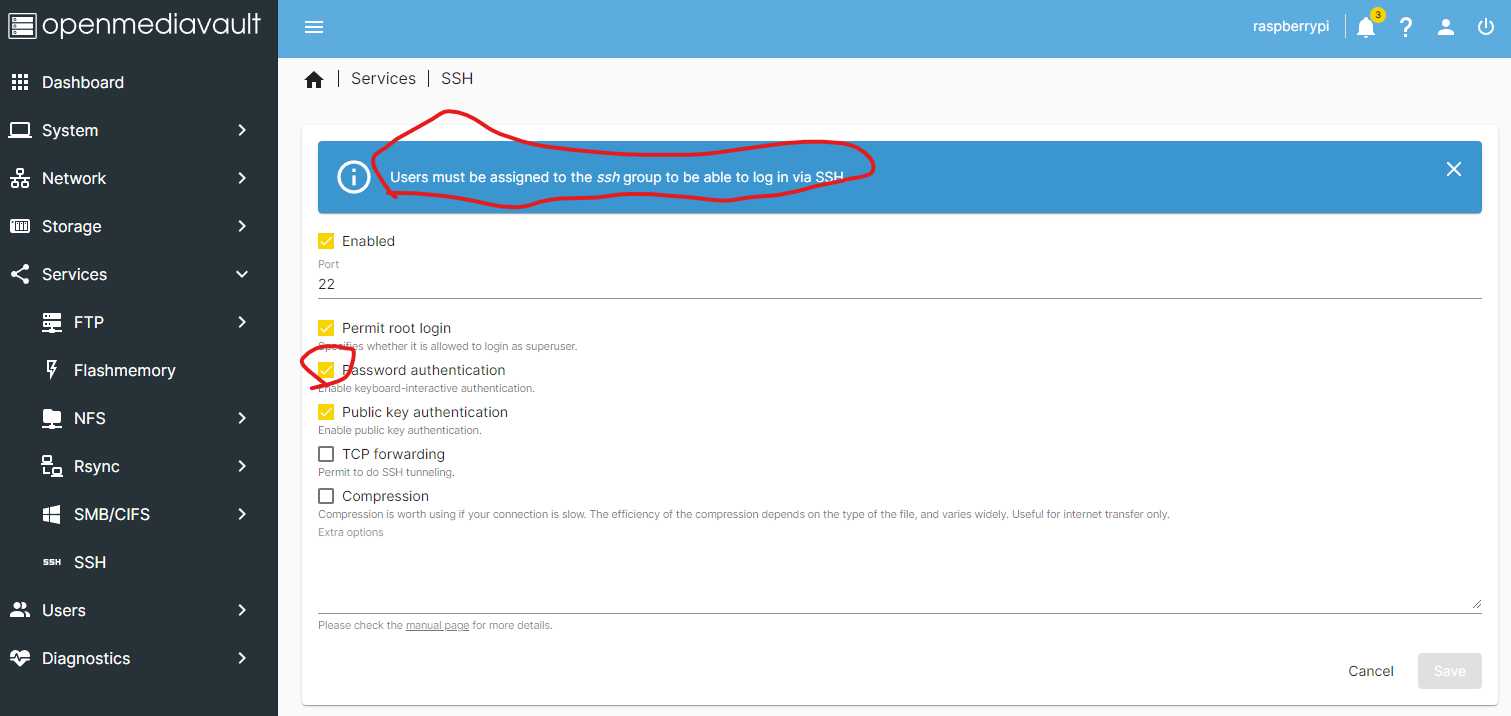
5.1.SSH permission denied on correct password authentication
/etc/ssh/sshd_config
PasswordAuthentication yes
PermitRootLogin yes
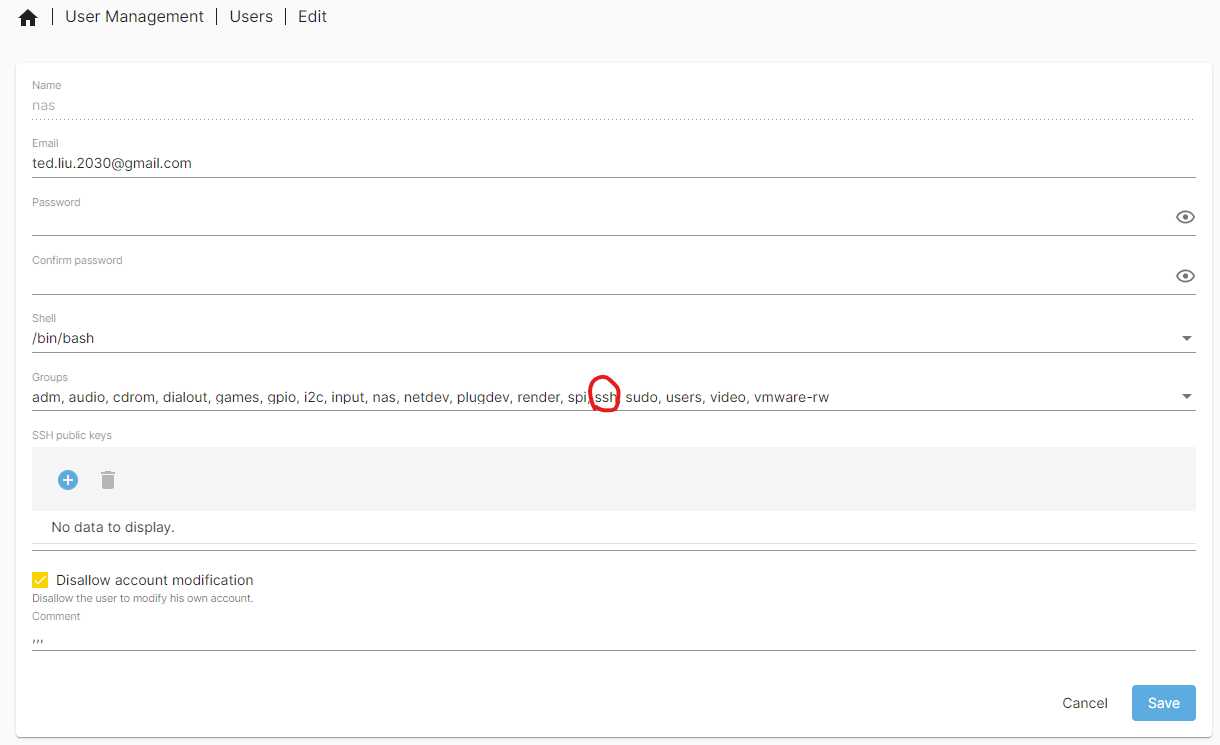
AllowUsers nas
AllowGroups root ssh nas
sudo systemctl restart ssh
5.2.WiFi dies when USB hard drive plugged in – Raspberry PI 4
When powering up the Pi4 with the drive hub on (self powered), the 2G WiFi will not work. However, if the drive hub is turned off (Pi4 left powered up and running) and then the 2G WiFi is commanded, the 2G WiFi will activate and work. Furthermore, if the drive hub is powered on after the Pi4 is powered on and running, the 2k WiFI will activate by it’s self and work. The 5K WiFi always works.
Although the drive hub has external 12V power, it may be pulling 5V from the USB connection to the Pi.
In this case, especially if you are further using 2.5″ notebook drives, the hub may take too much energy from the Pi and subsequently cause the WiFi to shut down.
5.3.SSH Access denied
5.4.copy files failed
Message from syslogd@naspi at Aug 28 23:21:36 ...
 kernel:[  795.966362] EXT4-fs (sda1): failed to convert unwritten extents to written extents -- potential data loss!  (inode 4325381, error -30)

Message from syslogd@naspi at Aug 28 23:21:36 ...
 kernel:[  795.985804] EXT4-fs (sda1): failed to convert unwritten extents to written extents -- potential data loss!  (inode 4325381, error -30)
6.Prepare Disks – Optional
Storage -> Disks -> Select a disk -> Wipe the disk
FileSystems -> Create File system
These steps will handle everything for you. Do not have to use fidisk command to do anything.
6.1.Delete Partition
Step 1: List Partition Scheme
fdisk -l
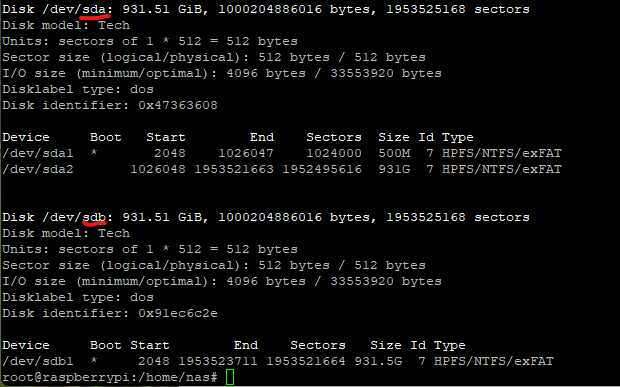
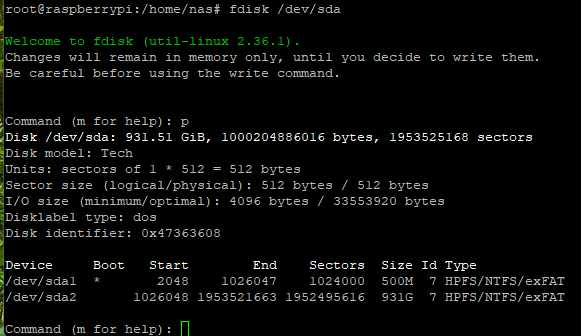
Step 2: Select the Disk
Select the disk that contains the partition you intend to delete.
Common disk names on Linux include:
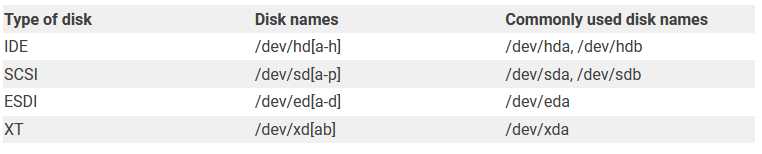
fdisk /dev/sda
Step 3: Delete Partitions
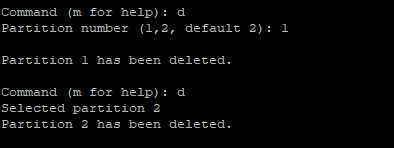
To delete partition, run the d command in the fdisk command-line utility.
Note: If you wish to delete multiple partitions, repeat this step as many times as necessary.
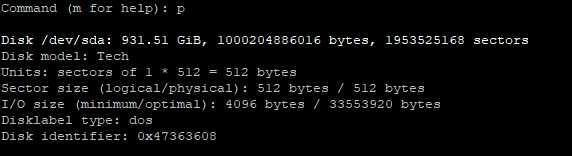
Step 4: Verify Partition Deletion
Reload the partition table to verify that the partition has been deleted. To do so, run the p command.
Step 5: Save Changes and Quit
Run the w command to write and save changes made to the disk.

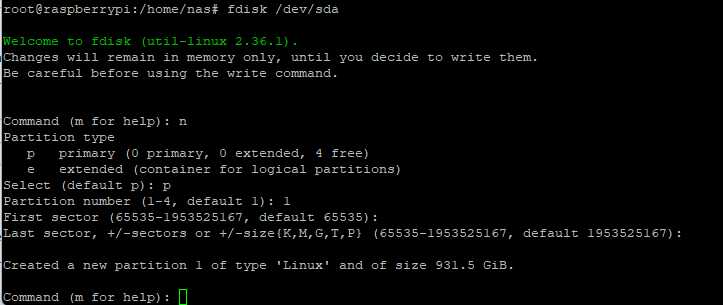
6.2.Create Partition
Use the n command to create a new partition. You can create a logical or primary partition (l for logical or p for primary). A disk can only have four primary partitions.
6.3.Partition 1 does not start on physical sector boundary
The key point is: set the start to any logical sector, which is a multiple of 8.
set 204800 since the start sector can only choose from 65535.
Command (m for help): p
Disk /dev/sdb: 931.51 GiB, 1000204886016 bytes, 1953525168 sectors
Disk model: Tech
Units: sectors of 1 * 512 = 512 bytes
Sector size (logical/physical): 512 bytes / 512 bytes
I/O size (minimum/optimal): 4096 bytes / 33553920 bytes
Disklabel type: dos
Disk identifier: 0xde3e40dc

Device     Boot Start        End    Sectors   Size Id Type
/dev/sdb1       65535 1953525167 1953459633 931.5G 83 Linux

Partition 1 does not start on physical sector boundary.

Command (m for help): d

Selected partition 1
Partition 1 has been deleted.

Command (m for help): 1
1: unknown command

Command (m for help): p

Disk /dev/sdb: 931.51 GiB, 1000204886016 bytes, 1953525168 sectors
Disk model: Tech
Units: sectors of 1 * 512 = 512 bytes
Sector size (logical/physical): 512 bytes / 512 bytes
I/O size (minimum/optimal): 4096 bytes / 33553920 bytes
Disklabel type: dos
Disk identifier: 0xde3e40dc

Command (m for help): n
Partition type
   p   primary (0 primary, 0 extended, 4 free)
   e   extended (container for logical partitions)
Select (default p): p
Partition number (1-4, default 1): 1
First sector (65535-1953525167, default 65535): 204800 <--****
Last sector, +/-sectors or +/-size{K,M,G,T,P} (204800-1953525167, default 1953525167):

Created a new partition 1 of type 'Linux' and of size 931.4 GiB.

Command (m for help): w
The partition table has been altered.
Failed to add partition 1 to system: Device or resource busy

The kernel still uses the old partitions. The new table will be used at the next reboot.
Syncing disks.

[nas@naspi:/home/nas]$sudo reboot
Fixed:
[nas@naspi:/home/nas]$sudo fdisk /dev/sdb

Welcome to fdisk (util-linux 2.36.1).
Changes will remain in memory only, until you decide to write them.
Be careful before using the write command.


Command (m for help): p
Disk /dev/sdb: 931.51 GiB, 1000204886016 bytes, 1953525168 sectors
Disk model: Tech
Units: sectors of 1 * 512 = 512 bytes
Sector size (logical/physical): 512 bytes / 512 bytes
I/O size (minimum/optimal): 4096 bytes / 33553920 bytes
Disklabel type: dos
Disk identifier: 0xde3e40dc

Device     Boot  Start        End    Sectors   Size Id Type
/dev/sdb1       204800 1953525167 1953320368 931.4G 83 Linux

Command (m for help):
7.Prepare file system
All disks should be automatic dispay on “Storage -> Disks”
Before using these disks, file system must be created.
7.1.Create file system
navigate to Storage and File Systems. You likely won’t see anything here, so select Create. Here, you can select your storage device. We recommend selecting EXT4 for the drive format. Select OK and close.
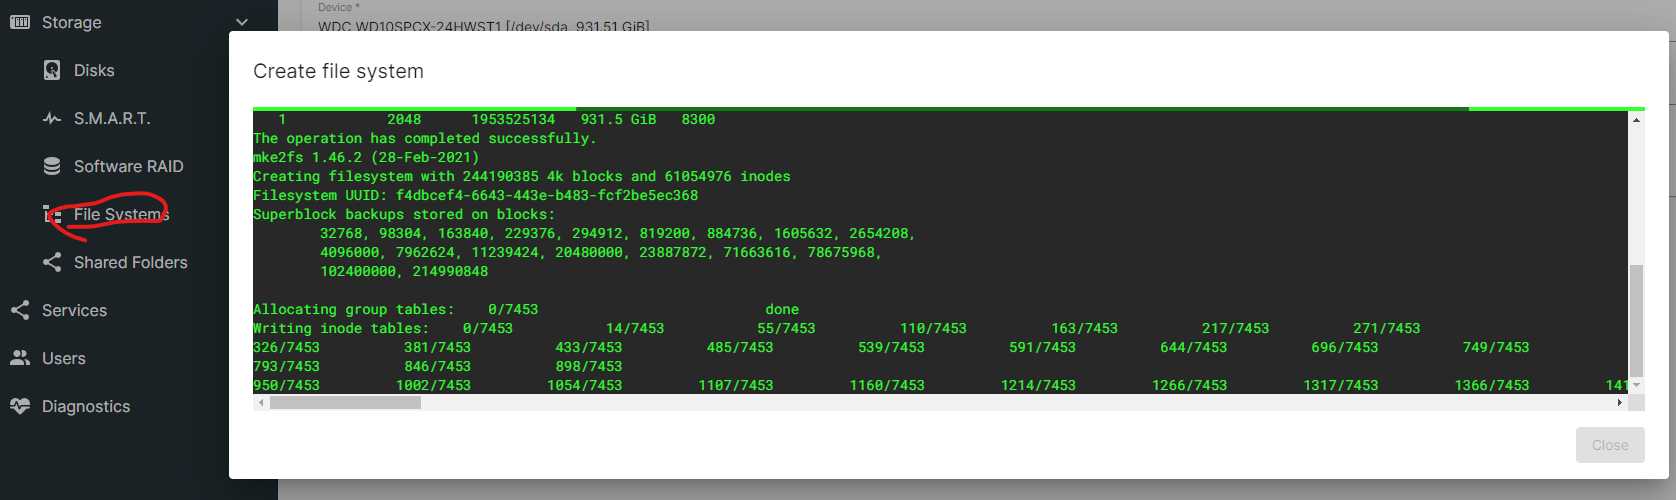
OMV will create new partition and format it.
7.2.Mount
Select the file system to mount it and apply changes.

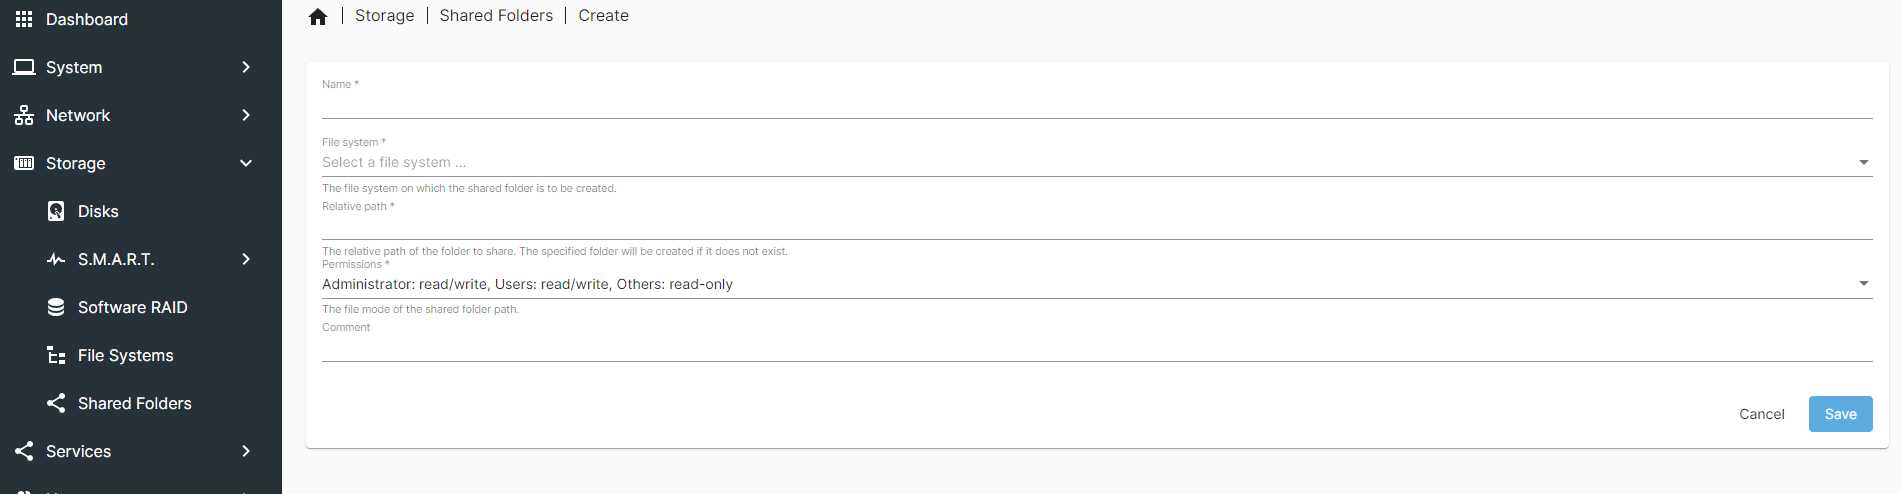
7.3.Create a shared folder
Navigate to Storage and Shared Folders and select Create. Here you can name the folder, select which drive it should exist on, and grant permissions to users. By default, the permissions should be correct, but you can tweak them if you prefer a different option for your network preferences. Save and apply changes.
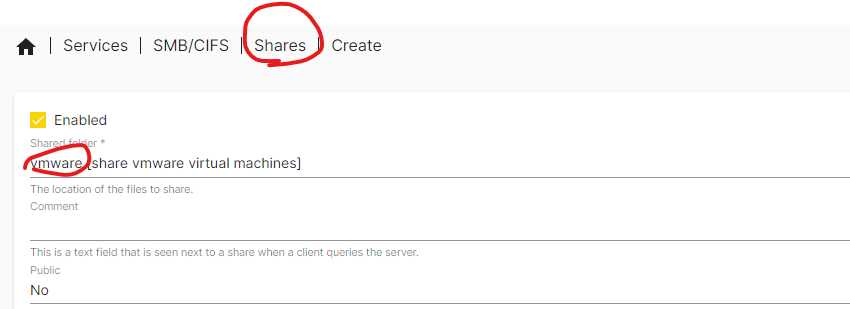
7.4.Enable SMB service
Navigate to Services and select SMB/CIFS.
Under Settings, check the Enabled box and save. Under Shares, select Create, add your shared folder, and save.

Under Settings, check the Enabled box and save. Under Shares, select Create, add your shared folder, and save.
8.Access your NAS
8.1.Access your NAS from Windows on port 445
Open Windows Explorer. In the path bar, write \XXX.XXX.X.XXX (using the IP address of your Raspberry Pi NAS).
That should create a new entry under Network in the left navigation bar and show its contents. Double-click on the share you want and enter the username and password that you created in Raspberry Pi Imager when prompted.
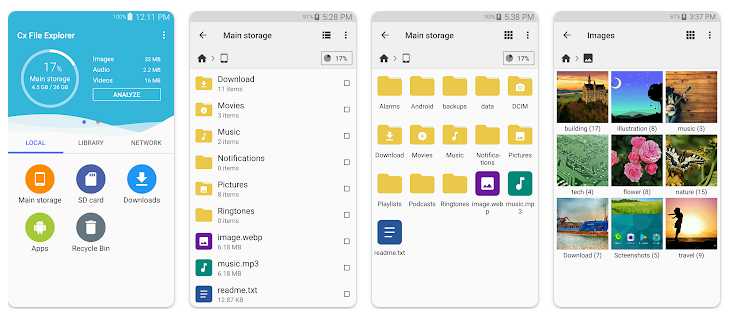
8.2.Access your NAS from Android

8.3.Access your NAS from Windows on port not 445
how to access samba share from Windows which is running on different port?
1.run Windows command prompt with Administrator
2.close the local samba server
sc config lanmanserver start=disabled
sc stop lanmanserver
3.reboot
4.Use netsh interface command create a new port proxy for this ip. If your server ip is ipv6, you should use v4tov6, otherwise v4tov4. Here my example, assuming your service’s port is 1139:
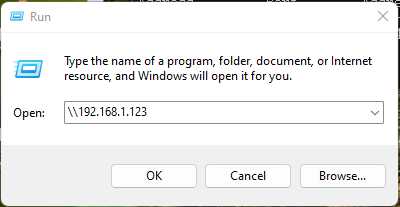
netsh interface portproxy add v4tov4 listenport=445 listenaddress=<YOUR local IP> connectport=12345 connectaddress=<Your NAS server>
netsh interface portproxy show all
iput your local IP in Run prompt:
8.4.Access your NAS from Ubuntu
CIFS installation
sudo apt-get install cifs-utils
Mount password protected network folders
The quickest way to auto-mounting a password-protected share is to edit /etc/fstab (with root privileges), to add this line:
//servername/sharename /media/windowsshare cifs username=msusername,password=mspassword,iocharset=utf8 0 0
This is not a good idea however: /etc/fstab is readable by everyone and so is your Windows password in it. The way around this is to use a credentials file. This is a file that contains just the username and password.
Using a text editor, create a file for your remote servers logon credential:
gedit ~/.smbcredentials
Enter your Windows username and password in the file:
username=msusername
password=mspassword
Save the file, exit the editor.
Change the permissions of the file to prevent unwanted access to your credentials:
chmod 600 ~/.smbcredentials
Then edit your /etc/fstab file (with root privileges) to add this line (replacing the insecure line in the example above, if you added it):
//servername/sharename /media/windowsshare cifs credentials=/home/ubuntuusername/.smbcredentials,iocharset=utf8 0 0
Save the file, exit the editor.
Finally, test the fstab entry by issuing:
sudo mount -a
If there are no errors, you should test how it works after a reboot. Your remote share should mount automatically.
9.Setup Firewall
9.1.Overview
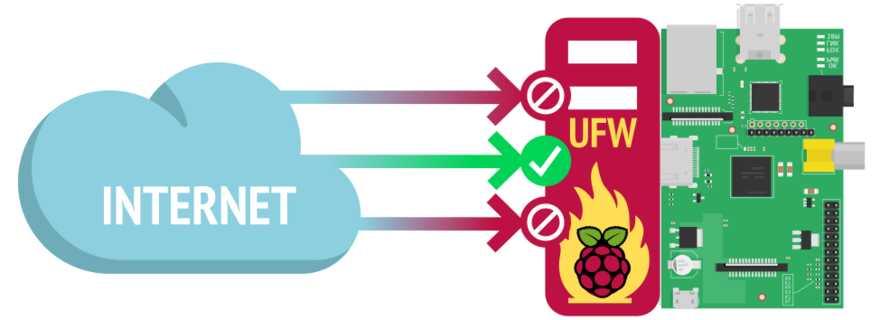
The level of security you need for your Raspberry Pi will strongly depend on how you plan to use it. For example, when your Raspberry Pi is connected to the internet, you should take the minimum security step to ensure that only the ports you require to be open are open!
A firewall is a software that monitors incoming and outcoming network traffic. It can then allow, reject or drop traffic.
Your Raspberry Pi is functional and connected without a firewall, but it can be made more secure with a firewall that only allows the types of traffic you permit.
9.2.Installing a Firewall
command line using the APT package manager
sudo apt install ufw
9.3.Manage Firewall
Check firewall status
sudo ufw status verbose
enable firwall
sudo ufw enable
Allow SSH port
sudo ufw allow 22
Allow HTTP port
sudo ufw allow 80
Allow SMB port
sudo ufw allow 445
check rule number
sudo ufw allow 22
delete the rule for SSH communication (number 2)
sudo ufw delete 2
9.4.set up port forward
Setup your port forward and test the port
https://canyouseeme.org/