1.Introduction
SSHFS (SSH File System) is a client for mounting a file system located on a remote machine onto your local system through an SSH connection. Using the SFTP (SSH file transfer protocol), the SSHFS command-line tool mounts a physical or virtual disk locally, allowing file transfer between a local and remote machine.
SSHFS is a command-line tool for safely mounting a remote folder from a server to a local machine. The client extends the SSH file transfer protocol, which helps locally mount a remote file system as a disk image securely.
SSHFS allows accessing, transferring, and manipulating files as if working on a local disk. This approach is handy when moving a lot of content to and from a remote machine.
SSH offers two ways to establish a connection:
- Using password authentication.
- Using the SSH key pair (recommended).
2.Set up SSH Key pair
STEP1: Run the ssh-keygen command.
You can use the -t option to specify the type of key to create.
ssh-keygen -t rsa
You can use the -b option to specify the length (bit size default 2048) of the key:
ssh-keygen -t rsa -b 4096

ssh-keygen -t rsa -b 4096 -f ~/.ssh/web-server.key -C "My web-server key"
- -t rsa : Specifies the type of key to create. The possible values are “rsa1” for protocol version 1 and “dsa”, “ecdsa”, “ed25519”, or “rsa” for protocol version 2.
- -b 4096 : Specifies the number of bits in the key to create
- -f ~/.ssh/web-server.key : Specifies the filename of the key file.
- -C “My web-server key” : Set a new comment.
-
Filename: Ubuntu Linux are configured to accept private keys with the default filename and path (~/.ssh/id_rsa for RSA keys) by default.
The corresponding public key will be generated using the same filename but with a .pub extension added and stored in the same location: ~/.ssh/id_rsa.pub.
STEP2: Install the public key in remote server
Use SFTP or SCP to copy the public key file to remote server.
For example:
scp ~/.ssh/id_rsa.pub user_name@remote_server_IP_Address:~/
Your public key will be copied to your home directory and saved with the same filename on the remote system.
Log into the remote system using your account username and password.
If your account on the remote system doesn’t already contain a ~/.ssh/authorized_keys file, create one:
mkdir -p ~/.ssh
touch ~/.ssh/authorized_keys
On the remote server, add the contents of your public key file (~/id_rsa.pub) to a new line in your ~/.ssh/authorized_keys file:
cat ~/id_rsa.pub >> ~/.ssh/authorized_keys
You may want to check the contents of ~/.ssh/authorized_keys to make sure your public key was added properly:
more ~/.ssh/authorized_keys
You may now safely delete the public key file (for example, ~/id_rsa.pub) from your account on the remote system
rm ~/id_rsa.pub
You now should be able to SSH to your remote server.
ssh username@remote_server_IP_Address
3.Install SSHFSInstall SSHFS
Ubuntu:
SSHFS is available on Ubuntu, you can install it using apt.
sudo apt install sshfs
To remove:
sudo apt purge sshfs
The primary difference being “remove” and “purge” is that “remove” only gets rid of the package leaving any configuration files untouched. Whereas “purge” not only removes the package but also removes all configuration files OUTSIDE THE HOME DIRECTORY.
Windows
To use SSHFS on Windows, download and install:
- The latest stable version of WinFS(https://github.com/billziss-gh/winfsp).
- The newest stable version of SSHFS-Win(https://github.com/billziss-gh/sshfs-win) is compatible with your system. Optionally, the SSHFS-Win Manager frontend interface is available as well. The interface provides a convenient GUI interface for establishing and managing connections.
4.Mount a Remote File System on Linux
Step 1: Create Mount Point
sudo mkdir /mnt/<folder_name>
Step 2: Mount the Remote File System Using SSHFS
The sshfs syntax:
sshfs [user@]host:[dir] mountpoint [options]
Invoke sshfs:
sshfs user_name@remote_server_IP_Address:/mnt/<folder_name> /mnt/<folder_name>
The privileges we have on the remote directory are the privileges the remote user has: by default local permissions are ignored by sshfs.
This means if the uid of the local user and the remote user doesn’t match, the remote directory is writable only by the remote user. By default, when we operate in the mounted directory, we do it as the remote user we connected as.
once the remote directory is mounted, we are able to access its content without problems. If we try to access it as another user, even as root, however, it fail:
$ sudo ls /mnt/<folder_name>
ls: cannot access '/mnt/<folder_name>': Permission denied
This error is due to the fact that, by default, only the user which performs the mount is allowed to access the mounted filesystem. In the example above, we invoked sshfs command as the “user_name” user, therefore we can only access the mounted filesystem as that user.
In order to change this behavior, and allow any user to access the mount point, we must pass the allow_other option when using sshfs. In order to use that option as a standard user, we first need to edit the /etc/fuse.conf file, and remove the comment from the use_allow_other line:
# mount_max = 1000
user_allow_other
Mount options are passed as argument to -o:
sudo sshfs -o allow_other,IdentityFile=/home/user_name/.ssh/id_rsa user_name@remote_server_IP_Address:/mnt/<folder_name> /mnt/<folder_name>
- “-o” precedes miscellaneous mount options, this is the same as when running the mount command normally for non-SSH disk mounts. In this case, you are using allow_other to allow other users to have access to this mount, so that it behaves like a normal disk mount, as sshfs prevents this by default.
-
The IdentityFile=\
option is for file systems with configured access via SSH. If the private key is under the root user, the command accepts a relative path. Otherwise, use the full link.
Notes:
– Not use both of the options default_permissions and allow_other when mounting.
When you use the option default_permissions in fusermount then fuse’s permission control of the fuse mount is handled by the kernel and not by fuse.
This means that the REMOTE_USER’s uid/gid aren’t mapped to the LOCAL_USER (sshfs.c IDMAP_NONE). It works the same way as a simple nfs fs without mapping.
So, it makes sense to prohibit the access, if the uid/gid numbers don’t match.
If you have the option allow_other then this dir is writable only by the local user with uid xxxx(onwer of the dir), if it exists.
From fuse’s man:
'default_permissions'

   By default FUSE doesn't check file access permissions, the
   filesystem is free to implement its access policy or leave it to
   the underlying file access mechanism (e.g. in case of network
   filesystems).  This option enables permission checking, restricting
   access based on file mode.  It is usually useful together with the
   'allow_other' mount option.

'allow_other'

   This option overrides the security measure restricting file access
   to the user mounting the filesystem.  This option is by default only
   allowed to root, but this restriction can be removed with a
   (userspace) configuration option.
Step 3: Check Mounted File System
cd /mnt/<folder_name>
touch test.txt
rm test.txt
Step 4: Unmount a Remote File System
sudo umount /mnt/<folder_name>
5.Mount a Remote File System on Windows
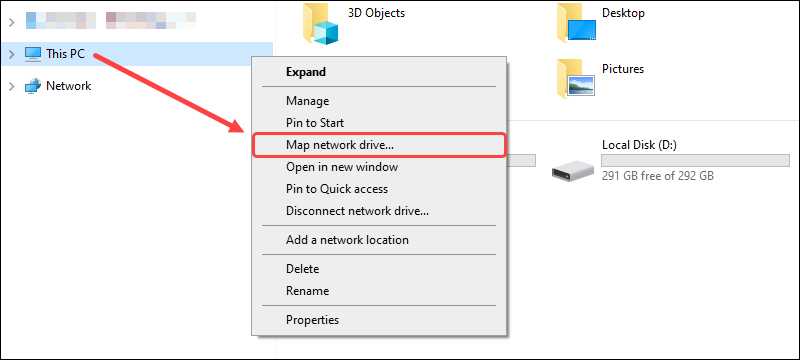
Step 1: Map Network Drive
Step 2: Mount the Remote File System Using SSHFS
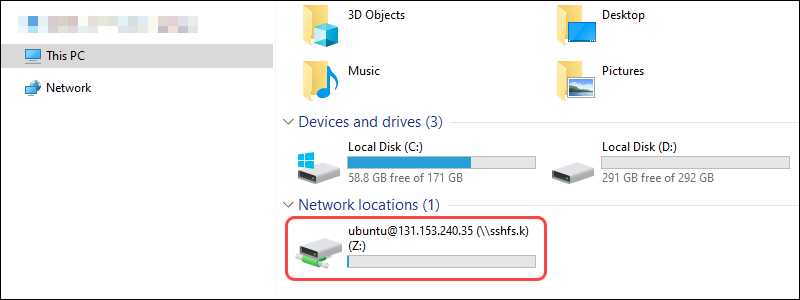
\sshfs[.option]\<remote user>@<remote host>[!port][\path]
Note: The default port for SSH connections is 22. Hackers are aware of this, too. Change the default port if transferring sensitive information.
Depending on your use case, the sshfs command offers a few options:
- sshfs maps the remote user’s home directory.
- sshfs.r connects to the remote user’s root directory.
- sshfs.k maps the remote user’s home directory and uses the SSH key stored in \
/.ssh/id_rsa. - sshfs.kr adds the remote user’s root directory and uses the locally stored SSH key.
For example:
\sshfs.k\ubuntu@<remote host>

Step 3: Check Mounted File System
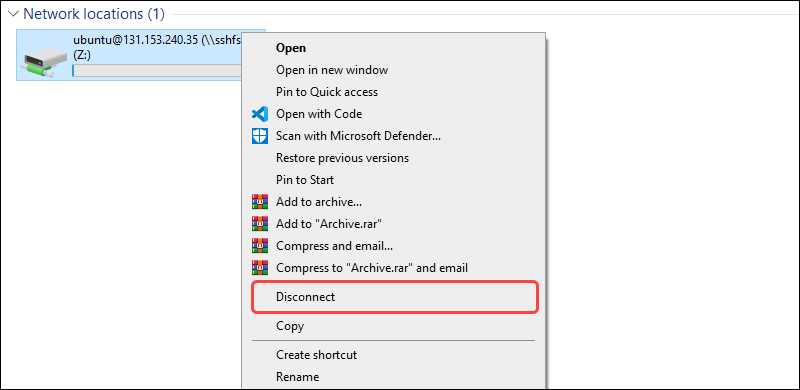
Step 4: Unmount a Remote File System on Windows via Explorer
6.Mount a Remote File System on Windows via SSHFS-Win Manager
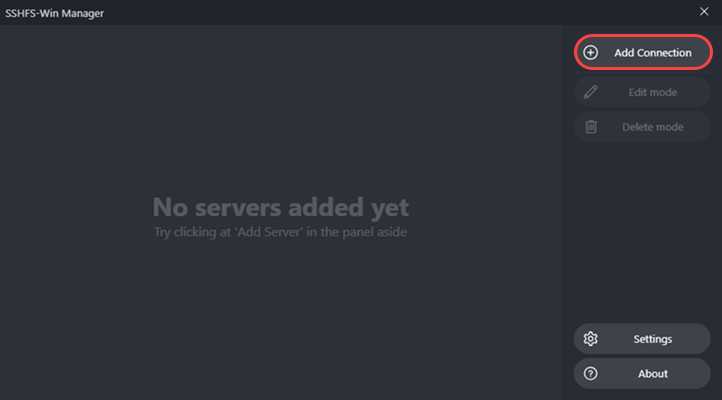
Step 1: Locate and Run the SSHFS-Win Manager
Search for SSHFS-Win Manager in the Start menu and run the program. A GUI interface opens for managing device connections.
Step 2: Add a Connection
A form menu pops out. Fill out the provided fields and select the options for your situation:
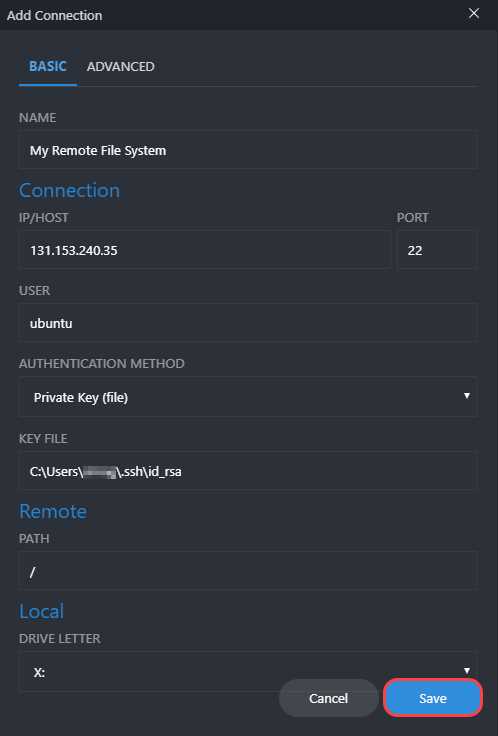
– Name is a custom name for your connection.
– IP/Host is the host address.
– Port is 22 by default for SSH connections. Leave as-is unless you specifically changed the port.
– The User is the username of the remote system.
– The Authentication method is either through a private key file or password. If using the secret key file, provide the path. Alternatively, the password option allows providing a password immediately or when establishing a connection.
– The Remote path is the path to the remote file system.
– Local Drive letter is a list of locally available drive letters for a mount point.
Lastly, Click Save when done filling out the fields. The newly created server connection shows up in the main menu.
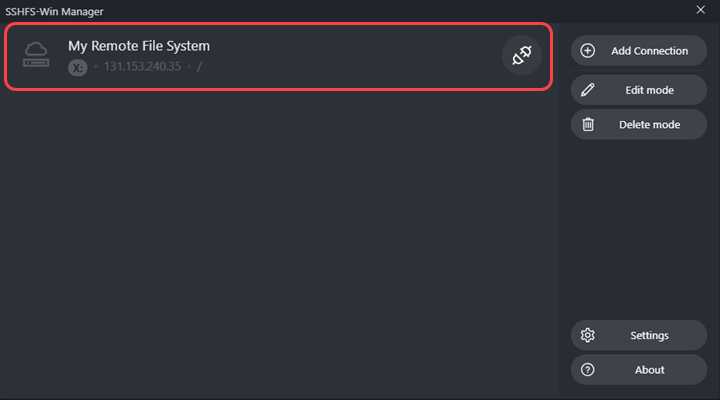
Step 3: Mount the Remote File System and View the Contents
Click the socket icon next to your connection name to establish a connection. If the connection succeeds, the socket icon changes to a green connected socket, and a folder icon appears:
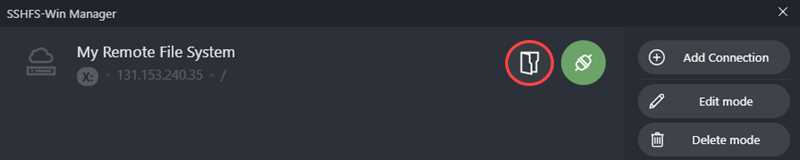
Click the folder icon to view the contents of the remote file system.
Step 4: Unmount a Remote File System on Windows via SSHFS Win-Manager
To unmount the server connection, click the socket icon in the SSHFS Win-Manager menu. If the connection is no longer needed, delete the information using the Delete mode button.