1.Overview
Let’s Encrypt is a free, automated, and open certificate authority (CA), run for the public’s benefit. It is a service provided by the Internet Security Research Group (ISRG).
https://letsencrypt.org/about/
Let’s Encrypt give people the digital certificates they need in order to enable HTTPS (SSL/TLS) for websites, for free, in the most user-friendly way.
2.How it works
https://letsencrypt.org/how-it-works/
Let’s Encrypt 和 ACME 协议的目标是实现可信数字证书的自动获取,从而简化 HTTPS 服务器部署中的人工操作。 这一目标是由 Web 服务器上的证书管理软件完成的。
为了理解该技术的工作原理,让我们来看一下使用支持 Let’s Encrypt 的证书管理软件来配置 https://example.com/ 的流程。
该流程分为两步。 首先,管理软件向证书颁发机构证明该服务器拥有域名的控制权。 之后,该管理软件就可以申请、续期或吊销该域名的证书。
域名认证
Let’s Encrypt 通过公钥识别服务器管理员。 证书管理软件首次与 Let’s Encrypt 交互时,会生成新的密钥对,并向 Let’s Encrypt CA 证明服务器控制着一个或多个域名。 这类似于创建帐户和向该帐户添加域名的传统证书颁发流程。
为了启动该过程,证书管理软件向 Let’s Encrypt CA 询问它需要做什么才能证明它控制 example.com。 Let’s Encrypt CA 会根据申请的域名提供一种或多种验证方式, 管理软件可以任选其一证明域名控制权。 例如,CA 可能会让证书管理软件(Agent)选择:
- 在 example.com 下配置 DNS 记录,或者
- 在 https://example.com/ 的已知 URI 下放置一个 HTTP 资源
除了验证方式外,Let’s Encrypt CA 还会提供一个一次性的数字 nonce,管理软件需要用私钥予以签名,从而证明密钥确实属于该软件。
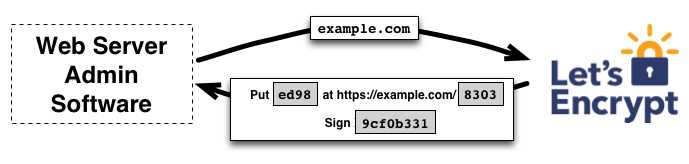
证书管理软件需要选择一种验证方式完成验证。 假设它选择了第二种方式,在 http://example.com 的指定路径创建了一份文件, 并用私钥对收到的 nonce 进行数字签名。 完成这些步骤后,证书管理软件会通知 CA 它已准备好完成验证。
然后,CA 的工作就是检查验证是否已经完成。 CA 会验证 nonce 的签名,并尝试从 Web 服务器下载指定文件,确认内容准确无误。
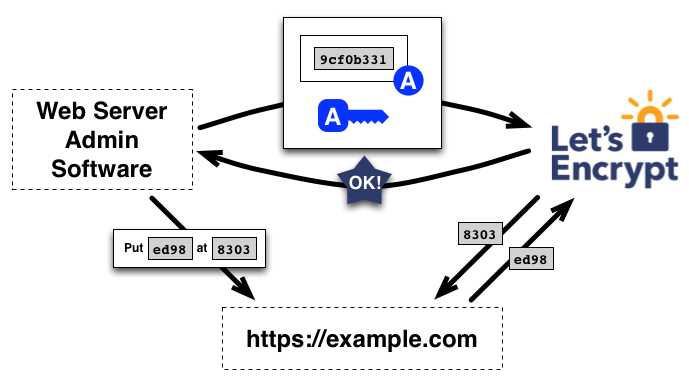
如果 nonce 的签名有效,验证也顺利通过,那么该公钥对应的证书管理软件就有权管理 example.com 的数字证书。 证书管理软件使用的密钥称为 example.com 的“授权密钥”。
证书颁发和吊销
管理软件具备授权密钥后,证书的申请、续期、吊销操作就简单了,只需将各类证书管理指令用授权密钥签名后发给 CA 即可。
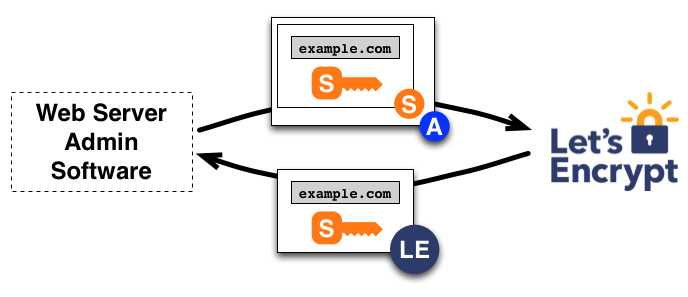
为了获得该域名的证书,证书管理软件将创建一个 PKCS#10 证书签名请求(CSR),要求 Let’s Encrypt CA 为指定的公钥颁发 example.com 的证书。 CSR 本身已经由其私钥进行了一次签名, 而证书管理软件还会用 example.com 的授权密钥对整个 CSR 再进行一次签名,以便 Let’s Encrypt CA 验证其来源。
Let’s Encrypt CA 收到请求后对这两份签名进行验证, 如果全部通过,就为 CSR 中的公钥颁发 example.com 的证书,并将证书文件发给管理软件。
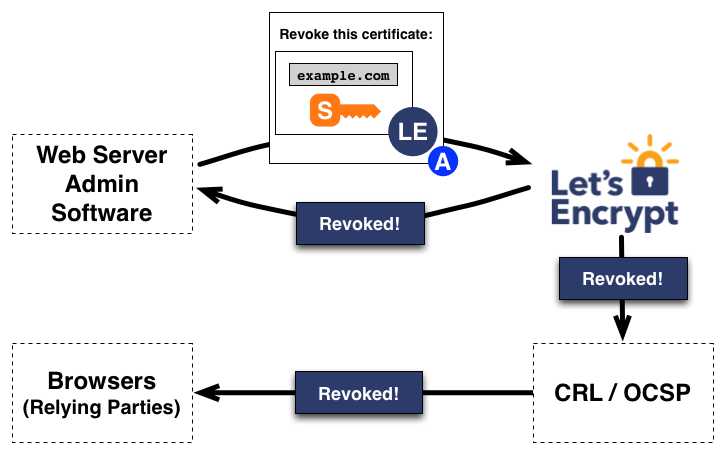
申请吊销证书的流程类似。 证书管理软件使用 example.com 的授权私钥签署一个吊销请求,Let’s Encrypt CA 将验证该请求是否已被授权。 如果已授权,则将吊销信息发布到正常的吊销通道(即 OCSP)中,以便浏览器等依赖方知道他们不应该接受这个已被吊销的证书。
3.Install Cerbot
https://eff-certbot.readthedocs.io/en/stable/index.html#
- Installing snap on CentOS
sudo yum install epel-release
- Installing snapd
sudo yum install snapd
Once installed, the systemd unit that manages the main snap communication socket needs to be enabled:
sudo systemctl enable --now snapd.socket
To enable classic snap support, enter the following to create a symbolic link between /var/lib/snapd/snap and /snap:
sudo ln -s /var/lib/snapd/snap /snap
Either log out and back in again or restart your system to ensure snap’s paths are updated correctly.
Snap is now installed and ready to go!
- Ensure that your version of snapd is up to date
Execute the following instructions on the command line on the machine to ensure that you have the latest version of snapd.
sudo snap install core
sudo snap refresh core
- Remove certbot-auto and any Certbot OS packages
If you have any Certbot packages installed using an OS package manager like apt, dnf, or yum, you should remove them before installing the Certbot snap to ensure that when you run the command certbot the snap is used rather than the installation from your OS package manager. The exact command to do this depends on your OS, but common examples are:
sudo yum remove certbot
- Install Certbot
Run this command on the command line on the machine to install Certbot.
sudo snap install --classic certbot
- Prepare the Certbot command
Execute the following instruction on the command line on the machine to ensure that the certbot command can be run.
sudo ln -s /snap/bin/certbot /usr/bin/certbot
- Install certbot-dns-godaddy plug-in
pip3 install --upgrade pip
pip3 install certbot-dns-godaddy
- run Certbot, just get a certificate
If you’re feeling more conservative and would like to make the changes to your nginx configuration by hand, run this command.
certbot certonly \
  --authenticator dns-godaddy \
  --dns-godaddy-credentials ~/credentials.ini \
  --keep-until-expiring --non-interactive --expand \
  --server https://acme-v02.api.letsencrypt.org/directory \
  -d domain.com
  -d www.domain.com
- Nginx configuration file
# RSA certificate
  ssl_certificate /etc/letsencrypt/live/sophon.ca:443:8080/fullchain.pem; # managed by Certbot
  ssl_certificate_key /etc/letsencrypt/live/sophon.ca:443:8080/privkey.pem; # managed by Certbot

  include /etc/letsencrypt/options-ssl-nginx.conf; # managed by Certbot

  # Redirect non-https traffic to https
  if (scheme != "https") {
      return 301 https://host$request_uri;
  } # managed by Certbot
4.Automatically Renew Let’s Encrypt Certificates
Let’s Encrypt certificates expire after 90 days. We encourage you to renew your certificates automatically. Here we add a cron job to an existing crontab file to do this.
- Create a shell script
/root/renew_cert.sh

certbot renew \
  --authenticator dns-godaddy \
  --dns-godaddy-credentials ~/credentials.ini \
  --keep-until-expiring --non-interactive --expand \
  --server https://acme-v02.api.letsencrypt.org/directory \
# --dry-run
  --quiet
- Open the crontab file.
crontab -e
- Add the certbot command to run daily. In this example, we run the command 2 weeks at midnight. The command checks to see if the certificate on the server will expire within the next 30 days, and renews it if so. The –quiet directive tells certbot not to generate output.
# Saving debug log to /var/log/letsencrypt/letsencrypt.log
# 2>&1 indicates that the standard error (2>) is redirected to
# the same file descriptor that is pointed by standard output (&1).
0 0 * * Fri [ (expr(date +%W) \% 2) -eq 1 ] && /root/renew_cert.sh > /root/renew_cert.log 2>&1
- Save and close the file.
All installed certificates will be automatically renewed and reloaded. -
Certbot renew configuration file
/etc/letsencrypt/renewal/<your_domain.com>.conf
account = 5cd841326239485676366c2a839986341
authenticator = dns-godaddy
webroot_path = /var/domian/public,
server = https://acme-v02.api.letsencrypt.org/directory
dns_godaddy_credentials = ~/credentials.ini
key_type = ecdsa
4.What are the well-known and acme-challenge directories?
All of our shared, semi-dedicated, and reseller hosting plans include a feature known as AutoSSL. AutoSSL automatically installs a signed, trusted, and secure SSL certificate on all domains hosted from your account. These SSL certificates are issued by Let’s Encrypt.
When Let’s Encrypt installs your certificate(s) it authenticates the domain through the ACME Protocol and domain validation. The Let’s Encrypt CA will look at the domain name being requested and issue one or more sets of challenges. This is why the ‘well-known’ and ‘acme-challenge’ directories are created as the validation files are placed in those directories.