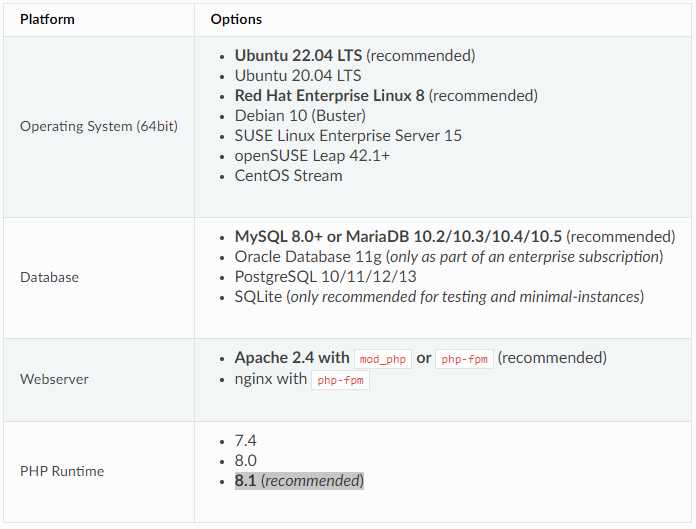
1.Requirements and high level steps
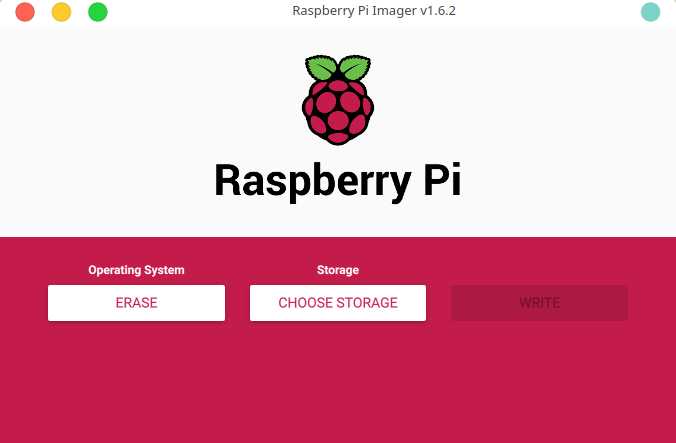
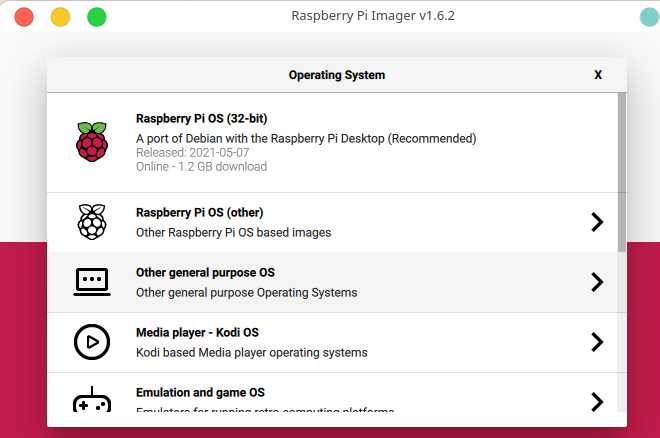
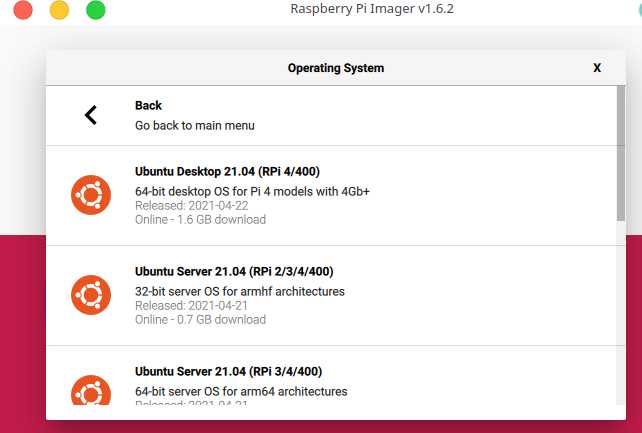
- Download and write the Ubuntu server 64 bit image to a micro SD card
- Install Ubuntu server 64 bit OS on RPi
- Configure External Storage
- Install MariaDB
- Install Nextcloud
- Configure Nextcloud
2.Install Ubuntu server 64 bit
2.1.write the Ubuntu image to SD Card

2.2.update Ubuntu
sudo apt update
sudo apt upgrade

Running kernel seems to be up-to-date.

Failed to check for processor microcode upgrades.

No services need to be restarted.

No containers need to be restarted.

No user sessions are running outdated binaries.

No VM guests are running outdated hypervisor (qemu) binaries on this host.
All these messages came from needrestart application which purpose is: check which daemons need to be restarted after library upgrades.
This application have several modules. The processor microcode module supports only AMD and Intel processors. So it knows nothing about ARM in the RaspberryPi, so it shows the mentioned error message.
If you do not want to get such messages, then remove this application by:
sudo apt-get purge needrestart
2.3.Set or Change Timezone
timedatectl list-timezones
sudo timedatectl set-timezone  America/Toronto
2.4.Install some optional apps
vim, htop, unzip, make and net-tools
sudo apt-get install vim
sudo apt-get install htop
sudo apt-get install net-tools
sudo apt-get install unzip
#install gcc, g++ and make
sudo apt install build-essential
2.5.Add user
groupadd nas
useradd -m -d /home/nas -g nas -s /bin/bash  nas
2.6.Disable IPv6
Step1: Check your IP address in Ubuntu
ip a
you should see an IPv6 address if it is enabled
Step2: To disable IPv6 you only have to input 3 commands:
sudo sysctl -w net.ipv6.conf.all.disable_ipv6=1
sudo sysctl -w net.ipv6.conf.default.disable_ipv6=1
sudo sysctl -w net.ipv6.conf.lo.disable_ipv6=1
Step3: check if it worked
ip a
this only temporarily disables IPv6.
Step4: Modify /etc/sysctl.conf
Add the following lines to the file:
net.ipv6.conf.all.disable_ipv6=1
net.ipv6.conf.default.disable_ipv6=1
net.ipv6.conf.lo.disable_ipv6=1
Step5: For the settings to take effect use:
sudo sysctl -p
Step6: create (with root privileges) the file /etc/rc.local and fill it with:
#!/bin/bash
# /etc/rc.local

/etc/sysctl.d
/etc/init.d/procps restart

exit 0
Step7: make the file executable
sudo chmod 755 /etc/rc.local
2.7.Install PWM fan control script
Install pigpio
Download and install latest version
wget https://github.com/joan2937/pigpio/archive/master.zip
unzip master.zip
cd pigpio-master
make
sudo make install
To check the library
These tests make extensive use of GPIO 25 (pin 22). Make sure nothing, or only a LED, is connected to the GPIO before running the tests. Most tests are statistical in nature and so may on occasion fail. Repeated failures on the same test or many failures in a group of tests indicate a problem.
sudo ./x_pigpio # check C I/F

sudo pigpiod    # start daemon

./x_pigpiod_if2 # check C      I/F to daemon
./x_pigpio.py   # check Python I/F to daemon
./x_pigs        # check pigs   I/F to daemon
./x_pipe        # check pipe   I/F to daemon
To start the pigpio daemon
sudo pigpiod
To stop the pigpio daemon
sudo killall pigpiod
create (as sudo) /lib/systemd/system/pigpiod.service, and add the following:
cd /lib/systemd/system/

vi pigpiod.service

[Unit]
Description=Daemon required to control GPIO pins via pigpio
[Service]
ExecStart=/usr/local/bin/pigpiod
ExecStop=/bin/systemctl kill -s SIGKILL pigpiod
Type=forking
[Install]
WantedBy=multi-user.target
restart, and check status of the service
sudo killall pigpiod
sudo systemctl start pigpiod
sudo systemctl status pigpiod
rc.local file missing
The /etc/rc.local file on Ubuntu and Debian systems are used to execute commands at system startup. It’s missing.
Create the /etc/rc.local file:
vi /etc/rc.local


#!/bin/sh -e
#
# rc.local
#
# This script is executed at the end of each multiuser runlevel.
# Make sure that the script will "exit 0" on success or any other
# value on error.
#
# In order to enable or disable this script just change the execution
# bits.
#
# By default this script does nothing.

exit 0
Install PWM fan control script
sudo apt-get install -y git pigpio
sudo apt-get install -y python3-pigpio python3-smbus
git clone https://github.com/geekworm-com/x-c1.git
cd x-c1
sudo chmod +x *.sh
sudo bash install.sh
echo "alias xoff='sudo /usr/local/bin/x-c1-softsd.sh'" >> ~/.bashrc
vi /etc/rc.local
sudo reboot
Test safe shutdown script
xoff
Please run xoff to shutdown or press the on-board button switch to shutdown.
DON’t run the shutdown Linux command otherwise the power of x-c1 will not be shutdown.
press button switch 1-2 seconds to reboot
press button switch 3 seconds to safe shutdown
press button switch 7-8 seconds to force shutdown
3.Configure External Storage
3.1.check hard drive health
smartmontools package is available in the repositories of all the major Linux distributions
apt-get update && sudo apt-get install smartmontools
Checking if SMART is enabled on the device
sudo smartctl -i /dev/sda
Get location of the disk
sudo blkid
/dev/sdb1: UUID="c5fe051a-bfc3-40a3-81b3-c83045748e3e" BLOCK_SIZE="4096" TYPE="ext4" PARTUUID="114b305a-4af1-4ace-8853-9d1854a14d18"
/dev/mmcblk0p1: LABEL_FATBOOT="system-boot" LABEL="system-boot" UUID="D7E2-9D99" BLOCK_SIZE="512" TYPE="vfat" PARTUUID="b0a6845e-01"
/dev/mmcblk0p2: LABEL="writable" UUID="b09bb4c8-de4d-4ce6-a93f-30c4c9241a58" BLOCK_SIZE="4096" TYPE="ext4" PARTUUID="b0a6845e-02"
/dev/sda1: UUID="5bcd4331-7026-4851-9af3-aa92cf0de456" BLOCK_SIZE="4096" TYPE="ext4" PARTUUID="fa0c1cff-64ee-4203-b23e-0d9d1c36fcaf"
sudo smartctl -i /dev/sda
smartctl 7.2 2020-12-30 r5155 [aarch64-linux-5.15.0-1015-raspi] (local build)
Copyright (C) 2002-20, Bruce Allen, Christian Franke, www.smartmontools.org

=== START OF INFORMATION SECTION ===
Device Model:     WDC WD10SPCX-24HWST1
Serial Number:    WD-WX71A8592K04
Firmware Version: 80103060
User Capacity:    1,000,204,886,016 bytes [1.00 TB]
Sector Size:      512 bytes logical/physical
Device is:        Not in smartctl database [for details use: -P showall]
ATA Version is:   ATA/ATAPI-7 (minor revision not indicated)
Local Time is:    Sat Oct  1 15:19:56 2022 UTC
SMART support is: Available - device has SMART capability.
SMART support is: Enabled


sudo smartctl -i /dev/sdb
smartctl 7.2 2020-12-30 r5155 [aarch64-linux-5.15.0-1015-raspi] (local build)
Copyright (C) 2002-20, Bruce Allen, Christian Franke, www.smartmontools.org

=== START OF INFORMATION SECTION ===
Model Family:     Western Digital Blue Mobile
Device Model:     WDC WD10JPVX-08JC3T6
Serial Number:    WD-WX41A1717U04
LU WWN Device Id: 5 0014ee 6b2101739
Firmware Version: 08.01A08
User Capacity:    1,000,204,886,016 bytes [1.00 TB]
Sector Sizes:     512 bytes logical, 4096 bytes physical
Rotation Rate:    5400 rpm
Device is:        In smartctl database [for details use: -P show]
ATA Version is:   ACS-2 (minor revision not indicated)
SATA Version is:  SATA 3.0, 6.0 Gb/s (current: 6.0 Gb/s)
Local Time is:    Sat Oct  1 15:20:51 2022 UTC
SMART support is: Available - device has SMART capability.
SMART support is: Enabled
If SMART is disabled, run this command:
sudo smartctl -s on /dev/sda
To get all the available SMART information about a storage device
sudo smartctl -a /dev/sda

SMART Attributes Data Structure revision number: 16
Vendor Specific SMART Attributes with Thresholds:
ID# ATTRIBUTE_NAME          FLAG     VALUE WORST THRESH TYPE      UPDATED  WHEN_FAILED RAW_VALUE
  1 Raw_Read_Error_Rate     0x002f   200   200   051    Pre-fail  Always       -       12
  3 Spin_Up_Time            0x0027   190   183   021    Pre-fail  Always       -       1475
  4 Start_Stop_Count        0x0032   098   098   000    Old_age   Always       -       2229
  5 Reallocated_Sector_Ct   0x0033   185   185   140    Pre-fail  Always       -       646
  7 Seek_Error_Rate         0x002f   200   200   051    Pre-fail  Always       -       0
  9 Power_On_Hours          0x0032   098   098   000    Old_age   Always       -       2093
 10 Spin_Retry_Count        0x0032   100   100   000    Old_age   Always       -       0
 11 Calibration_Retry_Count 0x0032   100   100   000    Old_age   Always       -       0
 12 Power_Cycle_Count       0x0032   099   099   000    Old_age   Always       -       1168
192 Power-Off_Retract_Count 0x0032   200   200   000    Old_age   Always       -       72
193 Load_Cycle_Count        0x0032   199   199   000    Old_age   Always       -       5864
194 Temperature_Celsius     0x0022   115   095   000    Old_age   Always       -       32
196 Reallocated_Event_Count 0x0032   138   138   000    Old_age   Always       -       62
197 Current_Pending_Sector  0x0032   200   200   000    Old_age   Always       -       0
198 Offline_Uncorrectable   0x0030   100   253   000    Old_age   Offline      -       0
199 UDMA_CRC_Error_Count    0x0032   200   200   000    Old_age   Always       -       120
200 Multi_Zone_Error_Rate   0x0008   200   200   000    Old_age   Offline      -       0
240 Head_Flying_Hours       0x0032   099   099   000    Old_age   Always       -       1395

Read SMART Error Log failed: scsi error aborted command

Read SMART Self-test Log failed: scsi error aborted command

Read SMART Selective Self-test Log failed: scsi error aborted command


sudo smartctl -a /dev/sdb
SMART Attributes Data Structure revision number: 16
Vendor Specific SMART Attributes with Thresholds:
ID# ATTRIBUTE_NAME          FLAG     VALUE WORST THRESH TYPE      UPDATED  WHEN_FAILED RAW_VALUE
  1 Raw_Read_Error_Rate     0x002f   200   200   051    Pre-fail  Always       -       0
  3 Spin_Up_Time            0x0027   187   183   021    Pre-fail  Always       -       1641
  4 Start_Stop_Count        0x0032   001   001   000    Old_age   Always       -       118119
  5 Reallocated_Sector_Ct   0x0033   200   200   140    Pre-fail  Always       -       0
  7 Seek_Error_Rate         0x002f   200   200   051    Pre-fail  Always       -       0
  9 Power_On_Hours          0x0032   094   094   000    Old_age   Always       -       4890
 10 Spin_Retry_Count        0x0032   100   100   000    Old_age   Always       -       0
 11 Calibration_Retry_Count 0x0032   100   100   000    Old_age   Always       -       0
 12 Power_Cycle_Count       0x0032   098   098   000    Old_age   Always       -       2648
192 Power-Off_Retract_Count 0x0032   199   199   000    Old_age   Always       -       876
193 Load_Cycle_Count        0x0032   147   147   000    Old_age   Always       -       159557
194 Temperature_Celsius     0x0022   111   094   000    Old_age   Always       -       36
196 Reallocated_Event_Count 0x0032   200   200   000    Old_age   Always       -       0
197 Current_Pending_Sector  0x0032   200   200   000    Old_age   Always       -       0
198 Offline_Uncorrectable   0x0030   100   253   000    Old_age   Offline      -       0
199 UDMA_CRC_Error_Count    0x0032   200   200   000    Old_age   Always       -       0
200 Multi_Zone_Error_Rate   0x0008   100   253   000    Old_age   Offline      -       0
240 Head_Flying_Hours       0x0032   098   098   000    Old_age   Always       -       2173

SMART Error Log Version: 1
No Errors Logged

SMART Self-test log structure revision number 1
Num  Test_Description    Status                  Remaining  LifeTime(hours)  LBA_of_first_error
# 1  Short offline       Interrupted (host reset)      90%         3         -

SMART Selective self-test log data structure revision number 1
 SPAN  MIN_LBA  MAX_LBA  CURRENT_TEST_STATUS
    1        0        0  Not_testing
    2        0        0  Not_testing
    3        0        0  Not_testing
    4        0        0  Not_testing
    5        0        0  Not_testing
Selective self-test flags (0x0):
  After scanning selected spans, do NOT read-scan remainder of disk.
If Selective self-test is pending on power-up, resume after 0 minute delay.
Very important parameters to check are, among the others, “Reallocated_Sector_Ct” and “Current_Pending_Sector”. In both cases if the RAW_VALUE is something other than 0, we should be very careful and start to backup data on the hard drive. The Reallocated_Sector_Ct is the count of sectors on the block device which cannot be used correctly.
Create Partition
fdisk /dev/sda
create ext4 filesystem
mkfs.ext4 /dev/sda1
3.2.Mount the HDD
Make a target directory
mkdir -p /drives/primary
mkdir -p /drives/backup
mount /dev/sda1 /drives/backup
mount /dev/sdb1 /drives/primary
vi /etc/fstab

/dev/sda1 /drives/backup ext4 defaults 0 0
/dev/sdb1 /drives/primary ext4 defaults 0 0
Reboot and verify the drive is being automatically mounted.
sudo reboot
ls /drives/primary
4.Install MariaDB
sudo apt install mariadb-server
After installing, the commands below can be used to stop, start and enable MariaDB service to always start up when the server boots.
sudo systemctl stop mariadb.service
sudo systemctl start mariadb.service
sudo systemctl enable mariadb.service
Initialize MariaDB
This password is NOT the linux root password. This is the root pwd for the mariaDB instance. We havent set it up yet, so just press enter.
Whats happening below:
- create root password
- Remove anonymous user as we wont use it. Bad for security
- Disallow remote login for root – we wont allow it. Bad for security
- Remove the test DB – as MariaDB recommends to remove test DB before moving the server to production
- Apply settings by reloading the privilege table
When prompted, answer the questions below by the following:
- Enter current password for root (enter for none): Just press enter
- Set root password? [Y/n]: Y
- New password: Enter password
- Re-enter new password: Repeat password
- Remove anonymous users? [Y/n]: Y
- Disallow root login remotely? [Y/n]: Y
- Remove test database and access to it? [Y/n]: Y
- Reload privilege tables now? [Y/n]: Y
sudo mysql_secure_installation

NOTE: RUNNING ALL PARTS OF THIS SCRIPT IS RECOMMENDED FOR ALL MariaDB
      SERVERS IN PRODUCTION USE!  PLEASE READ EACH STEP CAREFULLY!

In order to log into MariaDB to secure it, we'll need the current
password for the root user. If you've just installed MariaDB, and
haven't set the root password yet, you should just press enter here.

Enter current password for root (enter for none):
OK, successfully used password, moving on...

Setting the root password or using the unix_socket ensures that nobody
can log into the MariaDB root user without the proper authorisation.

You already have your root account protected, so you can safely answer 'n'.

Switch to unix_socket authentication [Y/n] n
 ... skipping.

You already have your root account protected, so you can safely answer 'n'.

Change the root password? [Y/n] y
New password:
Re-enter new password:
Password updated successfully!
Reloading privilege tables..
 ... Success!


By default, a MariaDB installation has an anonymous user, allowing anyone
to log into MariaDB without having to have a user account created for
them.  This is intended only for testing, and to make the installation
go a bit smoother.  You should remove them before moving into a
production environment.

Remove anonymous users? [Y/n] y
 ... Success!

Normally, root should only be allowed to connect from 'localhost'.  This
ensures that someone cannot guess at the root password from the network.

Disallow root login remotely? [Y/n] y
 ... Success!

By default, MariaDB comes with a database named 'test' that anyone can
access.  This is also intended only for testing, and should be removed
before moving into a production environment.

Remove test database and access to it? [Y/n] y
 - Dropping test database...
 ... Success!
 - Removing privileges on test database...
 ... Success!

Reloading the privilege tables will ensure that all changes made so far
will take effect immediately.

Reload privilege tables now? [Y/n] y
 ... Success!

Cleaning up...

All done!  If you've completed all of the above steps, your MariaDB
installation should now be secure.

Thanks for using MariaDB!
Restart the MariaDB server:
sudo systemctl restart mariadb.service
configure MariaDB
sudo mariadb
MariaDB [(none)]> CREATE DATABASE nextcloud;
MariaDB [(none)]> CREATE USER ‘ncuser’@’localhost’ IDENTIFIED BY ‘SecretPassword’;
MariaDB [(none)]> GRANT ALL ON nextcloud.* TO ‘ncuser’@’localhost’ IDENTIFIED BY ‘SecretPassword’ WITH GRANT OPTION;
MariaDB [(none)]> FLUSH PRIVILEGES;
MariaDB [(none)]> EXIT;
5.Install Nginx
sudo apt-get install nginx

nginx -v
nginx version: nginx/1.18.0 (Ubuntu)


sudo systemctl start nginx
sudo systemctl enable nginx
sudo systemctl status nginx
delete the default Nginx server block
cd sites-available
mv default /home/<your_user_name>/sites-available.default

cd sites-enabled
mv default /home/<your_user_name>/sites-enabled.default
6.Install PHP 8.1
https://docs.nextcloud.com/server/latest/admin_manual/installation/source_installation.html
Ubuntu 22.04 has PHP 8.1 packages and its extensions in the OS upstream repositories.
sudo apt install php8.1

php --version
PHP 8.1.2 (cli) (built: Aug  8 2022 07:28:23) (NTS)
Copyright (c) The PHP Group
Zend Engine v4.1.2, Copyright (c) Zend Technologies
    with Zend OPcache v8.1.2, Copyright (c), by Zend Technologies
Install PHP 8.1 Extensions
apt install php8.1-common
apt install php8.1-mysql
apt install php8.1-cli
apt install php8.1-curl
apt install php8.1-dom
apt install php8.1-GD
apt install php8.1-JSON
apt install php8.1-mbstring
apt install php8.1-zip
apt install php8.1-bz2
apt install php8.1-intl
apt install php8.1-ldap
apt install php8.1-smbclient
apt install php8.1-ftp
apt install php8.1-imap
apt install php8.1-bcmath
apt install php8.1-gmp
apt install php8.1-exif
apt install php8.1-apcu
apt install php8.1-memcached
apt install php8.1-redis
apt install php8.1-fpm
apt install php8.1-xml
apt install php8.1-ldap
apt install php8.1-cli
apt install php8.1-opcache
apt install php8.1-soap
apt install php8.1-cgi
php --modules

[PHP Modules]
apcu
bcmath
bz2
calendar
Core
ctype
curl
date
dom
exif
FFI
fileinfo
filter
ftp
gd
gettext
gmp
hash
iconv
igbinary
imap
intl
json
ldap
libsmbclient
libxml
mbstring
memcached
msgpack
openssl
pcntl
pcre
PDO
Phar
posix
readline
redis
Reflection
session
shmop
SimpleXML
smbclient
soap
sockets
sodium
SPL
standard
sysvmsg
sysvsem
sysvshm
tokenizer
xml
xmlreader
xmlwriter
xsl
Zend OPcache
zip
zlib

[Zend Modules]
Zend OPcache
If using PHP with Nginx web browser ensure php-fpm service is started and running:
systemctl start php*-fpm
systemctl enable php8.1-fpm
systemctl status php8.1-fpm.service
PHP-FPM default configuration file to set listening socket, user and other information are located in:
ls  -1 /etc/php/8.1/fpm/
conf.d
php-fpm.conf
php.ini
pool.d
upload-max-filesize
/etc/php/8.1/fpm/php.ini
cgi.fix_pathinfo=0
display_errors = On
display_startup_errors = On
log_errors = On
/etc/php/8.1/fpm/pool.d/www.conf
user = <Your user name>
group = <Your user name>

listen.owner = <Your user name>
listen.group = <Your user name>
listen.mode  = 0660

env[HOSTNAME] = $HOSTNAME
env[PATH] = /usr/local/bin:/usr/bin:/bin
env[TMP] = /tmp
env[TMPDIR] = /tmp
env[TEMP] = /tmp

*********************************
comment out this line:

;listen.acl_users = apache,nginx

sloved this issue:
 listen.owner and listen.group are ignored


配置不使用服务器端口,PHP-FPM将在套接字文件下运行。
将'listen'值更改为:
listen = /run/php/php8.1-fpm.sock
;listen = 127.0.0.1:9000

说明:
listen = /run/php/php8.1-fpm.sock
;nginx php process through "Unix domain socket"

listen = 127.0.0.1:9000
;nginx php process through TCP port 9000
启动php-fpm服务
systemctl stop php8.1-fpm.service
systemctl start php8.1-fpm.service

systemctl status php8.1-fpm.service
检查php-fpm运行状态
netstat -pl | grep php
unix  2      [ ACC ]     STREAM     LISTENING     114547   109347/php-fpm: mas  /run/php/php8.1-fpm.sock
7.Install Nextcloud
Download Nextcloud application from their website www.nextcloud.com. Go to the website, click Get Nextcloud, select Server packages and copy the download link. We will use wget to actually download it to the Pi.
wget https://download.nextcloud.com/server/releases/nextcloud-24.0.5.zip
Look in your nextcloud data dir find a username you have created. This user is administrator.
Cleaning
sudo apt autoremove
8.Letsencrypt SSL integration
8.1.Install Certificate
Install Certbot in Ubuntu with snapd
Step1: Install snapd:
sudo apt install snapd
Step2: Ensure you have the latest snapd version installed:
sudo snap install core; sudo snap refresh core
Step3: Install Certbot with snapd:
sudo snap install --classic certbot
Step4: Create a symlink to ensure Certbot runs:
sudo ln -s /snap/bin/certbot /usr/bin/certbot
Create an SSL Certificate with Certbot
Run Certbot to create SSL certificates and modify your web server configuration file to automatically redirect HTTP requests to HTTPS. Or, add “certonly” to create the SSL certificates without modifying system files (recommended if hosting staging sites that should not be forced to use an SSL).
Step1: Create SSL certs for all domains and configure redirects in the web server:
certbot certonly --agree-tos --manual --preferred-challenges=dns -d example.com
or
sudo certbot certonly --agree-tos --renew-by-defaul --webroot -w <Your site root dir> -d example.ca
Step2: Enter an email address for renewal and security notices.
Step3: Agree to the terms of service.
Step4: Specify whether to receive emails from EFF.
Step5: If prompted, choose whether to redirect HTTP traffic to HTTPS – 1 (no redirect, no further changes to the server) or 2 (redirect all HTTP requests to HTTPS).
Modify your nginx config file:
server {
    listen 80 default_server;
    listen [::]:80 default_server;
    root /var/www/html;
    server_name  example.com www.example.com;

    listen 443 ssl; # managed by Certbot

    # RSA certificate
    ssl_certificate /etc/letsencrypt/live/example.com/fullchain.pem; # managed by Certbot
    ssl_certificate_key /etc/letsencrypt/live/example.com/privkey.pem; # managed by Certbot

    include /etc/letsencrypt/options-ssl-nginx.conf; # managed by Certbot

    # Redirect non-https traffic to https
    if (scheme != "https") {
        return 301 https://host$request_uri;
    } # managed by Certbot
}
verify the syntax of your configuration and restart NGINX
nginx -t
nginx -s reload
8.2.Install Crontab
Check if cron package is installed:
dpkg -l cron
If cron is not installed, install the cron package
apt-get install cron
Verify if cron service is running
systemctl status cron
Configure cron job on ubuntu
vi /etc/crontab
8.3.Auo Renew shell script
#!/bin/bash
#    Source
#        https://gist.github.com/oodavid/54cadfb92ff49618797d
#    Adapted from
#        https://www.digitalocean.com/community/tutorials/how-to-secure-nginx-with-let-s-encrypt-on-ubuntu-14-04
#    Make sure this is added to the crontab, ie:
#        sudo crontab -e
#        30 2 * * 1 /home/ubuntu/khan-draw/ssl-letsencrypt-auto-renew.sh >> /var/log/ssl-letsencrypt-auto-renew.log

# Config
le_path="/home/ubuntu/letsencrypt";
email="david@oodavid.com";
webroot="/home/ubuntu/khan-draw/";
domains="draw.oodavid.com"; # Comma Seperated list of domains
exp_limit=30;
web_service="nginx";

# Root required
#if [[ EUID -ne 0 ]]; then
#    echo "Setup - This script must be run as root";
#    exit 0;
#fi;

# Get the certificate path from the domains (we only look at the first in a comma seperated list)
domain=`echodomains | sed 's/,.*//'`;
cert_file="/etc/letsencrypt/live/domain/fullchain.pem";
if [ ! -fcert_file ]; then
    echo "[ERROR] certificate file not found for domain domain.";
    exit 0;
fi;

# Check the date
exp=(date -d "`openssl x509 -in cert_file -text -noout|grep "Not After"|cut -c 25-`" +%s)
datenow=(date -d "now" +%s)
days_exp=(echo \(exp - datenow \) / 86400 |bc)
if [ "days_exp" -gt "exp_limit" ] ; then
    echo "The certificate is up to date, no need for renewal (days_exp days left).";
    exit 0;
fi;

# Update the cert
echo "The certificate for domain is about to expire. Starting renewal script..."le_path/letsencrypt-auto certonly -a webroot --agree-tos --renew-by-default --email email --webroot-path=webroot --domains="domains"

# Reload our service
echo "Reloadingweb_service"
/usr/sbin/service $web_service reload
9.Issues
9.1.Trusted domains
All URLs used to access your Nextcloud server must be whitelisted in your config.php file, under the trusted_domains setting. Users are allowed to log into Nextcloud only when they point their browsers to a URL that is listed in the trusted_domains setting. You may use IP addresses and domain names. A typical configuration looks like this:
'trusted_domains' =>
  array (
   0 => 'localhost',
   1 => 'server1.example.com',
   2 => '192.168.1.50',
   3 => '[fe80::1:50]',
),
The loopback address, 127.0.0.1, is automatically whitelisted, so as long as you have access to the physical server you can always log in. In the event that a load balancer is in place there will be no issues as long as it sends the correct X-Forwarded-Host header. When a user tries a URL that is not whitelisted the following error appears:

9.2.Too many requests
There were too many requests from your network. Retry later or contact your administrator if this is an error.

DELETE FROM nextcloud.oc_bruteforce_attempts