1.Ubuntu22.04安装VMware16
步骤1:下载安装包
步骤2:给vmware软件包加执行权限。
$ chmod +x VMware-Workstation-Full-16.2.3-19376536.x86_64.bundle
步骤3: 安装依赖
安装gcc
sudo apt-get install gcc
安装make
sudo apt-get install make
安装lib
sudo apt-get install libaio1 libglib2.0-dev
安装git
sudo apt-get install git
步骤3:安装kernel modules
这一步最关键, 主要是解决vmware-host-modules问题 , 能不能正常使用, 全看这一步有没有正确处理, 这个vmware-host-modules, 必须要从github下载以后,手动编译安装才能使用, 不能通过apt-get安装。上一步中我们已经安装了git, 接下来就用git下载vmware-host-modules项目进行手动编译。
1)找到一个目录(自己随便选择就行, 建议路径中不要有中文和空格【个人习惯】)
2)下载 vmware-host-modules
git clone https://github.com/mkubecek/vmware-host-modules.git
3)进入下载之后的目录
切换分支vmware-host-modules
首先确定你下载的VM的版本, 因为不同的版本安装的内容不同, 确定版本之后, 切换到自己版本的分支中进行编译!
切换到自己版本对应的分支中 !
git checkout workstation-16.2.3
5)编译vmware-host-modules
make
6)安装vmware-host-modules
sudo make install
步骤4:运行下载的安装包
sudo ./VMware-Workstation-Full-16.2.3-19376536.x86_64.bundle
步骤5:配置所有模块
sudo vmware-modconfig --console --install-all
一些错误, 不要紧, 不影响使用 !
步骤6:进行初始设置
sudo vmware
2.Unable to start VMWorkstation
sudo /etc/init.d/vmware start
Starting VMware services:
   Virtual machine monitor                                            failed
   Virtual machine communication interface                             done
   VM communication interface socket family                            done
   Blocking file system                                                done
   Virtual ethernet                                                   failed
   VMware Authentication Daemon                                        done
Possible Solutions
sudo vmware-modconfig --console --install-all
Alternatively, you could try this first:
sudo apt-get install build-essential linux-headers-(uname -r) open-vm-dkms
sudo ln -s /usr/src/linux-headers-(uname -r)/include/generated/uapi/linux/version.h /usr/src/linux-headers-$(uname -r)/include/linux/version.h
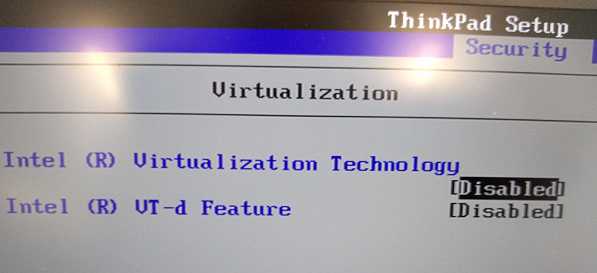
3.How to enable Virtualization Technology on Lenovo PC
- Boot systems to BIOS with the F1 key at power on.
- elect the Security tab in the BIOS.
- Enable Intel VTT or Intel VT-d if needed. See the following images for possible locations of the virtualization options.

4.Disable Secure Boot
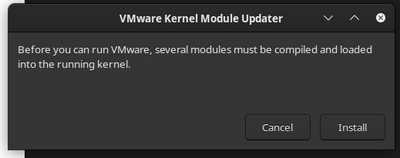
“Cannot open /dev/vmmon: No such file or directory” error when powering on VM.
What Is Secure Boot?
As we know, a traditional BIOS will boot form anywhere, while Secure Boot which is working on the top of UEFI is used to make sure that Windows operating system remains safe from Malware. To put it more clearly, Secure Boot ensures that a device boots using only the software that is trusted by the Original Equipment Manufacturer.
How Does Secure Boot Work?
Once you power on a PC, it starts the process of executing code that configures the processor, memory, and hardware peripherals to make a preparation for the operating system to boot.
During the preparation, Secure Boot checks the signature of firmware code that exists on hardware peripherals like storage deices.
During the boot process, secure Boot will check for an embedded signature inside of the fireware module. If the signature match against a database of signature in Secure Boot, the nodule is allowed to execute.
It can be said that Secure Boot works like a security gate. Code with valid credentials can get through the security gate and execute. Surely, code with bad credentials or no credential will be refused.
Disable Secure Boot

5.Compiling vmmon module fails

Modules will not compile on Debian Testing with Workstation 16.2.4
/tmp/modconfig-lXl0QD/vmnet-only/vm_assert.h:43:10: fatal error: stdarg.h: No such file or directory
43 | #include <stdarg.h>
clone https://github.com/mkubecek/vmware-host-modules/archive/workstation-16.2.4.tar.gz
wget https://github.com/mkubecek/vmware-host-modules/archive/workstation-16.2.4.tar.gz
tar -xzf workstation-16.2.4.tar.gz
cd vmware-host-modules-workstation-16.2.4
tar -cf vmmon.tar vmmon-only
tar -cf vmnet.tar vmnet-only
sudo cp -v vmmon.tar vmnet.tar /usr/lib/vmware/modules/source/
sudo vmware-modconfig --console --install-all
7.GNU C Compiler (gcc) version 12.2.0, was not found vmware
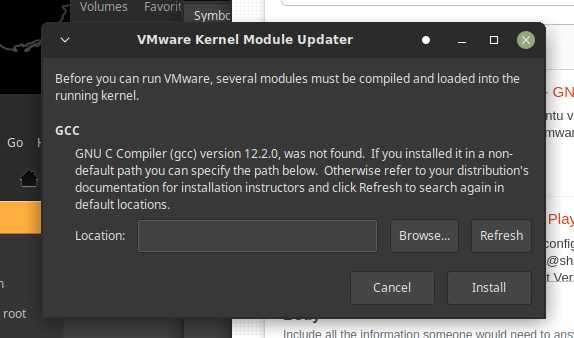
sudo vmware-modconfig --console --install-all

Unable to install all modules.  See log for details.
Missing gcc 12
My gcc –version is 11.4.0. I checked ls /usr/bin/x86_64-linux-gnu-* and version 12 was not there.
sudo add-apt-repository ppa:ubuntu-toolchain-r/ppa -y
sudo apt update
sudo apt install g++-12 gcc-12
Then try again.
skb_gso_segment undefined
The build breaks because of gcc header changes. The VMWare build provides a log file like /tmp/vmware-user/vmware_1234.log that shows the compiler error.
This particular function, skb_gso_segment, has moved to a new header that VMWare bridge.c does not #include.
To see for yourself the header where this function is defined, cd /usr/src/linux-hwe-6.5-headers-6.5.0-14/include/net and grep skb_gso_segment *.
To fix VMWare code:
sudo su
cd /usr/lib/vmware/modules/source

#back up original tar file
cp vmnet.tar vmnet.tar.original

# change the code
tar -xvf vmnet.tar
vi vmnet-only/bridge.c
After the #include <linux/netdevice.h>, add
#include <net/gso.h>
Save and exit. Then rebuild the tar file.
tar -cf vmnet.tar vmnet-only
exit
Then try again.
__pte_offset_map undefined
Next the build fails because a function has changed names. In VMWare Workstation 17, the code in pgtbl.h was changed like this by VMWare:
#if LINUX_VERSION_CODE >= KERNEL_VERSION(6,5,0)
            pte_t *pte = pte_offset_kernel(pmd, addr);
#else
            pte_t *pte = pte_offset_map(pmd, addr);
#endif
To fix v16, I made a similar change.
sudo su
cd /usr/lib/vmware/modules/source

# back up original tar file
cp vmmon.tar vmmon.tar.original

# change the code
tar -xvf vmmon.tar
vi vmmon-only/include/pgtbl.h
In the editor, search down to pte_offset_map and change it to pte_offset_kernel.
Save and exit. Then rebuild the tar file.
tar -cf vmmon.tar vmmon-only
exit
Then try again.
sudo vmware-modconfig --console --install-all
Starting VMware services:
   Virtual machine monitor                                             done
   Virtual machine communication interface                             done
   VM communication interface socket family                            done
   Virtual ethernet                                                    done
   VMware Authentication Daemon                                        done
   Shared Memory Available                                             done
8. fatal error: stdarg.h: No such file or directory
sudo apt-get install linux-headers-`uname -r`
find /usr/lib -name 'stdarg.h'
sudo CPATH=/usr/lib/gcc/x86_64-linux-gnu/12/include vmware-modconfig --console --install-all
vmware-installer -u vmware-workstation

VMWARE_VERSION=workstation-16.2.3
TMP_FOLDER=/tmp/patch-vmware
rm -fdr TMP_FOLDER
mkdir -pTMP_FOLDER
cd TMP_FOLDER
sudo apt install git -y
git clone https://github.com/mkubecek/vmware-host-modules.git
cdTMP_FOLDER/vmware-host-modules
git checkout $VMWARE_VERSION
git fetch
make

cd /tmp/patch-vmware
vi ./vmware-host-modules/vmmon-only/include/pgtbl.h
replace pte_offset_map to pte_offset_kernel


sudo make install
sudo rm /usr/lib/vmware/lib/libz.so.1/libz.so.1
sudo ln -s /lib/x86_64-linux-gnu/libz.so.1 /usr/lib/vmware/lib/libz.so.1/libz.so.1
# Cd to te dir where the vmware modules are.
cd /usr/lib/vmware/modules/source
# Unpack vmnet.
tar -xvf vmnet.tar
# Add the missing include (code is just there now)
sed -i '#include <net/gso.h>' vmnet-only/bridge.c
# Backup original vmnet.tar
mv vmnet.tar vmnet.tar.original
# Pack the patched vmnet.
tar -cf vmnet.tar vmnet-only