1. What version are you using?
select current_version()
5.19.2
Snowflake Enterprise Edition
It includes all the features and services of Enterprise Edition, with the addition of enhanced security and data protection. In addition, database failover/failback adds support for business continuity and disaster recovery.
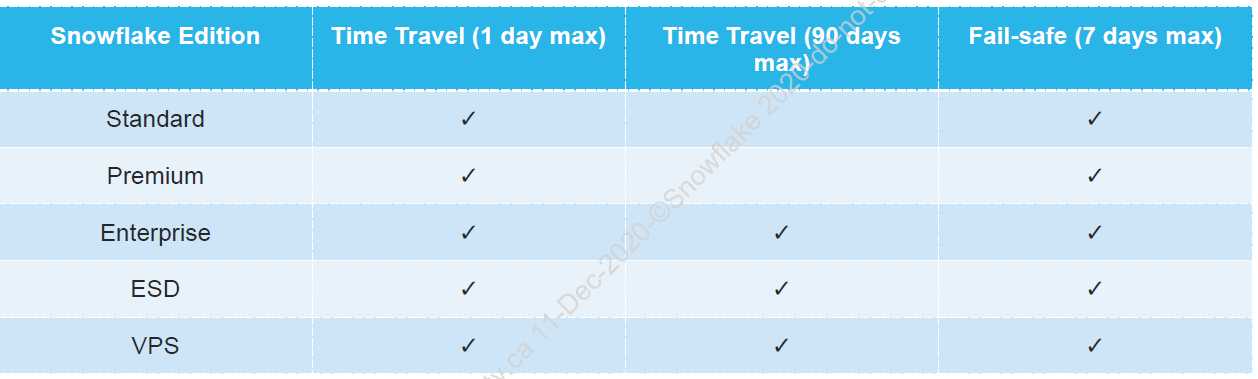
Business Critical Edition, formerly known as Enterprise for Sensitive Data (ESD), offers even higher levels of data protection to support the needs of organizations with extremely sensitive data, particularly PHI data that must comply with HIPAA and HITRUST CSF regulations.
Virtual Private Snowflake offers our highest level of security for organizations that have the strictest requirements, such as financial institutions and any other large enterprises that collect, analyze, and share highly sensitive data.
It includes all the features and services of Business Critical Edition, but in a completely separate Snowflake environment, isolated from all other Snowflake accounts (i.e. VPS accounts do not share any resources with accounts outside the VPS).
Client Releases (by Month)
Within each month, the list is organized by client and version. Descriptions are provided only for the changes/fixes made to recent versions of each client. For descriptions of all the changes/fixes made to a particular client, see Client Changes by Version(in the Snowflake Documentation).
February 2021

2. Window Functions
A window function operates on a group (“window”) of related rows.
Each time a window function is called, it is passed a row (the current row in the window) and the window of rows that contain the current row. The window function returns one output row for each input row. The output depends on the individual row passed to the function and the values of the other rows in the window passed to the function.
Some window functions are order-sensitive. There are two main types of order-sensitive window functions:
Rank-related functions.
Window frame functions.
Rank-related functions list information based on the “rank” of a row. For example, if you rank stores in descending order by profit per year, the store with the most profit will be ranked 1; the second-most profitable store will be ranked 2, etc.
Window frame functions allow you to perform rolling operations, such as calculating a running total or a moving average, on a subset of the rows in the window.
Refer to: Snowflake Window Functions
3.RANK funcitons
Let’s walk through an example in Snowflake showing how RANK(), DENSE_RANK(), and ROW_NUMBER() behave differently.
CREATE OR REPLACE TEMP TABLE sales (region STRING, salesperson STRING, revenue INT);

INSERT INTO sales VALUES
  ('East', 'Alice', 5000),
  ('East', 'Bob',   7000),
  ('East', 'Carol', 7000),
  ('West', 'Dan',   6000),
  ('West', 'Emma',  8000),
  ('West', 'Frank', 8000);
SELECT
    region,
    salesperson,
    revenue,
    RANK()       OVER (PARTITION BY region ORDER BY revenue DESC) AS rank_num,
    DENSE_RANK() OVER (PARTITION BY region ORDER BY revenue DESC) AS dense_rank_num,
    ROW_NUMBER() OVER (PARTITION BY region ORDER BY revenue DESC) AS row_num
FROM sales
ORDER BY region, rank_num;
| region | salesperson | revenue | rank_num | dense_rank_num | row_num |
|---|---|---|---|---|---|
| East | Bob | 7000 | 1 | 1 | 1 |
| East | Carol | 7000 | 1 | 1 | 2 |
| East | Alice | 5000 | 3 | 2 | 3 |
| West | Emma | 8000 | 1 | 1 | 1 |
| West | Frank | 8000 | 1 | 1 | 2 |
| West | Dan | 6000 | 3 | 2 | 3 |
Key Differences
- RANK() → Skips ranks after ties
Emma & Frank tie at 1 → next is 3 (rank 2 skipped).
-
DENSE_RANK() → No gaps in ranks
Emma & Frank tie at 1 → next is 2.
-
ROW_NUMBER() → Always unique
Breaks ties arbitrarily, just assigns 1, 2, 3…
4.Materialized View
A materialized view is a pre-computed data set derived from a query specification (the SELECT in the view definition) and stored for later use. Because the data is pre-computed, querying a materialized view is faster than executing a query against the base table of the view. This performance difference can be significant when a query is run frequently or is sufficiently complex. As a result, materialized views can speed up expensive aggregation, projection, and selection operations, especially those that run frequently and that run on large data sets.
Note:
Materialized views are designed to improve query performance for workloads composed of common, repeated query patterns. However, materializing intermediate results incurs additional costs. As such, before creating any materialized views, you should consider whether the costs are offset by the savings from re-using these results frequently enough.
5.How to grant select on all future tables in a schema and database level
Existing Tables:
Before learning how to work with future tables let us first understand how the grant works on existing tables.Since each table belongs to a single schema (container) and the schema, in turn, belongs to a database, hence the table becomes the schema object and to assign any schemaobjectpriviliges, we need to first grant USAGE privilege on parent objects such as schema and database but this will be valid if we are trying to grant select privilege to all table for a single schema :
For example: Let’s assume we have a database MY_DB, schema MY_SCHEMA and a test role TEST_ROLE already created, then
use role accountadmin;
grant usage on database MY_DB to role TEST_ROLE;
grant usage on schema MY_DB.MY_SCHEMA to role TEST_ROLE;
grant select on all tables on schema MY_DB.MY_SCHEMA to role TEST_ROLE;
The above will grant select on all tables within a schema but to grant select to all tables in a database one should:
use role accountadmin;
grant usage on database MY_DB to role TEST_ROLE;
grant usage on all schemas in database MY_DB  to role TEST_ROLE;
grant select on all tables in database MY_DB to role TEST_ROLE;
Future Tables:
Similarly, to grant select on all future tables in a schema and database level.
- Schema level:
use role accountadmin;
create database FUTURE_DB;
grant usage on database FUTURE_DB to role TEST_ROLE;
grant usage on schema FUTURE_DB.MY_SCHEMA to role TEST_ROLE;
grant select on future tables in schema  FUTURE_DB.MY_SCHEMA to role TEST_ROLE;
- Database Level: (assuming the privileges are granted from scratch)
use role account admin;
create database FUTURE_DB;
grant usage on database FUTURE_DB to role TEST_ROLE;
grant usage on future schemas in database FUTURE_DB to role TEST_ROLE;
grant select on future tables in database FUTURE_DB to role TEST_ROLE;
Example:
use role accountadmin;
create schema future_schema1;
use schema future_schema1;
create table future_table1 (col1 varchar)
insert into future_table1 values ('abc');

create schema future_schema2;
use schema future_schema1;
create table future_table2 (col1 varchar)
insert into future_table2 values ('xyz');

grant role TEST_ROLE to role accountadmin;
use role TEST_ROLE;
use database future_db;
select * from future_schema1.future_table1;
select * from future_schema2.future_table2;
6.Clustering Keys and Clustered Tables
Refer to: Clustering Keys and Clustered Tables
In general, Snowflake produces well-clustered data in tables; however, over time, particularly as DML occurs on very large tables (as defined by the amount of data in the table, not the number of rows), the data in some table rows might no longer cluster optimally on desired dimensions.
To improve the clustering of the underlying table micro-partitions, you can always manually sort rows on key table columns and re-insert them into the table; however, performing these tasks could be cumbersome and expensive.
Instead, Snowflake supports automating these tasks by designating one or more table columns/expressions as a clustering key for the table. A table with a clustering key defined is considered to be clustered.
Attention
Clustering keys are not intended for all tables. The size of a table, as well as the query performance for the table, should dictate whether to define a clustering key for the table. In particular, to see performance improvements from a clustering key, a table has to be large enough to consist of a sufficiently large number of micro-partitions, and the column(s) defined in the clustering key have to provide sufficient filtering to select a subset of these micro-partitions.
In general, tables in the multi-terabyte (TB) range will experience the most benefit from clustering, particularly if DML is performed regularly/continually on these tables.
Also, before explicitly choosing to cluster a table, Snowflake strongly recommends that you test a representative set of queries on the table to establish some performance baselines.
Reclustering Example


- To start, table t1 is naturally clustered by date across micro-partitions 1-4.
- The query (in the diagram) requires scanning micro-partitions 1, 2, and 3.
- date and type are defined as the clustering key. When the table is reclustered, new micro-partitions (5-8) are created.
- After reclustering, the same query only scans micro-partitions 5 and 6.
CREATE TABLE <name> ... CLUSTER BY ( <expr1> [ , <expr2> ... ] )
ALTER  TABLE <name> CLUSTER BY ( <expr1> [ , <expr2> ... ] )
ALTER  TABLE <name> DROP CLUSTERING KEY
In addition, after reclustering:
- Micro-partition 5 has reached a constant state (i.e. it cannot be improved by reclustering) and is therefore excluded when computing depth and overlap for future maintenance. In a well-clustered large table, most micro-partitions will fall into this category.
- The original micro-partitions (1-4) are marked as deleted, but are not purged from the system; they are retained for Time Travel and Fail-safe.
Note
This example illustrates the impact of reclustering on an extremely small scale. Extrapolated to a very large table (i.e. consisting of millions of micro-partitions or more), reclustering can have a significant impact on scanning and, therefore, query performance.
7.How Does Snowpipe Work?
Snowpipe enables loading data from files as soon as they’re available in a stage. This means you can load data from files in micro-batches, making it available to users within minutes, rather than manually executing COPY statements on a schedule to load larger batches.
Snowpipe loads data from files as soon as they are available in a stage. The data is loaded according to the COPY statement defined in a referenced pipe.
A pipe is a named, first-class Snowflake object that contains a COPY statement used by Snowpipe. The COPY statement identifies the source location of the data files (i.e., a stage) and a target table. All data types are supported, including semi-structured data types such as JSON and Avro.
- Different mechanisms for detecting the staged files are available:
- Automating Snowpipe using cloud messaging
- Calling Snowpipe REST endpoints
8.Interal stage and External stage
Snowflake refers to the location of data files in cloud storage as a stage.
Snowflake supports two types of stages for storing data files used for loading/unloading:
- Internal stages store the files internally within Snowflake.
-
External stages store the files in an external location (i.e. S3 bucket) that is referenced by the stage. An external stage specifies location and credential information, if required, for the S3 bucket.
Upload files to your cloud storage account using the tools provided by the cloud storage service. -
Amazon S3
- Google Cloud Storage
- Microsoft Azure
A named external stage is a database object created in a schema. This object stores the URL to files in cloud storage, the settings used to access the cloud storage account, and convenience settings such as the options that describe the format of staged files.
9.Internal Stages: User stages, Table Stages, Named Stages
By default, each user and table in Snowflake is automatically allocated an internal stage for staging data files to be loaded. In addition, you can create named internal stages.
File staging information is required during both steps in the data loading process:
- You must specify an internal stage in the PUT command when uploading files to Snowflake.
-
You must specify the same stage in the COPY INTO <table> command when loading data into a table from the staged files.
Consider the best type of stage for specific data files. Each option provides benefits and potential drawbacks.
User Stages
Each user has a Snowflake stage allocated to them by default for storing files. This stage is a convenient option if your files will only be accessed by a single user, but need to be copied into multiple tables.
User stages have the following characteristics and limitations:
- User stages are referenced using @~; e.g. use LIST @~ to list the files in a user stage.
- Unlike named stages, user stages cannot be altered or dropped.
- User stages do not support setting file format options. Instead, you must specify file format and copy options as part of the COPY INTO <table> command.
This option is not appropriate if:
- Multiple users require access to the files.
- The current user does not have INSERT privileges on the tables the data will be loaded into.
Table Stages
Each table has a Snowflake stage allocated to it by default for storing files. This stage is a convenient option if your files need to be accessible to multiple users and only need to be copied into a single table.
- Table stages have the following characteristics and limitations:
- Table stages have the same name as the table; e.g. a table named mytable has a stage referenced as @%mytable.
- Unlike named stages, table stages cannot be altered or dropped.
- Table stages do not support setting file format options. Instead, you must specify file format and copy options as part of the COPY INTO <table> command.
- Table stages do not support transforming data while loading it (i.e. using a query as the source for the COPY command).
Note that a table stage is not a separate database object; rather, it is an implicit stage tied to the table itself. A table stage has no grantable privileges of its own. To stage files to a table stage, list the files, query them on the stage, or drop them, you must be the table owner (have the role with the OWNERSHIP privilege on the table).
This option is not appropriate if you need to copy the data in the files into multiple tables.
Internal Named Stages
Internal stages are named database objects that provide the greatest degree of flexibility for data loading. Because they are database objects, the security/access rules that apply to all objects apply:
- Users with the appropriate privileges on the stage can load data into any table.
- Ownership of the stage can be transferred to another role, and privileges granted to use the stage can be modified to add or remove roles.
- When you create a stage, you must explicitly grant privileges on the stage to one or more roles before users with those roles can use the stage.
If you plan to stage data files that will be loaded only by you, or will be loaded only into a single table, then you may prefer to simply use either your user stage or the stage for the table into which you will be loading data.
Named internal stages are optional but recommended when you plan regular data loads that could involve multiple users and/or tables.
10. DATA_RETENTION_TIME_IN_DAYS
- Available for database, schema, and table objects
- Default 1 day, can be set up to 90 days for permanent tables, Enterprise edition or higher only
- set for Account, Database, Schema, Table
- Can be disabled by setting default retention to 0 days
- Can be used in query, clone, or restore objects to query, clone, point-in-time data
create table mytable(col1 number, col2 date) data_retention_time_in_days=90;

alter table mytable set data_retention_time_in_days=30;

select * from my_table at(offset => -60*5);

select * from my_table at(timestamp => 'Mon, 01 May 2015 16:20:00 -0700'::timestamp_tz);
create table restored_table clone my_table
  at(timestamp => 'Mon, 09 May 2015 01:01:00 +0300'::timestamp_tz);

create schema restored_schema clone my_schema at(offset => -3600);

create database restored_db clone my_db
  before(statement => '8e5d0ca9-005e-44e6-b858-a8f5b37c5726');
11. Temporary vs Transient Tables
Permanent table
It is the regular database table. Consumes space, Time-travel and fail-safe period can be enabled. All tables in snowflake by default are micro-partitioned, compressed, encrypted and stored in columnar format
Temporary table
A temporary table is used for storing non-permanent, transitory data (e.g. ETL data, session-specific data). Temporary tables only exist within the session in which they were created and persist only for the remainder of the session. As such, they are not visible to other users or sessions. Once the session ends, data stored in the table is purged completely from the system and, therefore, is not recoverable, either by the user who created the table or Snowflake. You can create a temporary table that has the same name as an existing table in the same schema, effectively hiding the existing table. To create a temporary table,
create temporary table mytemptable (id number, creation_date date);
Transient Tables
Snowflake supports creating transient tables that persist until explicitly dropped and are available to all users with the appropriate privileges. Transient tables are similar to permanent tables with the key difference that they do not have a Fail-safe period. As a result, transient tables are specifically designed for transitory data that needs to be maintained beyond each session (in contrast to temporary tables) but does not need the same level of data protection and recovery provided by permanent tables. to create a transient table:
create transient table mytranstable (id number, creation_date date);
Comparison of Permanent vs Temporary vs Transient tables

12. Snowflake roles and privileges
A Comprehensive Tutorial of Snowflake Privileges and Access Control
A standard model for Snowflake roles and privileges
How To Create a Snowflake Role Hierarchy
13. create user
Only user adminstrators (i.e. users with the USERADMIN role or higher), or another role with the CREATE USER privilege on the account, can create users.
CREATE [ OR REPLACE ] USER [ IF NOT EXISTS ] <name>
  [ objectProperties ]
  [ objectParams ]
  [ sessionParams ]

objectProperties ::=
  PASSWORD = '<string>'
  LOGIN_NAME = <string>
  DISPLAY_NAME = <string>
  FIRST_NAME = <string>
  MIDDLE_NAME = <string>
  LAST_NAME = <string>
  EMAIL = <string>
  MUST_CHANGE_PASSWORD = TRUE | FALSE
  DISABLED = TRUE | FALSE
  SNOWFLAKE_SUPPORT = TRUE | FALSE
  DAYS_TO_EXPIRY = <integer>
  MINS_TO_UNLOCK = <integer>
  DEFAULT_WAREHOUSE = <string>
  DEFAULT_NAMESPACE = <string>
  DEFAULT_ROLE = <string>
  MINS_TO_BYPASS_MFA = <integer>
  RSA_PUBLIC_KEY = <string>
  RSA_PUBLIC_KEY_2 = <string>
  COMMENT = '<string_literal>'

objectParams ::=
  NETWORK_POLICY = <string>

sessionParams ::=
  ABORT_DETACHED_QUERY = TRUE | FALSE
  AUTOCOMMIT = TRUE | FALSE
  BINARY_INPUT_FORMAT = <string>
  BINARY_OUTPUT_FORMAT = <string>
  DATE_INPUT_FORMAT = <string>
  DATE_OUTPUT_FORMAT = <string>
  ERROR_ON_NONDETERMINISTIC_MERGE = TRUE | FALSE
  ERROR_ON_NONDETERMINISTIC_UPDATE = TRUE | FALSE
  JSON_INDENT = <num>
  LOCK_TIMEOUT = <num>
  QUERY_TAG = <string>
  ROWS_PER_RESULTSET = <num>
  SIMULATED_DATA_SHARING_CONSUMER = <string>
  STATEMENT_TIMEOUT_IN_SECONDS = <num>
  STRICT_JSON_OUTPUT = TRUE | FALSE
  TIMESTAMP_DAY_IS_ALWAYS_24H = TRUE | FALSE
  TIMESTAMP_INPUT_FORMAT = <string>
  TIMESTAMP_LTZ_OUTPUT_FORMAT = <string>
  TIMESTAMP_NTZ_OUTPUT_FORMAT = <string>
  TIMESTAMP_OUTPUT_FORMAT = <string>
  TIMESTAMP_TYPE_MAPPING = <string>
  TIMESTAMP_TZ_OUTPUT_FORMAT = <string>
  TIMEZONE = <string>
  TIME_INPUT_FORMAT = <string>
  TIME_OUTPUT_FORMAT = <string>
  TRANSACTION_DEFAULT_ISOLATION_LEVEL = <string>
  TWO_DIGIT_CENTURY_START = <num>
  UNSUPPORTED_DDL_ACTION = <string>
  USE_CACHED_RESULT = TRUE | FALSE
  WEEK_OF_YEAR_POLICY = <num>
  WEEK_START = <num>
create user user1 password='abc123' default_role = myrole must_change_password = true;

  PASSWORD = '<string>'
  LOGIN_NAME = <string>
  DISPLAY_NAME = <string>

  FIRST_NAME = <string>
  MIDDLE_NAME = <string>
  LAST_NAME = <string>
  EMAIL = <string>
  MUST_CHANGE_PASSWORD = TRUE | FALSE

  DAYS_TO_EXPIRY = <integer>
  MINS_TO_UNLOCK = <integer>
  DEFAULT_WAREHOUSE = <string>
  DEFAULT_ROLE = <string>
  TIMESTAMP_TZ_OUTPUT_FORMAT = <string>
  TIMEZONE = <string>
14. STREAMS AND TASKS
As a Developer/Consultant you work on projects end-to-end starting from data preparation through to deployment and releases. Once all your work is deployed into production here comes the play of CI/CD pipelines i.e., automate the data load into production tables. All this time you may have worked with the user interface to create jobs and tasks to achieve this. Let us see how to achieve the same using Snowflake streams and Tasks
Tasks in Snowflake are pretty simple. It is the control over your procedures to execute them in the order you want them to run. For a one-time load, it’s pretty easy, just kick off the master task job and it runs in a chain reaction in the way you have set them up. But for delta loads on a daily basis you want to run your tasks and job as soon as you receive them. Let us find out how we can do this via Snowflake.
Let’s assume you own a car dealership shop. You have 4-dimension tables Dealer, Branch, Product, Date and one Fact table Sales. In our scenario we shall use a third-party tool to ingest data into our external cloud storage account (Azure, AWS). We use Snowpipe to ingest the data from these storages into our load tables in Snowflake. Let us now demonstrate the daily load using Snowflake.
Create tasks for each of the 3 table procedures in the order of execution we want. Date Dimension does not depend on any data we receive as delta files. However, this is an important dimension table that needs to be updated on a daily basis even though you have no delta files. Date_Key from the Date dimension table will be used across all the other tables. You can schedule your Date Dimension task to run using CRON Job.
In the below diagram we have our tsk_master which is the main trigger job that activates the rest of the jobs to complete in the order we desire. tsk_Cleanup is required to empty the delta landing space on the Snowflake side. So, when there is new data our process handles the new data correctly or if you want to use Snowflake timetravel then you can eliminate creating cleanup tasks. While using snowflake timetravel make sure you set your timetravel period correct otherwise you may have duplicate data loaded into your tables.
Here is the graphical representation of what we are trying to achieve for the rest of the tables.

Below are the codes to create the above graphical structure.
CREATE TASK tsk_master
    WAREHOUSE  = DEMO_WH
    SCHEDULE = ‘5 MINUTE’
COMMENT = ‘Master task job to trigger all other tasks’
AS ALTER TASK tsk_master SUSPEND;

CREATE TASK tsk_triggerFact
    WAREHOUSE  = DEMO_WH;
    COMMENT = ‘Trigger Fact table after all dimension tables are updated’
    AFTER tsk_master
AS CALL procCheckDims;

CREATE TASK tsk_Dealer
    WAREHOUSE  = DEMO_WH;
    COMMENT = ‘Update Dealer Dimension’
    AFTER tsk_master
AS CALL procDealer;

CREATE TASK tsk_Branch
    WAREHOUSE  = DEMO_WH;
    COMMENT = ‘Update Branch Dimension’
    AFTER tsk_master
AS CALL procBranch;

CREATE TASK tsk_Product
    WAREHOUSE  = DEMO_WH;
    COMMENT = ‘Update Product Dimension’
    AFTER tsk_master
AS CALL procProduct;

CREATE TASK tsk_StageFact1
    WAREHOUSE  = DEMO_WH;
    COMMENT = ‘Update StageFact1’
    AFTER tsk_triggerFact
AS CALL procStageFact1;

CREATE TASK tsk_StageFact2
    WAREHOUSE  = DEMO_WH;
    COMMENT = ‘Update StageFact2’
    AFTER tsk_ StageFact1
AS CALL procStageFact2;

CREATE TASK tsk_FactSales
    WAREHOUSE  = DEMO_WH;
    COMMENT = ‘Update FactSales’
    AFTER tsk_ StageFact2
AS CALL procFactSales;

CREATE TASK tsk_Cleanup
    WAREHOUSE  = DEMO_WH;
    COMMENT = ‘Truncate load tables after every delta process completes’
    AFTER tsk_ FactSales
AS CALL procCleanup;
What is the purpose of the task_triggerFact job? It is used mainly to start the execution for fact tables once the dimension tables are ready and updated with daily delta. To achieve this, you need to write a procedure that checks if all dimension tables are successfully executed or not. If status for all dimension tables is successfully completed, then you can start the process for loading your facts otherwise you will end up having incomplete data for the fact table. This is an important step to ensure all dimension tables are loaded before you start processing for fact tables.
But we need something to tell Snowflake that there is new delta data that’s come in. To achieve this, we will use Snowflake Streams. When our delta has landed up successfully into our cloud storage you can Snowpipe this timestamp into Snowflake. Assume you have a table named DeltaIngest. The purpose of this table is to store the timestamp of new delta files received. We need to create a stream on this table to check if there is any new data waiting for our action.
CREATE TABLE DELTAINGEST (
    SRC VARCHAR,
    UPDATETIME TIMESTAMP
);  -- this table is required to hold the new delta load timestamp ingested through Snowflake

CREATE OR REPLACE STREAM DELTALOAD_STREAM on table DELTAINGEST; -- creates a stream
DELTALOAD_STREAM table will have attributes such as LOADTIME, SRC, METADATA ACTION, METADATA ISUPDATE, METADATA ROW_ID. Our Delta will always insert new records into our load tables hence METADATA ACTION will have the value INSERT as the DML operation.
What is a Stream? A stream is basically a pointer that will let us know the status of the DML operation that was recorded on the defined table. Stream will hold the data until you perform a read operation on the stream. In order to refresh the stream after each delta load you need to read the data from the stream which will clear the data for the next delta. To do this you need to have another table created that can read data from the stream and write it into the other table. Let us name this table as StreamRead. Now all we need to do is to modify our tsk_master. Instead of alter tasks we can now insert records into StreamRead after which our process clears the stream for next load.
CREATE TABLE STREAMREAD (
    DELTATIME TIMESTAMP,
    SRC VARCHAR
);    -- purpose of this table is to clear the stream


CREATE TASK tsk_master
    WAREHOUSE  = DEMO_WH
    SCHEDULE = ‘5 MINUTE’
COMMENT = ‘Master task job to trigger all other tasks’
AS INSERT INTO STREAMREAD(UPDATETIME, DESCRIPTION) SELECT LOADTIME, SRC FROM DELTALOAD_STREAM;
15.how Ataccama supports data governance
![图片上传中…]
- Data Catalog & Metadata Management
- Central catalog for all enterprise data assets (databases, files, APIs, cloud data, etc.).
- Automated metadata harvesting → helps users find, classify, and understand data.
- Business glossary → defines terms (e.g., “Customer”, “Revenue”) so everyone uses consistent definitions.
- Supports data lineage → see how data flows from source to target systems.
- Data Quality & Profiling
- Runs data profiling to assess quality (completeness, validity, uniqueness, accuracy).
- Detects anomalies, duplicates, missing values.
- Auto-suggests data quality rules and monitors them.
- Provides data quality scores → governance teams can prioritize remediation.
- Data Stewardship & Workflow
- Assigns data owners, stewards, custodians with clear responsibilities.
- Built-in workflows for approvals, exceptions, remediation.
- Example: If sensitive data is found, Ataccama can route it to a steward to validate and classify.
- Policy Management & Compliance
- Supports data classification (e.g., PII, financial, health data).
- Applies data governance policies (e.g., GDPR, HIPAA, CCPA).
- Enforces data masking, redaction, or encryption for sensitive fields.
- Audit trails → track who accessed or modified data.
- Data Lineage & Impact Analysis
- Visualizes how data moves across systems.
- Useful for compliance reporting, impact analysis, and debugging data issues.
- Helps answer: “If I change this column in Oracle, what downstream dashboards or models will break?”
- Self-Service & Democratization
- Business users can search, trust, and use data without deep IT knowledge.
- Data marketplace → request access with proper approvals.
- Promotes data democratization while keeping governance guardrails.
In summary:
Ataccama brings data governance + data quality + metadata management + compliance into a single platform, enabling organizations to:
- Trust their data
- Comply with regulations
- Empower business teams
- Reduce risk and duplication