1.Method One
1.1.Download Raspberry Pi Imager
Raspberry Pi Imager is the quick and easy way to install Raspberry Pi OS and other operating systems to a microSD card, ready to use with your Raspberry Pi.
1.2.Install Raspberry Pi Imager and start it up
1.3.Download Raspberry Pi OS image
Many operating systems are available for Raspberry Pi, including Raspberry Pi OS, official supported operating system, and operating systems from other organisations.
Raspberry Pi Imager is the quick and easy way to install an operating system to a microSD card ready to use with your Raspberry Pi. Alternatively, choose from the operating systems below, available to download and install manually.
1.4. official supported OS
The official Raspberry Pi OS, the default user name is pi, with password raspberry.
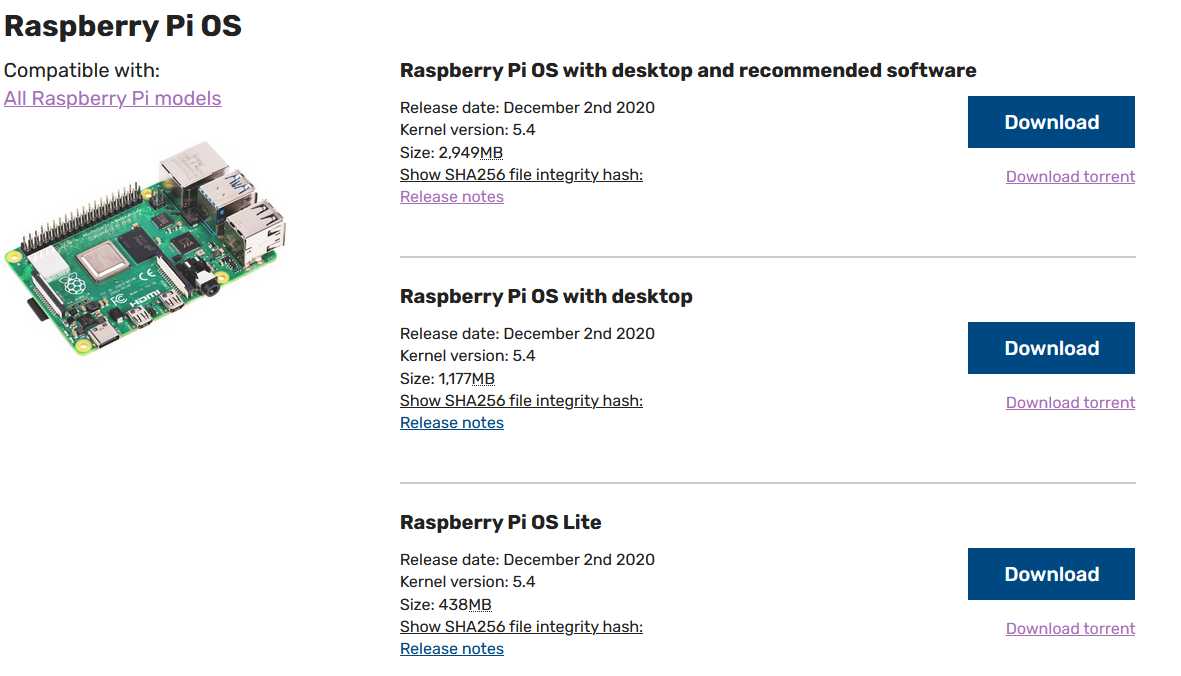
1.4.1.Dowload Raspberry Pi OS Lite
1.4.2.Decompress imag file and Flash to SD disk
Decompress
You may need to unzip .zip downloads to get the image file (.img) to write to your SD card.
Note: the Raspberry Pi OS with desktop image contained in the ZIP archive is over 4GB in size and uses the ZIP64 format. To uncompress the archive, a unzip tool that supports ZIP64 is required. The following zip tools support ZIP64:
- 7-Zip (Windows)
- The Unarchiver (Mac)
- Unzip (Linux)
1.4.3.Installation
Connect you SD Card to Raspberry Pi 4.
After you booted your Raspberry Pi 4 your are ask for login.
username: pi
password: raspberry
Setup Wifi
Set up the /etc/wpa_supplicant/wpa_supplicant.conf file
country=CA
ctrl_interface=DIR=/var/run/wpa_supplicant GROUP=netdev
update_config=1
network={
    ssid="your-networks-SSID"
    psk="your-networks-password"
}
Set up the /etc/dhcpcd.conf file
interface wlan0
static ip_address=192.168.1.200
static routers=192.168.1.1
static domain_name_servers=8.8.8.8
Enable SSH
sudo systemctl enable ssh
sudo systemctl start ssh
Reboot
rfkill list
sudo rfkill unblock all
sudo reboot
Alternatively, raspi-config can be used in the terminal.
1.4.4.Install a Desktop Enviroment – Preparing
refer to:
GUIDE:Raspbian Lite with RPD/LXDE/XFCE/MATE/i3/Openbox/X11 GUI
Desktop environment options:
- Raspberry Pi Desktop (RPD)
- Lightweight X11 Desktop Environment (LXDE)
- XFCE Desktop Environment (XFCE)
- MATE Desktop Environment (MATE)
Memory Usage:
RPD: 90MB
LXDE: 97MB
XFCE: 107MB
MATE: 107MB
sudo apt-get update
sudo apt-get upgrade
sudo apt-get dist-upgrade
sudo apt-get clean
sudo raspi-config
Change Locale: en.US.UTF-8 UTF8 or en.CA.UTF-8 UTF8
Change Timezone
Change Keyboard Layout: ex.(Generic 105-key (Intl) PC keyboard)
sudo reboot
1.4.4.Install a Desktop Enviroment – Installing a GUI
we need these 4 things:
- Display Server: Xorg Display Server
- Desktop Environment: RPD, LXDE, XFCE, or MATE
- Window Manager: Openbox Window Manager (RPD/LXDE) or XFWM Window Manager (XFCE) or Marco Window Manager (MATE)
- Login Manager: LightDM Login Manager
For those that know about Linux, you may be wondering why the login manager chosen here is LightDM. For the most part, it is lightweight and it looks nice. But one feature that I believe stands out from other login managers is the ability to run Synergy client without errors. Synergy is a utility that allows you to use a computer’s mouse and keyboard (Windows, Mac, or Linux) and share it with another computer, in this case, a Raspberry Pi. Of course you can install another login manager if you don’t want LightDM.
Some users may not want a login manager. This is perfectly fine depending on how you will use your Raspberry Pi. For example, we may want the Pi to boot into the command line always and if there is a need to launch a desktop environment, a simple command will let you launch it. Continue to read on for more information.
Since we are focusing on Raspbian Lite, then the GUI installed will also be “lite”. I understand that “lite” can have different meanings, but beginners are the main focus here. The important thing here is for users to personalize their Pi, without relying on prebuilt Raspbian. I believe these are the best GUI options. As always, you are free to use whatever you want. Moving forward, we will be installing the core of RPD, LXDE, XFCE, or MATE. This will give us only the GUI. There won’t be any applications installed other than the required PIXEL, LXDE, XFCE, or MATE components such as a file manager, terminal, and settings.
1. install Xorg
sudo apt-get install --no-install-recommends xserver-xorg
If you only install xserver-xorg, you will not have the ability to launch the Xorg Display Server from the command line. This would be a problem if you are not planning on installing a login manager. Otherwise, you do not need to do this. If this is the case, you may want to also install xinit by typing in:
sudo apt-get install --no-install-recommends xinit
2. Desktop Environment: RPD, LXDE, XFCE, or MATE
2.1. RPD GUI
RPD is a desktop environment designed by the Raspberry Pi Foundation. It is designed to be easy to use, which is why it looks simple. The backend of RPD is LXDE, which is a great choice as it is known for its low memory usage. For this desktop environment, you have two choices. You can either install the basic RPD desktop environment or a stripped version of it. The basic RPD desktop environment is the same as the one included in the regular Raspbian distribution, but without preinstalled applications. Essentials such as settings, task manager, terminal and file manager are included. To install the basic RPD desktop environment, type in:
sudo apt-get install raspberrypi-ui-mods
The stripped version of the RPD desktop environment only contains the file manager and settings for appearance, audio, network, and bluetooth. There is no trash support, no mounting of drives, or terminal included since the required components are not installed by default. No other applications are included either. However, you can add these components later if you wish. If you want to install the stripped version of the RPD desktop environment, type in:
sudo apt-get install --no-install-recommends raspberrypi-ui-mods lxsession
Now, here are some list of packages you may want to install if you are installing the stripped version of RPD:
pi-greeter : The Raspberry Pi LightDM login theme
rpd-icons : The Raspberry Pi Desktop icon theme
gtk2-engines-clearlookspix : GTK Theme Engine (used to render Raspberry Pi LightDM login/desktop theme properly)
Openbox Window Manager is installed by default when you install RPD. You do not need to do anything here.
2.2. LXDE GUI
When you install LXDE, some essentials such as settings, terminal and file manager are included. LXAppearance is used to change the look of applications such as panels, icons, progress bars, cursors, and so on. This is optional to install but I recommend installing it in order to give yourself more customization abilities. To install LXDE with LXAppearance type in:
sudo apt-get install lxde-core lxappearance
Openbox Window Manager is actually installed by default when you install lxde-core. You do not need to do anything here. You can customize the look of the titlebar using the Openbox settings which is also installed by default. By using LXAppearance and Openbox settings together, you chose what LXDE looks like!
2.3. XFCE GUI
When you install XFCE, some essentials such as settings and file manager are included. By default, XFCE uses XFCE4 Terminal. This is optional to install, however if you choose not to install it, then XTerm will be the default Terminal app.. To install XFCE with XFCE4 Terminal, type in:
sudo apt-get install xfce4 xfce4-terminal
XFWM Window Manager is actually installed by default when you install xfce4. You do not need to do anything here!
2.4. MATE GUI
When you install MATE, some essentials such as settings, terminal, and file manager are included. To install MATE, type in:
sudo apt-get install mate-desktop-environment-core
Marco Window Manager is actually installed by default when you install MATE. You do not need to do anything here!
3. Install LightDM login manager
If you have installed the basic or stripped version of the RPD desktop environment, then LightDM package is installed automatically so you can skip this step. As of the release of Raspbian Stretch, if you installed the XFCE desktop environment, LightDM is also installed automatically so you do not need to do this step. Otherwise, to install LightDM, type in:
sudo apt-get install lightdm
If you choose not to install a login manager but you did install xinit earlier, then this means that everytime your Pi boots, you will always boot into the command line. However, the desktop environment is already set up for you and is ready to be launched at any time.
4. Everything we need to have Raspbian Lite with a GUI is ready!
Fortunately, we don’t have to do anything else but reboot! Reboot your Pi. When it finishes booting, you will see the LightDM login screen. From here, you will need use both a keyboard and a mouse. Log in and you should now see either RPD, LXDE, XFCE, or MATE desktop!
Otherwise, if no login manager was installed, then just login via the command line! At anytime, you can launch the Xorg Display Server by typing in:
startx
You should now see either RPD, LXDE, XFCE, or MATE desktop! From here, you will need use both a keyboard and a mouse.
5. So what now?
This is where you decide what you want to do with your custom Rasbian Lite installation with a GUI. You can change the look, install applications, start programming, do what is necessary to make it work the way you want it to!
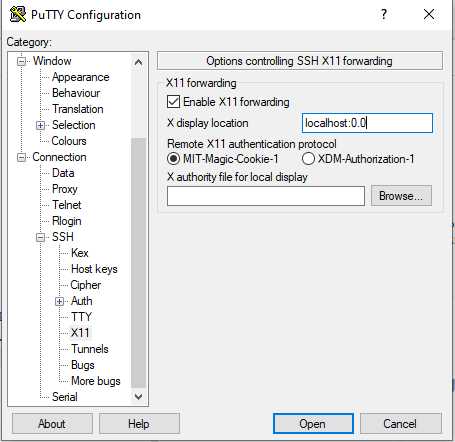
1.4.5.X11 Forwarding (Remote Applications)
X11 Forwarding is an SSH remote tunneling system where you can run applications installed on a Linux system remotely from another system running Windows, macOS, or Linux.
For example, let’s say that you have a clean Raspbian Lite installation on your Raspberry Pi. Now, if you physically want use your Raspberry Pi like a normal computer (with monitor, keyboard, mouse), then most likely you want to install a GUI on Raspbian Lite. However, if you only care about running specific applications on Rasbian Lite and don’t have a need to use it as a normal computer (no monitor/keyboard/mouse/GUI), then X11 Forwarding may be something you’d like to use.
Here’s how it works. You would connect to your Raspberry Pi via SSH with X11 Forwarding option enabled from another system. When it is connected, if you type in an application name, lets say “leafpad” and press Enter, the application will open on your desktop. That’s it! So in other words, your system will show you the application’s GUI while the Raspberry Pi handles the workload for that application. Pretty neat right?
If you want to use X11 Forwarding, it’s very simple. Follow the instructions below:
- Follow the steps above to have a clean installation of Raspbian Lite. If you already installed a desktop environment and still want to enable X11 Forwarding, continue to step 2.
-
You need to enable SSH on Raspbian Lite. Using the command line (or Terminal window), type in:
sudo raspi-config
Select option #5 (Interfacing Options) and press Enter. Then select option #P2 (SSH) and press Enter. You will be asked if you want to enable the SSH server. Select “Yes” and press enter. A popup will open saying the SSH server has been enabled. Select “Ok” and you will be returned to the main menu. Select Finish and press Enter to exit raspi-config.
- Obtain the IP address of your Raspberry Pi. Using the command line (or Terminal window), type in:
hostname -I
- Reboot the Raspberry Pi
sudo reboot
- Once the Raspberry Pi has been rebooted, you no longer need to physically use the Raspberry Pi since you can now remotely log onto the Raspberry Pi via SSH.
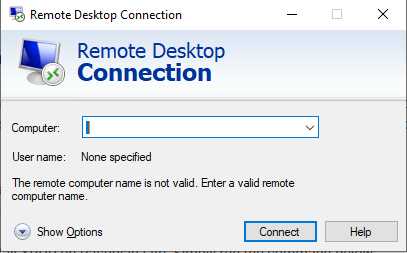
1.4.6.Remote Desktop Protocol (RDP)
If you are a Windows user, you may be interested in accessing your Raspberry Pi desktop remotely without having to connect your Raspberry Pi to a TV or monitor to use it. This is where the Remote Desktop Protocol (RDP) comes into play. With this protocol, you will be able to use the built-in Remote Desktop Connection application on Windows to access your Raspberry Pi desktop remotely.
Assuming that your Raspberry Pi is running Raspbian Lite with a desktop environment and has no installation of VNC Server or TightVNC Server, the installation and configuration should be very easy.
To use the Remote Desktop Protocol, you must install XRDP on Raspbian Lite. Simply run the command below:
sudo apt-get install xrdp
Once XRDP has been installed, it will run automatically in the background and will transmit the Raspberry Pi desktop whenever Remote Desktop Connection on Windows connects to your Raspberry Pi.
Now, run Remote Desktop Connection on Windows.
1.4.7.Install firfox
Firefox is not installed by default on Raspbian operating system. But it is available in the official package repository of Raspbian.
run the following command to install Firefox on Raspbian:
sudo apt install firefox-esr
Firefox on Raspbian is labeled as Firefox ESR. You can find Firefox ESR in the application menu of Raspbian. To start Firefox, click on the Firefox ESR icon.
If you want to set Firefox as the default browser on Raspbian, run the following command:
sudo update-alternatives --config x-www-browser
1.4.8.Install Chromium
The Chromium web browser is the open-source version of Chrome. For the most part, it features the same functionality as Chrome.
Sadly this means you will not be able to view streaming services like Netflix or Amazon Prime on your Raspberry Pi using the Chromium web browser.
Please note that Chromium is included as the default web browser in the desktop version of Raspberry Pi OS stretch and later.
sudo apt-get install chromium-browser --yes
1.4.9.Bluetooth
Install Blueman. Once the required Bluetooth software packages have finished installing, restart your Raspberry Pi. Upon rebooting, you should see a second Bluetooth icon with a blue circular background in the top-right corner of your menu bar.
sudo apt install bluetooth pi-bluetooth bluez blueman bluealsa pulseaudio
sudo usermod -G bluetooth -a pi
cat /etc/group | grep bluetooth
bluetooth:x:112:pi
sudo systemctl status bluetooth.service
SAP Driver Initialization Failure
sudo vi /lib/systemd/system/bluetooth.service
ExecStart=/usr/lib/bluetooth/bluetoothd --noplugin=sap

sudo reboot
Privacy Setting Rejected Failure
sudo systemctl status bluetooth.service

sudo vi /lib/systemd/system/bthelper@.service
[Unit]
Description=Raspberry Pi bluetooth helper
Requires=bluetooth.service
After=bluetooth.service

[Service]
Type=simple
ExecStartPre=/bin/sleep 2
ExecStart=/usr/bin/bthelper %I

sudo reboot
Check pulseaudio is running
ps aux | grep pulseaudio

#if not started
pulseaudio --start
check authentication agent is running
/usr/lib/policykit-1-gnome/polkit-gnome-authentication-agent-1
ps -ef|grep policy
Pair Bluetooth Device
bluetoothctl
power on
agent on
default-agent
scan on
pair 4B:FE:39:4D:36:C9
trust 4B:FE:39:4D:36:C9
connect 4B:FE:39:4D:36:C9
1.4.10.HDMI no sound
sudo vi /boot/config.txt
uncomment hdmi_drive=2
1.4.11.Support Chinese
# select local
sudo raspi-config
select  locales ex: zh_???

# install fonts
sudo apt-get install ttf-wqy-microhei
# 文泉驛微米黑
1.4.12.Change root password
sudo vi /etc/passwd
#Change the line
root:x:0:0:root:/root:/bin/bash
#remove the x so the line reads
root::0:0:root:/root:/bin/bash
Reboot the Raspberry Pi
sudo passwd root
1.4.13.Install git
sudo apt-get install git
1.4.14.Install i2c-tools
sudo apt-get install i2c-tools
1.4.15.Install Python3.8
Prerequisites
sudo apt-get install -y build-essential tk-dev libncurses5-dev libncursesw5-dev libreadline6-dev libdb5.3-dev libgdbm-dev libsqlite3-dev libssl-dev libbz2-dev libexpat1-dev liblzma-dev zlib1g-dev libffi-dev tar wget vim
Download Python
wget https://www.python.org/ftp/python/3.8.0/Python-3.8.0.tgz
Install Python 3.8
sudo tar zxf Python-3.8.0.tgz
cd Python-3.8.0
sudo ./configure --enable-optimizations
sudo make -j 4
sudo make altinstall
Check Python version
python3.8 -V
Make Python 3.8 as the default version
echo "alias python=/usr/local/bin/python3.8" >> ~/.bashrc
source ~/.bashrc
Check Python Version
python -V
Install pip3 for managing Python3 libraries
sudo apt-get install python3-pip
1.4.16.Install missing packages
sudo pip3 install rpi_ws281x
sudo apt-get install python-rpi.gpio python3-rpi.gpio
sudo apt-get install python3-smbus
sudo apt-get install wiringpi
sudo pip3 install RPi.GPIO
sudo pip3 install wiringPi
sudo pip3 install gpio

cd /tmp
wget https://project-downloads.drogon.net/wiringpi-latest.deb
sudo dpkg -i wiringpi-latest.deb
1.4.17.Install Webcam
1) /boot/config.txt
# Enalble audio (loads snd_bcm2835)
dtparam=audio=on
start_x=1
gpu_mem=128
2) To enable it to access the camera, you should first load the driver module:
Load bcm2835-v4l2 module:
sudo modprobe bcm2835-v4l2
or add bcm2835-v4l2 to /etc/modules.
This should create a camera device at /dev/video0.
3) You can then get information by typing
v4l2-ctl --all
If you have V4L2 installed then you can try to access the camera through that driver to see what happens. V4L2 should come pre-installed on the latest Raspberian OS.
You can check by typing which v4l2-ctl. Normally it is /usr/bin/v4l2-ctl, otherwise try a sudo apt-get install v4l-utils.
4) determine the list of frame sizes and frame rates supported.
v4l2-ctl --device=/dev/video0 --list-formats-ex
if you got this error, please check the cable connections:
Cannot open device /dev/video0, exiting.
5)
vcgencmd get_camera
if you got this error, please check the cable connections:
supported=1 detected=0
6)
There are two ways of accessing the camera: Through the Broadcom specific MMAL library, which is used by raspistill and raspivid, or via Video4Linux2, which is a cross platform standard.
raspistill -o image.jpg
7)
lsmod

bcm2835_v4l2           40960  0
1.4.18.Installing snap
sudo apt install snapd
sudo reboot
sudo snap install core
1.4.19.VLC media player
sudo apt install vlc
or
sudo snap install vlc
1.4.20.Install Zoom
Enable OpenGL:
sudo apt-get install libgl1-mesa-dri libgl1-mesa-glx libgles2 libgles2-mesa
chrome://gpu
Your Pi’s GPU might has been blacklisted, work around:
chromium-browser --enable-webgl --ignore-gpu-blacklist
sudo raspi-config
Then in the menu that appears choose Advanced Options, GL Driver, Fake/Firmware KMS, then select Enable. Once you’re done reboot the system and Chromium will support WebGL!
Choose Fake/Firmware KMS, the legacy driver will run on the Pi4, but you lose 3D acceleration/OpenGL.
Test:
sudo apt-get install neverball
neverball
In Chromium go to the chrome webstore.
https://chrome.google.com/webstore/detail/zoom/hmbjbjdpkobdjplfobhljndfdfdipjhg?hl=en-US
Click Install App.
Launch it from Menu –> Chromium Apps –> Zoom.
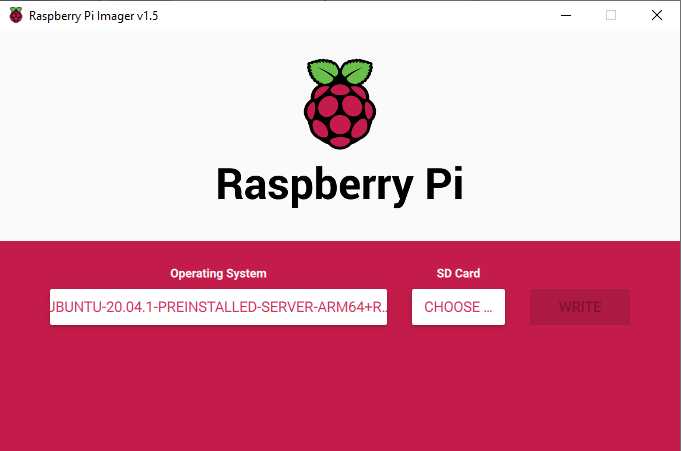
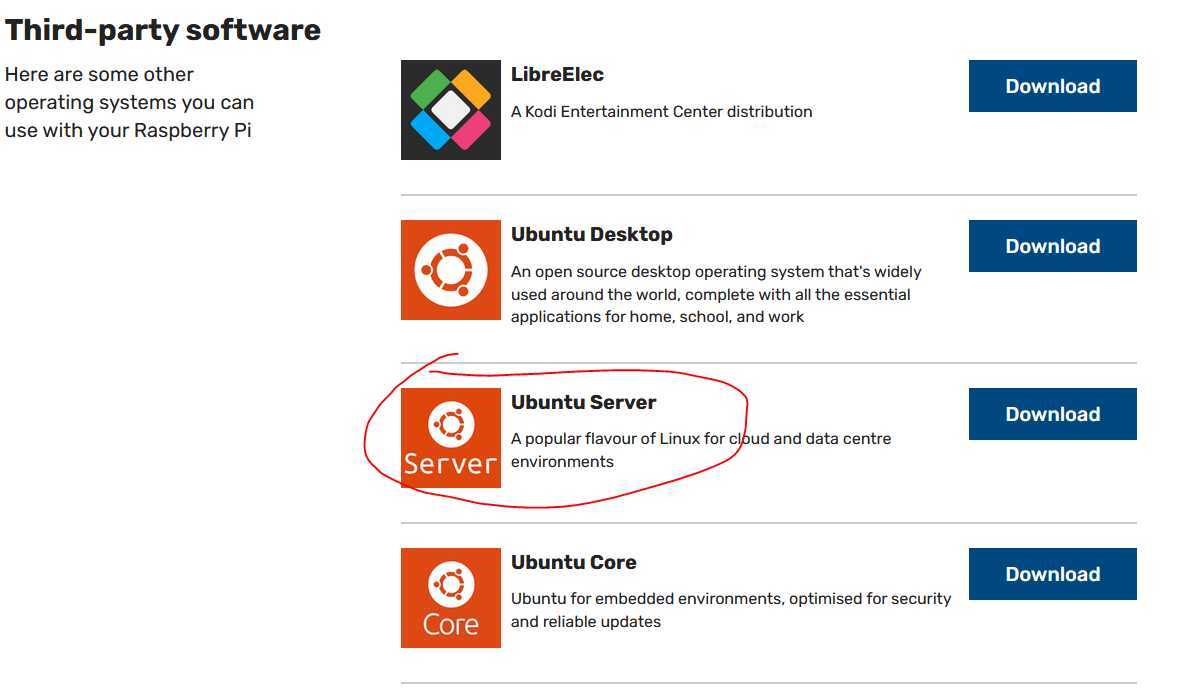
1.5.Ubuntu
Username: ubuntu
Password: ubuntu
Please change password to : raspberry
1.5.1.Download Ubuntu Image
1.5.2.Decompress imag file and Flash to SD disk
Decompress
xz -dv ubuntu-20.04.1-preinstalled-server-arm64+raspi.img.xz
-z,——compress 压缩
-d,——decompress, --uncompress 解压
-v,——verbose 啰嗦;如果要更详细,请指定两次
Flash
1.5.3.Installation
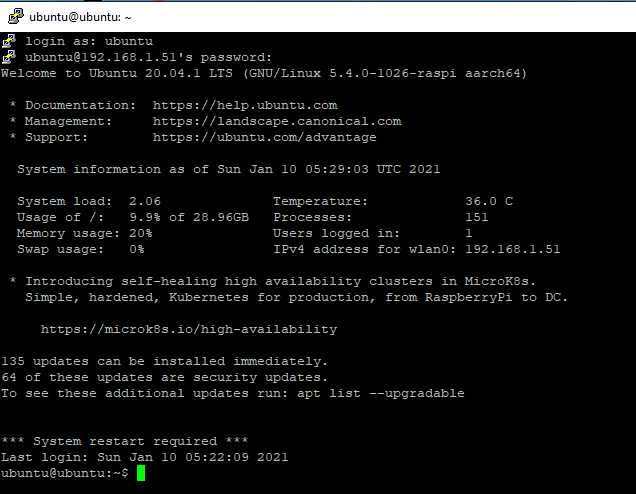
Connect you SD Card to Raspberry Pi 4.
After you booted your Raspberry Pi 4 you are welcomed by the new Initial Setup process.
Setup Wifi
1)Find WiFi card name:
$ ls /sys/class/net
eth0  lo  wlan0
on my machine, it’s “wlan0”. To simplify our demo, assume that yours is “wlan0” as well.
2)Edit network configuration file to add WiFi info:
sudo vi /etc/netplan/50-cloud-init.yaml
you will see the following in the original file:
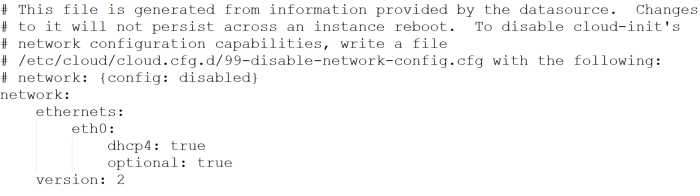
After adding your WiFi info such that it should look something like the following:
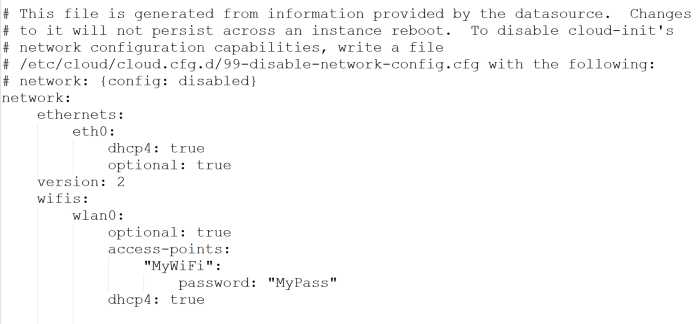
3)Make sure that the 3 pieces of info above is replaced with yours.
- wlan0
- MyWiFi
- MyPass
And also please make sure that you are a very careful person to input the above info with exact format as original file started, and all indents should be typed with spaces (4 spaces each level), NOT tabs, which is very important!
4)apply the changes and connect to your wireless interface by executing the bellow command
sudo netplan generate
sudo netplan apply
Alternatively, if you run into some issues execute:
sudo netplan --debug apply
5)It is possible that wpa_supplicant service is not running. Run this command
sudo systemctl start wpa_supplicant
Restart your Ubuntu system again, log in and generate and apply netplan once again:
sudo netplan generate
sudo netplan apply
6)If all went well you would be able to see your wireless adapter connected to the wireless network by executing the ip command
ip a
1.5.4.Access Ubuntu 20.04 for Raspberry Pi via SSH
If you know the IP address of your Raspberry Pi, you can access it via SSH. As mentioned above, the SSH server is installed and activated by default.
1.5.5.Update your system to the latest version
After logging in, the system also reported that there are updates for ? packages.

sudo apt update
sudo apt upgrade
After Ubuntu 20.04 for Raspberry Pi is up to date, it’s ready to install a desktop environment.
1.5.6.Install a desktop
You have the possibility to install a desktop environment. You can choose between Xubuntu, Lubuntu and Kubuntu, i.e. Xfce, LXQt and KDE.
sudo apt install xubuntu-desktop
For the test I was pragmatic and just took Xubuntu or Xfce. Even on a Raspberry Pi 4 it takes a while to install a graphical desktop environment. Time for a coffee.
Once the installation is complete, simply reboot your Raspberry Pi with Ubuntu 20.04 LTS Focal Fossa. The graphical desktop environment will start automatically.
The system will also install various desktop applications such as Firefox, Thunderbird, LibreOffice, Pidgin and GIMP.
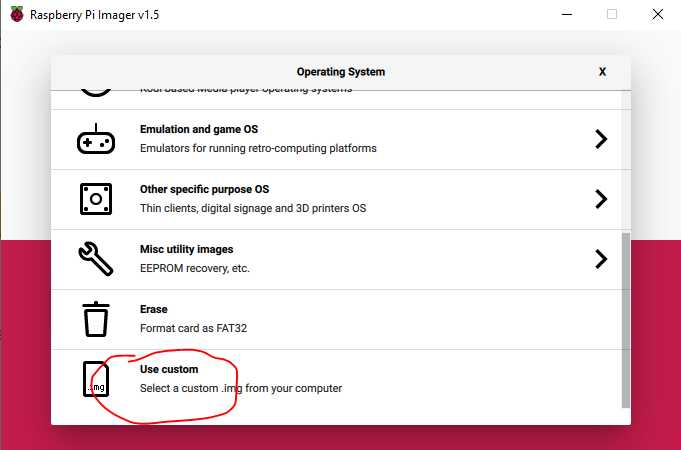
1.6.Manjaro
1.6.1.Download Manjaro Image

1.6.1.Falsh to SD Card with Raspberry Pi Imager
decompress xz image file: Manjaro-ARM-kde-plasma-rpi4-20.12.1.img.xz
Flash to SD card.
1.6.2.Decompress imag file and Flash to SD disk
Decompress
xz -dv elementaryos-hera-arm64+raspi4.20191223.img.xz
-z,——compress 压缩
-d,——decompress, --uncompress 解压
-v,——verbose 啰嗦;如果要更详细,请指定两次
Flash
1.6.2.Installation
Connect you SD Card to Raspberry Pi 4.
Startup up Raspberry Pi with the SD card.
You are welcomed by the new Initial Setup process.
choose the following:
– keyboard layout (ex. windowkeys)
– username
– additional user groups
– Full Name
– user password
– root password
– timezone (ex. America/Toronto)
– language locale (ex.en-CA.UTF_8)
– hostname (ex.dog)
1.6.3.Configure Remote Desktop
Server:(Windows)
sudo pacman -S freerdp
Client:
sudo pacman -S krdc
Enable snapd
Snapd can be installed from Manjaro’s Add/Remove Software application (Pamac), found in the launch menu. From the application, search for snapd, select the result, and click Apply.
Install krdc
sudo snap install krdc
2.Method Two
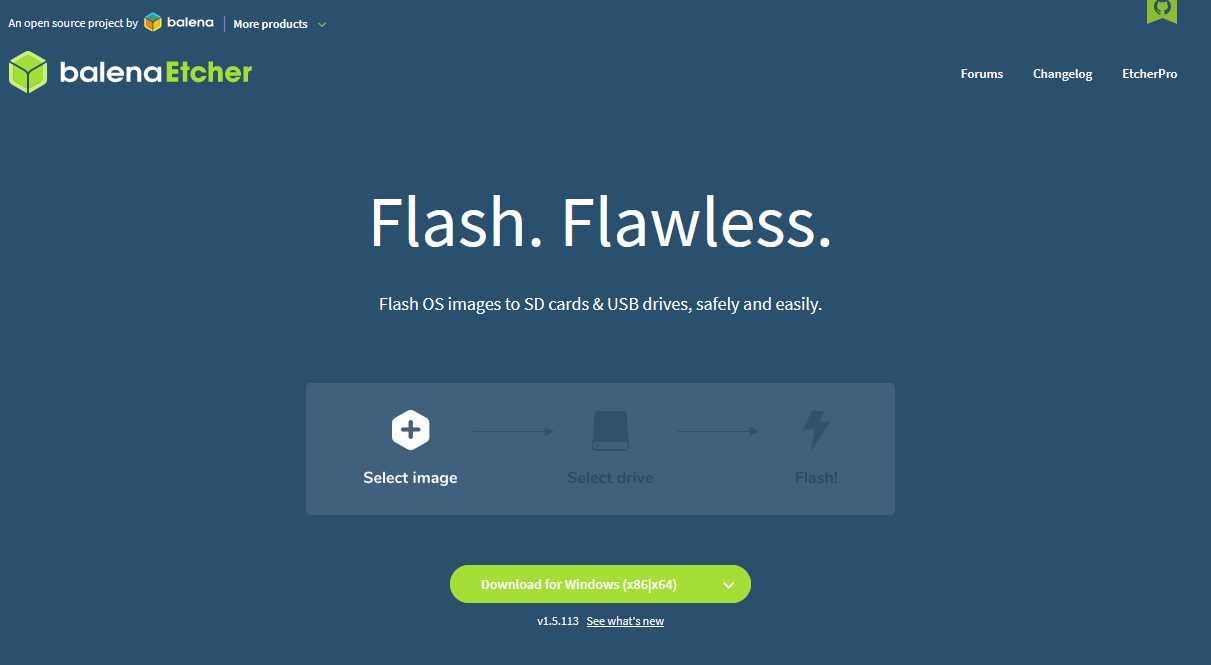
2.1.Download balenaEtcher and install
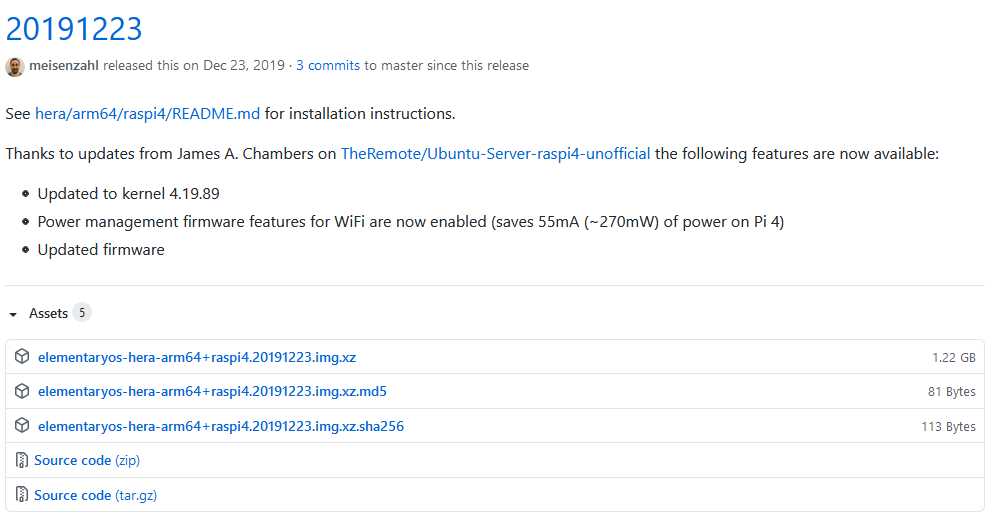
2.2.Download Elementary OS for Raspberry Pi 4
Download the latest unofficial release for Raspberry Pi 4 from github.
2.3.Decompress imag file and Flash to SD disk
Decompress
xz -dv elementaryos-hera-arm64+raspi4.20191223.img.xz
-z,——compress 压缩
-d,——decompress, --uncompress 解压
-v,——verbose 啰嗦;如果要更详细,请指定两次
Flash
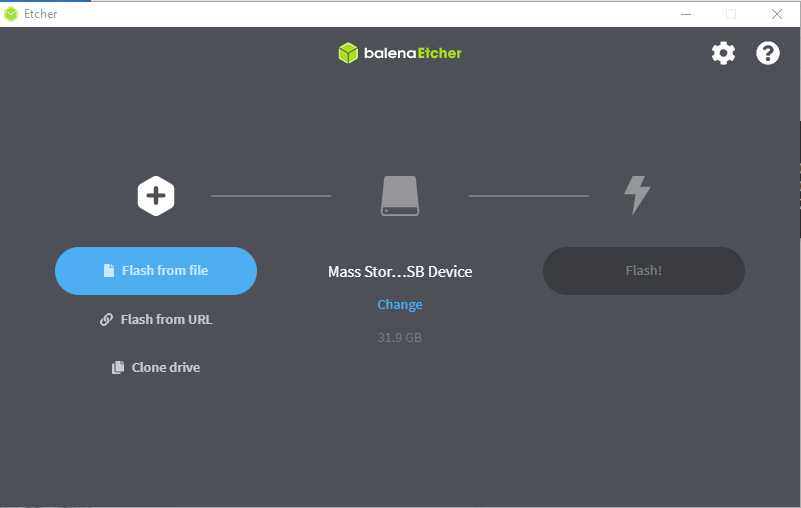
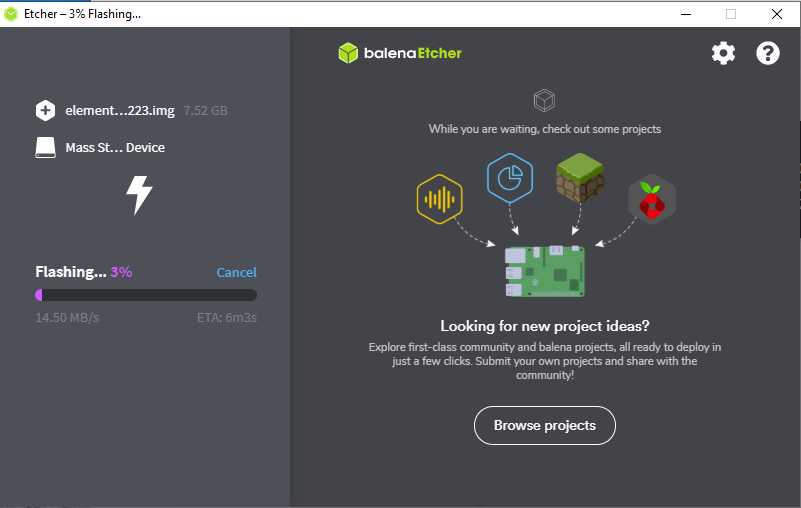
As recommended by the Raspberry Pi Foundation use balenaEtcher to flash the image to a SD card. The SD card should be at least 8 GB in size.
2.4.Installation
Connect you SD Card to Raspberry Pi 4.
After you booted your Raspberry Pi 4 you are welcomed by the new Initial Setup process.
First you have to choose your language.
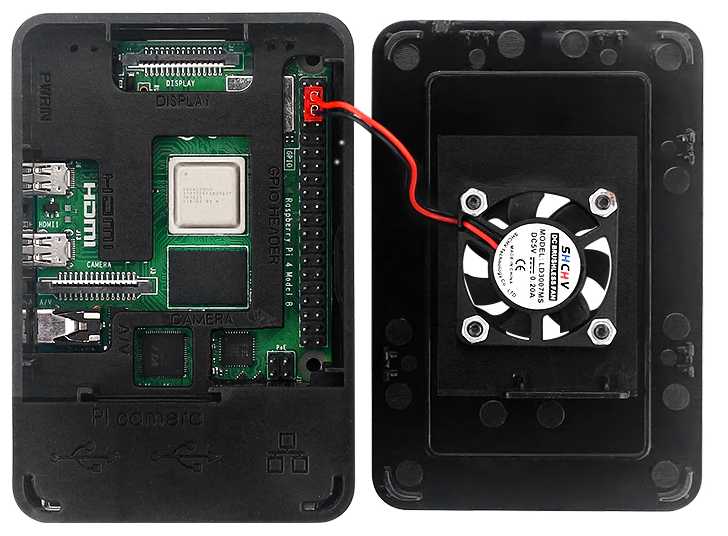
3.Board Assembly